How to Generate a Secure PDF in JavaScript
This tutorial and the sample source code explain securing PDF forms and protecting them from unauthorized access, data extraction, and modification using the PDF protection functionalities from the PDF.co Web API using JavaScript programming language. The users can efficiently secure their files using this API by protecting their PDF documents via five levels of protection.
The tutorial contains explanations and sample codes for every level of protection to explain to the users the methods of PDF protection.
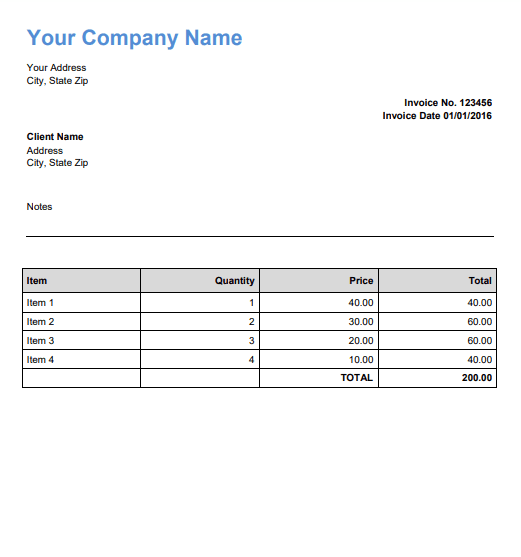
Below is the original PDF file that this tutorial tries to secure by applying the above five methods:
Step 1: PII or Sensitive Data Removal/Redaction
The PDF.co Web API provides PDF Search and Replace Text functionality. This functionality helps users to search and replace the text of their choice. Therefore, the users can protect their sensitive information using the API for their PDF documents using single or multiple replacements.
Endpoint Parameters for Adding PDF Security
Following are the endpoint parameters of search and replace functionality for multiple replacements:
- url: It is a required parameter. It provides the URL to the source file. The platform supports the links from Dropbox, Google Drive, and the built-in storage of PDF.co.
- password: This optional string parameter provides a password for the PDF file.
- name: This is an optional string parameter that provides the file name for the generated output.
- searchStrings[]: It refers to the array of strings to search.
- replaceStrings[]: It is the array containing the replacements strings.
The users can also add other optional parameters such as pages, profiles, async, and many others as required.
How to Secure Your PDF – Example
The following source code shows how to edit PDF documents by searching and replacing the text. This sample code in Javascript takes a PDF document, an invoice in this example, which contains personal information about the customer, such as his shopping list and name.
The users can give links to their online PDF documents or upload their documents on the PDF.co cloud and use the generated link in the API request. The code sends an API request to the PDF.co web API, which edits the document and returns the file URL to the updated PDF document with the replaced text.
Then the code reads the file and writes it to the local storage in a PDF file. However, the users can choose to keep it online and not download it.
Sample Code to Secure PDF File
Below is the sample code to show the replacement of multiple texts in the PDF file:
var https = require("https");
var path = require("path");
var fs = require("fs");

const API_KEY = "********************************************";
// Direct URL of source PDF file.
// You can also upload your own file into PDF.co and use it as url. Check "Upload File" samples for code snippets: https://github.com/bytescout/pdf-co-api-samples/tree/master/File%20Upload/
const SourceFileUrl = "https://bytescout-com.s3-us-west-2.amazonaws.com/files/demo-files/cloud-api/pdf-to-text/sample.pdf";

// PDF document password. Leave empty for unprotected documents.
const Password = "";

// Destination PDF file name
const DestinationFile = "./result.pdf";

const searchStrings = [
    "Your Company Name",
    "Client Name",
    "Item"
  ]

const  replaceStrings =[
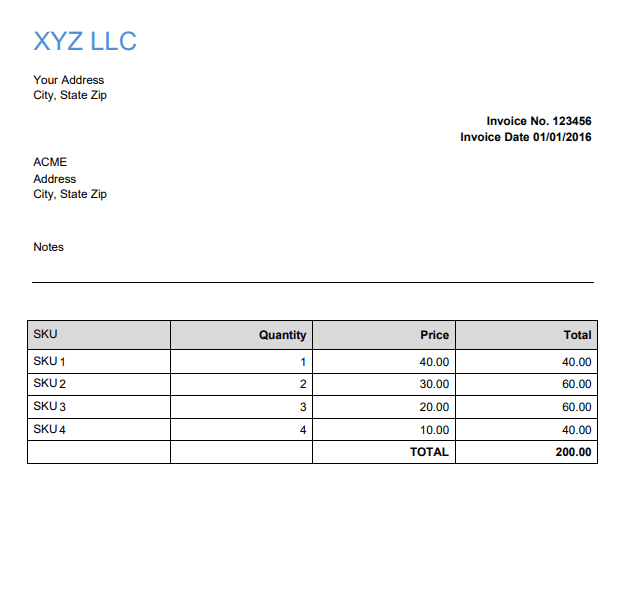
    "XYZ LLC",
    "ACME",
    "SKU"
  ];

// Prepare request to `Replace Text from PDF` API endpoint
var queryPath = `/v1/pdf/edit/replace-text`;

// JSON payload for api request
var jsonPayload = JSON.stringify({
    name: path.basename(DestinationFile), password: Password, url: SourceFileUrl, searchStrings: searchStrings, replaceStrings: replaceStrings
});

var reqOptions = {
    host: "api.pdf.co",
    method: "POST",
    path: queryPath,
    headers: {
        "x-api-key": API_KEY,
        "Content-Type": "application/json",
        "Content-Length": Buffer.byteLength(jsonPayload, 'utf8')
    }

};

// Send request
var postRequest = https.request(reqOptions, (response) => {
    response.on("data", (d) => {
        // Parse JSON response
        var data = JSON.parse(d);
        if (data.error == false) {
            // Download PDF file
            var file = fs.createWriteStream(DestinationFile);
            console.log(data.url)
            https.get(data.url, (response2) => {
                response2.pipe(file)
                    .on("close", () => {
                        console.log(`Generated PDF file saved as "${DestinationFile}" file.`);
                    });
            });
        }
        else {
            // Service reported error
            console.log(data.message);
        }
    });

}).on("error", (e) => {
    // Request error
    console.log(e);
});

// Write request data
postRequest.write(jsonPayload);
postRequest.end();
Secure PDF Output
Below is the screenshot of the output file containing the replaced text:
NOTE: Securing PDF documents is a wise business practice that deserves thoughtful consideration. If by any chance you also want to learn how to generate a secured PDF in C#, we have a dedicated tutorial for this action too.
Step 2: Secure PDF using Document Watermarking
The PDF.co Web API provides functionality to add images, texts, signatures, links to external sites, and external PDF files to add in a PDF document. The users can update or modify any PDF document to make it more secure using this functionality.
Endpoint Parameters to Enable PDF Protection
Following are the parameters of the PDF.co Web API’s PDF add text, signature, and images endpoint:
- url: It refers to the URL of an image or pdf as an HTTP link, file token, or a URL with a base64 encoded image.
- pages: This parameter refers to comma-separated indices of pages that the user wants to use.
- password: It is an optional parameter that must be a string and provides a password for the PDF file.
- name: It is an optional parameter that provides the name for the generated output file.
- x: It provides X-coordinate for the image.
- y: It provides Y-coordinate for the image.
- width: This optional parameter provides the width of the box.
- height: This optional parameter provides the height of the box.
Users can utilize other parameters from the API according to their requirements.
How to Protect PDF – Example using Javascript
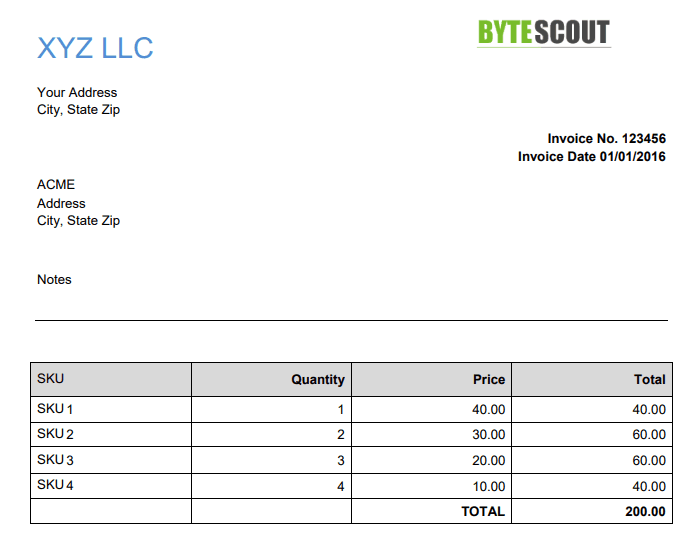
The following source code shows how to add a watermark to the PDF document to enhance its security. The code below takes the output PDF file as input, adds an image as its watermark, and downloads it to the user’s computer. The users can use the PDF.co web API to add text and image watermarks to their files. Moreover, they can choose the watermark’s dimensions and positions in the PDF file.
Sample Code for PDF Protection
Below is the sample code to add a watermark to the PDF document:
var https = require("https");
var path = require("path");
var fs = require("fs");
// The authentication key (API Key).
const API_KEY = "*********************************************";

// Direct URL of source PDF file.
// You can also upload your own file into PDF.co and use it as url. Check "Upload File" samples for code snippets: https://github.com/bytescout/pdf-co-api-samples/tree/master/File%20Upload/
const SourceFileUrl = "https://pdf-temp-files.s3.us-west-2.amazonaws.com/3UR333XZKZVHR4ROM6UQ6ZPMQ35E7BEM/result.pdf?X-Amz-Expires=3600&X-Amz-Security-Token=FwoGZXIvYXdzEND%2F%2F%2F%2F%2F%2F%2F%2F%2F%2FwEaDAW5jmOmwN4wMjpqAyKCATF%2FGuqpwKq3CtXan8Mw8Gc73OmzmJ8TRg9wTLzU5hmlS9EY%2Fn0Y%2FDnzteS7%2BWi2fbmw%2Bu0KXw%2FFrpLRbJ7ZXH4j32tXgefebWMMragO6yq7gAcuUtFqmMtr%2FG11YKJImf%2FLZ2jqJs8EaGIntLulU8PiC4hl%2Ft5XF1HyFc3NqZp%2Bl1oop%2BePlwYyKPYTWy1paf%2FE1Oe16lOP%2FALr9SYhEJGlriahTHt4nGW9KMjCKfRVZ8A%3D&X-Amz-Algorithm=AWS4-HMAC-SHA256&X-Amz-Credential=ASIA4NRRSZPHCTU2DAOL/20220729/us-west-2/s3/aws4_request&X-Amz-Date=20220729T150358Z&X-Amz-SignedHeaders=host&X-Amz-Signature=40cc92154c2f4a8ac512cd7ff09caf12db759bbb937fa5c521aab579f86c7e8a";

// Comma-separated list of page indices (or ranges) to process. Leave empty for all pages. Example: '0,2-5,7-'.
const Pages = "";

// PDF document password. Leave empty for unprotected documents.
const Password = "";

// Destination PDF file name
const DestinationFile = "./result.pdf";

// Image params

const X = 400;
const Y = 20;
const Width = 119;
const Height = 32;
const ImageUrl = "https://bytescout-com.s3.amazonaws.com/files/demo-files/cloud-api/pdf-edit/logo.png";

// * Add image *
// Prepare request to `PDF Edit` API endpoint
var queryPath = `/v1/pdf/edit/add`;

// JSON payload for api request
var jsonPayload = JSON.stringify({
    name: path.basename(DestinationFile),
    password: Password,
    url: SourceFileUrl,
    images: [
        {
            url: ImageUrl,
            x: X,
            y: Y,
            width: Width,
            height: Height,
            pages: Pages,
        }
    ]
});

var reqOptions = {
    host: "api.pdf.co",
    method: "POST",
    path: queryPath,
    headers: {
        "x-api-key": API_KEY,
        "Content-Type": "application/json",
        "Content-Length": Buffer.byteLength(jsonPayload, 'utf8')
    }

};

// Send request
var postRequest = https.request(reqOptions, (response) => {
    response.on("data", (d) => {
        // Parse JSON response
        var data = JSON.parse(d);

        if (data.error == false) {
            // Download the PDF file
            var file = fs.createWriteStream(DestinationFile);
            console.log(data.url)
            https.get(data.url, (response2) => {
                response2.pipe(file).on("close", () => {
                    console.log(`Generated PDF file saved to '${DestinationFile}' file.`);
                });
            });
        }

        else {
            // Service reported error
            console.log(data.message);
        }
    });

}).on("error", (e) => {
    // Request error
    console.error(e);
});


// Write request data
postRequest.write(jsonPayload);
postRequest.end();
Protected PDF Output
Below is the screenshot of the output file containing the watermark:
Step 3: How to Enable PDF Built-in Security
The PDF.co Web API provides functionality to add password and security limitations to a PDF or remove any existing limitations and passwords from a PDF document. The users can use PDF passwords and security functionality from PDF.co to secure their documents.
The following are the parameters of the PDF Password and Security endpoint:
- URL: It is a required parameter to provide the URL of the source code.
- name: It is an optional parameter to provide the name of the output file.
- ownerPassword: This parameter provides the owner password used for the document encryption and set the restrictions.
- userPassword: This optional parameter provides the user password for viewing and printing the document.
- encryptionAlgorithm: It provides the encryption algorithm such as RC4_40bit, RC4_128bit, AES_128bit, and AES_256bit.
Moreover, the users can use parameters such as allowAccessibilitySupport, allowAssemblyDocument, allowPrintDocument, allowFillForms, and many others.
Implement PDF Built-in Security using Javascript
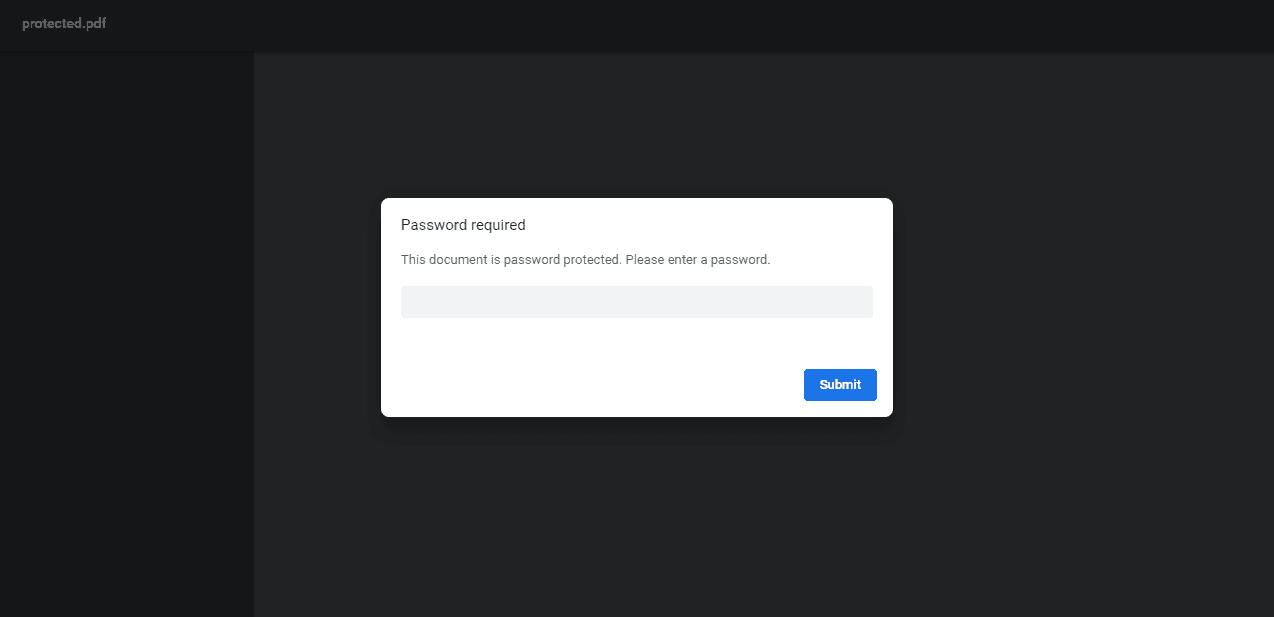
The following source code shows the users how to add security to PDF documents using PDF.co built-in security. The code below takes the above output file as the source file and adds the owner password, user password, and encryption algorithm. The user can not open the downloaded output file without the owner’s or user’s password.
Sample Code for PDF Built-in Security
Below is the sample code to add the security using in-built features:
var https = require("https");
var path = require("path");
var fs = require("fs");

// The authentication key (API Key).
const API_KEY = "******************************************";

// Direct URL of source PDF file.
// You can also upload your own file into PDF.co and use it as url. Check "Upload File" samples for code snippets: https://github.com/bytescout/pdf-co-api-samples/tree/master/File%20Upload/
const SourceFileUrl = "https://pdf-temp-files.s3.us-west-2.amazonaws.com/FRIBM3CAXVH87S3ZFA4W0B0USY1GSV1R/result.pdf?X-Amz-Expires=3600&X-Amz-Security-Token=FwoGZXIvYXdzEND%2F%2F%2F%2F%2F%2F%2F%2F%2F%2FwEaDHLLQDpP%2ByQBXvicECKCAa6XjX4DCVrMwlVpIX41lGITf9pLge0xPoQPB2CxIjyeLjo4k3GKgVeaCSxOMUCObwj3uiGdTx8IapUSGevewEWRiwI0h%2FmSVwNaRin97QdQF6%2BlXdb5OWq4XMWlOrhQpECmaIBWV0GDt0G%2Be26dLKvnUAx0mGCPqGz2g8tsBpRNdxIoqOWPlwYyKOrL21P24bHRyauMdqUo%2FCyzIk9OTJmpnhMIwLpJylYuFS%2Bsv1ZL4pM%3D&X-Amz-Algorithm=AWS4-HMAC-SHA256&X-Amz-Credential=ASIA4NRRSZPHBQJCVX7Q/20220729/us-west-2/s3/aws4_request&X-Amz-Date=20220729T150429Z&X-Amz-SignedHeaders=host&X-Amz-Signature=ab457f7a38e30a8a4fe77bc2c5c89888411e08b03add7c25b5f313554337da73";

// Destination PDF file name
const DestinationFile = "./protected.pdf";

// document passwords
const OwnerPassword = "123456";
const UserPassword = "654321";

// Encryption algorithm.
// Valid values: "RC4_40bit", "RC4_128bit", "AES_128bit", "AES_256bit".
const EncryptionAlgorithm = "AES_128bit";

// Allow or prohibit content extraction for accessibility needs.
const AllowAccessibilitySupport = true;

// Allow or prohibit assembling the document.
const AllowAssemblyDocument = true;

// Allow or prohibit printing PDF document.
const AllowPrintDocument = true;

// Allow or prohibit filling of interactive form fields (including signature fields) in PDF document.
const AllowFillForms = true;

// Allow or prohibit modification of PDF document.
const AllowModifyDocument = true;

// Allow or prohibit copying content from PDF document.
const AllowContentExtraction = true;

// Allow or prohibit interacting with text annotations and forms in PDF document.
const AllowModifyAnnotations = true;

// Allowed printing quality.
// Valid values: "HighResolution", "LowResolution"
const PrintQuality = "HighResolution";

// Runs processing asynchronously.
// Returns Use JobId that you may use with /job/check to check state of the processing (possible states: working, failed, aborted and success).
const async = false;

// Prepare request to `PDF Security` API endpoint
var queryPath = `/v1/pdf/security/add`;

// JSON payload for api request
var jsonPayload = JSON.stringify({
    name: path.basename(DestinationFile),
    url: SourceFileUrl,
    ownerPassword: OwnerPassword,
    userPassword: UserPassword,
    encryptionAlgorithm: EncryptionAlgorithm,
    allowAccessibilitySupport: AllowAccessibilitySupport,
    allowAssemblyDocument: AllowAssemblyDocument,
    allowPrintDocument: AllowPrintDocument,
    allowFillForms: AllowFillForms,
    allowModifyDocument: AllowModifyDocument,
    allowContentExtraction: AllowContentExtraction,
    allowModifyAnnotations: AllowModifyAnnotations,
    printQuality: PrintQuality,
    async: async
});

var reqOptions = {
    host: "api.pdf.co",
    method: "POST",
    path: queryPath,
    headers: {
        "x-api-key": API_KEY,
        "Content-Type": "application/json",
        "Content-Length": Buffer.byteLength(jsonPayload, 'utf8')
    }
};

// Send request
var postRequest = https.request(reqOptions, (response) => {
    response.on("data", (d) => {
        // Parse JSON response
        var data = JSON.parse(d);
        console.log(data.url);
    });
}).on("error", (e) => {

    // Request error
    console.log(e);
});

// Write request data
postRequest.write(jsonPayload);
postRequest.end();
PDF Output with Added Security
Below is the screenshot of the dialog box asking for the password before opening the PDF file:
Step 4: Add Protection by Making PDF Unsearchable
The PDF.co Web API provides functionality to turn PDF, scanned JPG, and PNG images into an unsearchable format. This functionality makes it harder to copy any text from documents, thus making them less vulnerable.
This security practice is extremely useful for sensitive documents such as invoices, receipts, and other business papers. We also have a dedicated tutorial on how to create a PDF invoice using HTML templates in Javascript, in case you’re interested.
Endpoint Parameters to Add Protection
Following are the parameters of the PDF that make text searchable or unsearchable endpoint:
- url: It is a required parameter that provides the URL to the source file.
- pages: It is an optional parameter that provides a comma-separated list for page indices the user wants to process.
- password: It is an optional parameter that provides the password for the PDF file.
- name: It is an optional parameter that provides the name for the generated output.
The users can also use parameters such as async, profiles, expiration, httpusername, and many others.
While we’re on the subject of security, another thing that you should secure is digital signatures for online transactions.
Enable PDF Protection using Javascript
The following source code shows how to make a PDF document unsearchable by making its text unsearchable. The below code takes a PDF document and turns it into a collection of image pages in a PDF file. This way, the users can not copy text from the PDF file without using text recognition. The users can see the cursor change in the below-working GIF, showing that the above PDF files were text searchable while the resulting file is unsearchable.
Sample Code to Add PDF Protection
Following is the sample code to make PDF unsearchable:
var https = require("https");
var path = require("path");
var fs = require("fs");

// The authentication key (API Key).

const API_KEY = "*****************************************";

// Direct URL of source PDF file.
// You can also upload your own file into PDF.co and use it as url. Check "Upload File" samples for code snippets: https://github.com/bytescout/pdf-co-api-samples/tree/master/File%20Upload/
const SourceFileUrl = "https://pdf-temp-files.s3.us-west-2.amazonaws.com/FRIBM3CAXVH87S3ZFA4W0B0USY1GSV1R/result.pdf?X-Amz-Expires=3600&X-Amz-Security-Token=FwoGZXIvYXdzEND%2F%2F%2F%2F%2F%2F%2F%2F%2F%2FwEaDHLLQDpP%2ByQBXvicECKCAa6XjX4DCVrMwlVpIX41lGITf9pLge0xPoQPB2CxIjyeLjo4k3GKgVeaCSxOMUCObwj3uiGdTx8IapUSGevewEWRiwI0h%2FmSVwNaRin97QdQF6%2BlXdb5OWq4XMWlOrhQpECmaIBWV0GDt0G%2Be26dLKvnUAx0mGCPqGz2g8tsBpRNdxIoqOWPlwYyKOrL21P24bHRyauMdqUo%2FCyzIk9OTJmpnhMIwLpJylYuFS%2Bsv1ZL4pM%3D&X-Amz-Algorithm=AWS4-HMAC-SHA256&X-Amz-Credential=ASIA4NRRSZPHBQJCVX7Q/20220729/us-west-2/s3/aws4_request&X-Amz-Date=20220729T150429Z&X-Amz-SignedHeaders=host&X-Amz-Signature=ab457f7a38e30a8a4fe77bc2c5c89888411e08b03add7c25b5f313554337da73";

//document pages. Empty means all pages
const Pages = "";

// PDF document password. Leave empty for unprotected documents.
const Password = "";

// Destination PDF file name
const DestinationFile = "./result.pdf";

// Prepare request to `Make UnSearchable PDF` API endpoint
var queryPath = `/v1/pdf/makeunsearchable`;

// JSON payload for api request
var jsonPayload = JSON.stringify({
    name: path.basename(DestinationFile), password: Password, pages: Pages, url: SourceFileUrl
});

var reqOptions = {
    host: "api.pdf.co",
    method: "POST",
    path: queryPath,
    headers: {
        "x-api-key": API_KEY,
        "Content-Type": "application/json",
        "Content-Length": Buffer.byteLength(jsonPayload, 'utf8')
    }
};

// Send request
var postRequest = https.request(reqOptions, (response) => {
    response.on("data", (d) => {
        // Parse JSON response
        var data = JSON.parse(d);
        if (data.error == false) {
            // Download PDF file
            var file = fs.createWriteStream(DestinationFile);
            console.log(data.url)
            https.get(data.url, (response2) => {
                response2.pipe(file)
                .on("close", () => {
                    console.log(`Generated PDF file saved as "${DestinationFile}" file.`);
                });
            });
        }
        else {
            // Service reported error
            console.log(data.message);
        }
    });
}).on("error", (e) => {
    // Request error
    console.log(e);
});

// Write request data
postRequest.write(jsonPayload);
postRequest.end();
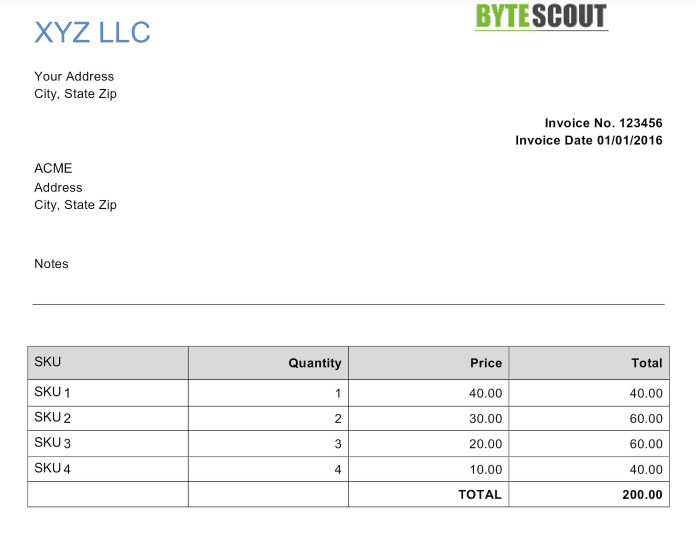
PDF Output with Added Protection
Below is the screenshot of the output file:
Step 5: Convert PDF to Image to Protect it
The PDF.co Web API provides the functionality to convert any PDF document to JPG. This API endpoint is helpful for high-quality rendering and efficiently generates previews and thumbnails.
Endpoint Parameters for PDF to Image Conversion
Following are the PDF to JPG endpoint parameters:
- url: It is a required parameter that provides the URL to the source file.
- pages: It is an optional parameter that provides a comma-separated list of page indices the user wants to process.
- password: It is an optional parameter that provides the password for the PDF file.
The users can also use other parameters such as async, profiles, inline, rect, httpusername, and many others.
Convert PDF to Image using Javascript
The following code in Javascript shows how to convert a PDF document into an image. The below code takes the above output file as its source file and converts it into an image file. It is almost the same as the above because in making the document unsearchable, the code converts the text to an image, which is almost the same as this endpoint, by converting the PDF pages into images.
Sample Code to Convert PDF to Image
Below is the sample code to show the conversion of PDF to image:
var https = require("https");
var fs = require(fs");
const API_KEY = "***************************";

// Source PDF file
// You can also upload your own file into PDF.co and use it as url. Check "Upload File" samples for code snippets: https://github.com/bytescout/pdf-co-api-samples/tree/master/File%20Upload/
const SourceFileUrl = "https://pdf-temp-files.s3.us-west-2.amazonaws.com/UFSTX2LFI4UH56IGDZAHFBS984J64DS2/result.pdf?X-Amz-Expires=3600&X-Amz-Security-Token=FwoGZXIvYXdzEL%2F%2F%2F%2F%2F%2F%2F%2F%2F%2F%2FwEaDOLjvHobgvHVNRfK0CKCATfBACgxa%2Bonk7F1ASK1YQ2XEWbB4iJvlXYnW7%2BOdYx5uYlsBuLVCJvZbUYLDFC7dQ7jU2mLyweH8087ma%2BwzzjRdXnpmxMRzHQTG%2BPpMH2jARWzEjMY8cpwHFSF60B5mrFyBCGCNIi9and1KJrRFUX%2BnoSygll59k7g1lm5qVROHJoogIKMlwYyKCjFyDaBfnhsv4sSo4syeX6CXYl3VYQsRXiLIx7y0JxUgqgDTbAHAdg%3D&X-Amz-Algorithm=AWS4-HMAC-SHA256&X-Amz-Credential=ASIA4NRRSZPHKBJ5BUOU/20220729/us-west-2/s3/aws4_request&X-Amz-Date=20220729T151853Z&X-Amz-SignedHeaders=host&X-Amz-Signature=0e6b72e15b2d6a83e78577b08eea76c90ef4683dd848a413748d956d5907776a";

// Comma-separated list of page indices (or ranges) to process. Leave empty for all pages. Example: '0,2-5,7-'.
const Pages = "";

// PDF document password. Leave empty for unprotected documents.
const Password = "";

// Prepare request to `PDF To JPEG` API endpoint
var queryPath = `/v1/pdf/convert/to/jpg`;

// JSON payload for api request
var jsonPayload = JSON.stringify({
    password: Password, pages: Pages, url: SourceFileUrl
});

var reqOptions = {
    host: "api.pdf.co",
    method: "POST",
    path: queryPath,
    headers: {
        "x-api-key": API_KEY,
        "Content-Type": "application/json",
        "Content-Length": Buffer.byteLength(jsonPayload, 'utf8')
    }
};

// Send request
var postRequest = https.request(reqOptions, (response) => {
    response.on("data", (d) => {
        // Parse JSON response
        var data = JSON.parse(d);
        if (data.error == false) {
            // Download generated JPEG files
            var page = 1;
            data.urls.forEach((url) => {
                var localFileName = `./page${page}.jpg`;
                var file = fs.createWriteStream(localFileName);
                https.get(url, (response2) => {
                    response2.pipe(file)
                    .on("close", () => {
                        console.log(`Generated JPEG file saved as "${localFileName}" file.`);
                    });

                });
                page++;
            }, this);
        }
        else {
            // Service reported error
            console.log(data.message);
        }
    });
}).on("error", (e) => {
    // Request error
    console.error(e);
});

// Write request data
postRequest.write(jsonPayload);
postRequest.end();
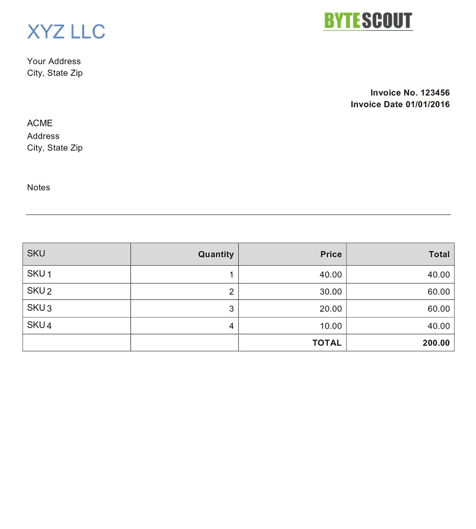
Converted PDF Output
Below is the screenshot of the output image file:
Related Tutorials


