Important: The Google Sheets file must be accessible through a public or shareable link so PDF.co can read and convert it.
Save Excel or Google Sheets as a Landscape PDF Using PDF.co and Zapier
4 Minutes Read
Overview
In this tutorial, you will learn how to automatically convert a Google Sheets file into a PDF in landscape orientation using PDF.co and Zapier.
This workflow is useful when you have a spreadsheet stored in Google Drive and want Zapier to automatically send it to PDF.co for conversion. The final PDF can then be saved back to Google Drive or another cloud storage app.
Workflow Diagram
Google Drive (New File in Folder) → PDF.co (Anything to PDF Converter) → Google Drive (Upload file)
PDF.co Endpoint Used
This workflow uses PDF.co’s PDF from Excel / Anything to PDF conversion capability.
PDF.co API Endpoint: /v1/xls/convert/to/pdf
Endpoint Documentation: https://docs.pdf.co/api-reference/convert-from-excel/pdf
This endpoint converts an excel file into a PDF. In this tutorial, the source URL will be a Google Sheets export link that includes the landscape setting.
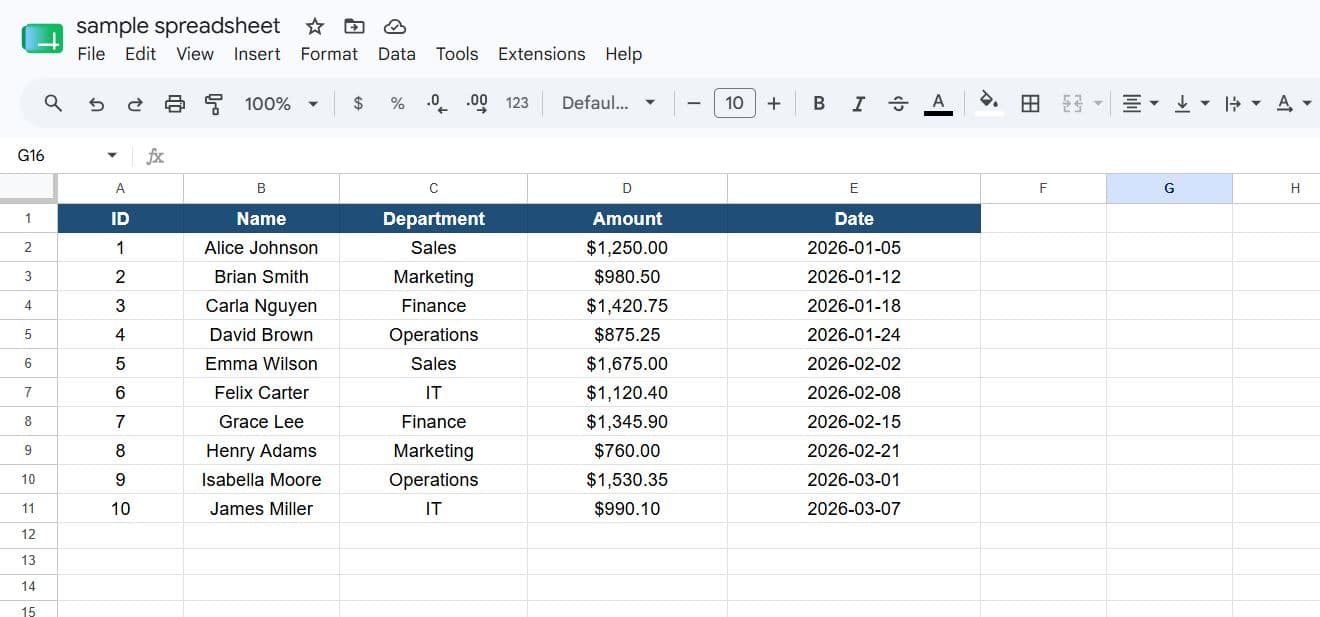
SOURCE FILE :
PDF.co Zapier Module Used
In Zapier, this endpoint is used through the PDF.co app action:
App: PDF.co
Action Event: Anything to PDF Converter
This PDF.co action receives the Google Sheets export URL and returns a PDF output URL.
Before You Start
Make sure you have the following:
- A Zapier account.
- A PDF.co account.
- Your PDF.co API Key.
- A Google Sheets file stored in Google Drive.
- A Google Drive folder where the converted PDF will be saved.
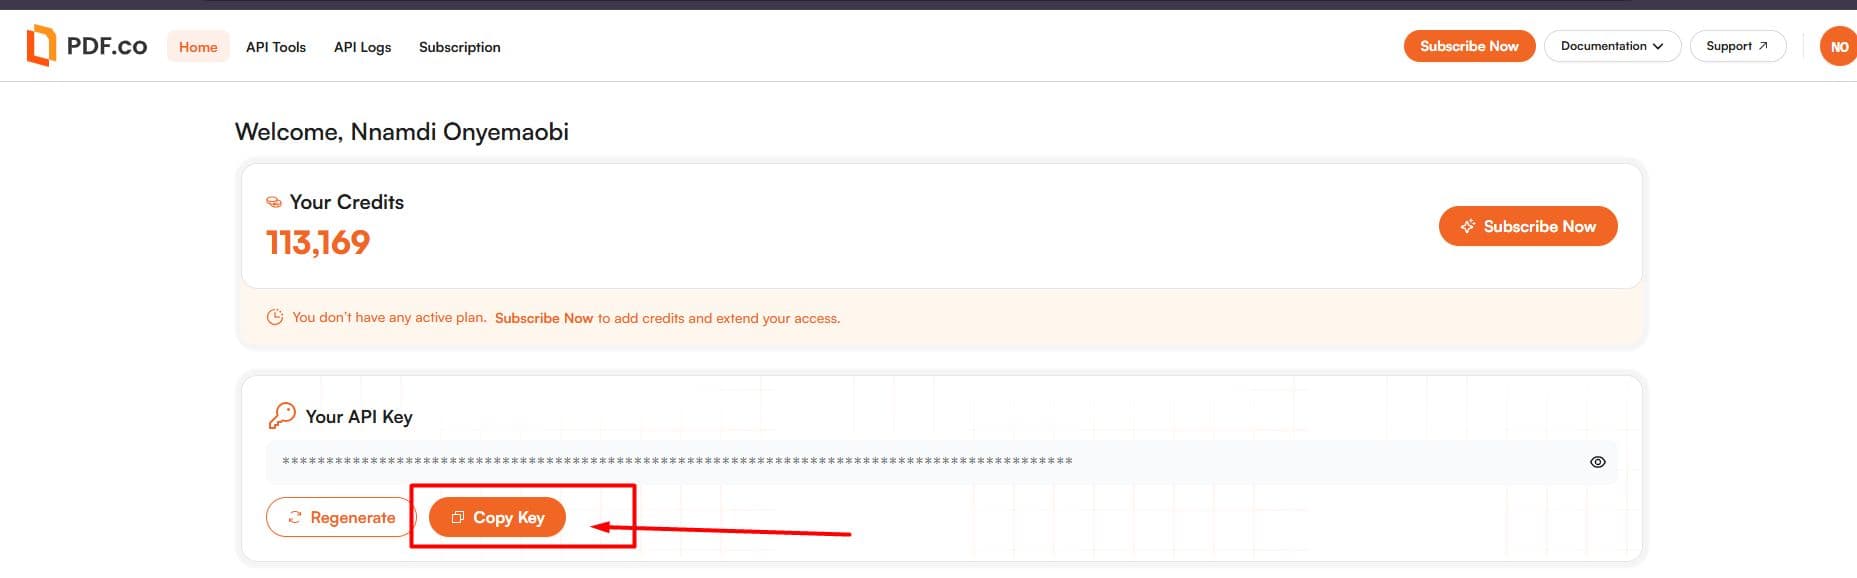
To get your PDF.co API Key:
- Go to https://app.pdf.co.
- Log in to your PDF.co account.
- Open your dashboard.
- Copy your API Key.
IN THIS TUTORIAL
Step 1: Create a New Zap
What this step does
This step starts the automation setup in Zapier.
Instructions
- Log in to your Zapier account.
- Click Create.
- Select Zaps.
- Zapier will open the Zap editor.
- Name your Zap something clear, such as: Convert Google Sheet to Landscape PDF with PDF.co
Step 2: Set Up the Google Drive Trigger
What this step does
This step tells Zapier when the automation should start. In this tutorial, the Zap will run whenever a new spreadsheet file is added to a selected Google Drive folder.
Instructions
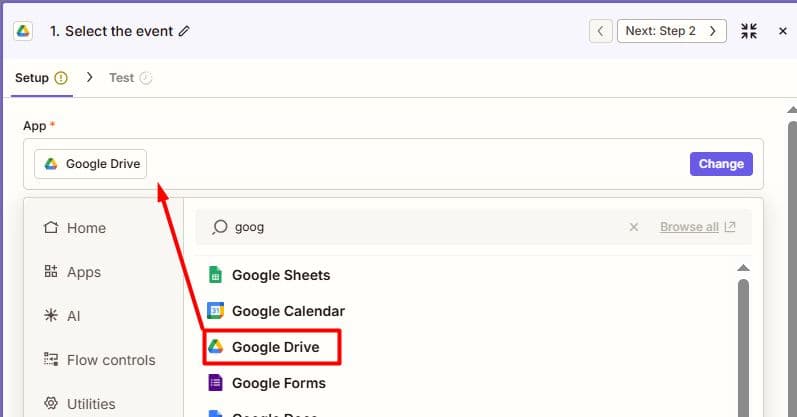
- In the first step of the Zap, click Trigger.
- Search for Google Drive.
- Select Google Drive.
- For the trigger event, choose New File in Folder.
Step 3: Connect Your Google Drive Account
What this step does
This step allows Zapier to access the Google Drive folder where your spreadsheet file is stored.
Instructions
- Choose your Google Drive account.
- If your account is not connected yet, click Sign in and complete the connection.
- Click Continue.
Step 4: Choose the Google Drive Folder
What this step does
This step tells Zapier which Google Drive folder to watch for new spreadsheet files.
Instructions
- In the Drive field, select your Google Drive.
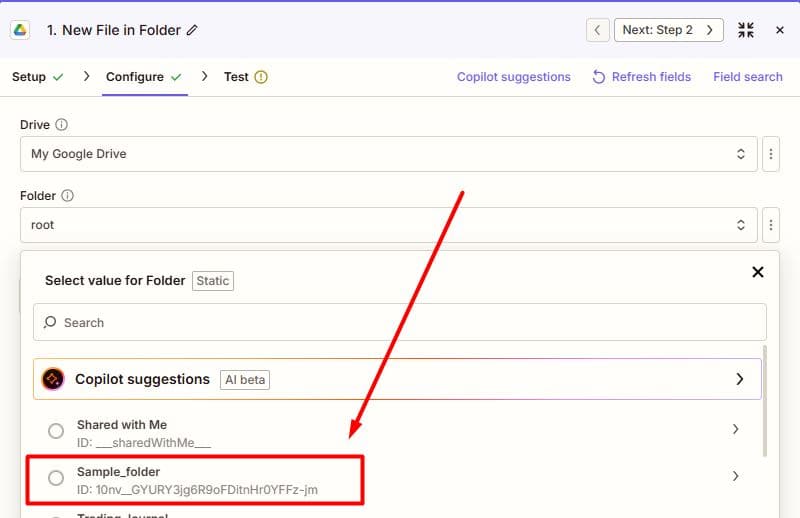
- In the Folder field, select the folder where your Google Sheets file will be added.
- Click Continue.
Make sure the spreadsheet file in this folder is accessible to PDF.co. If the file is private, PDF.co may not be able to read it.
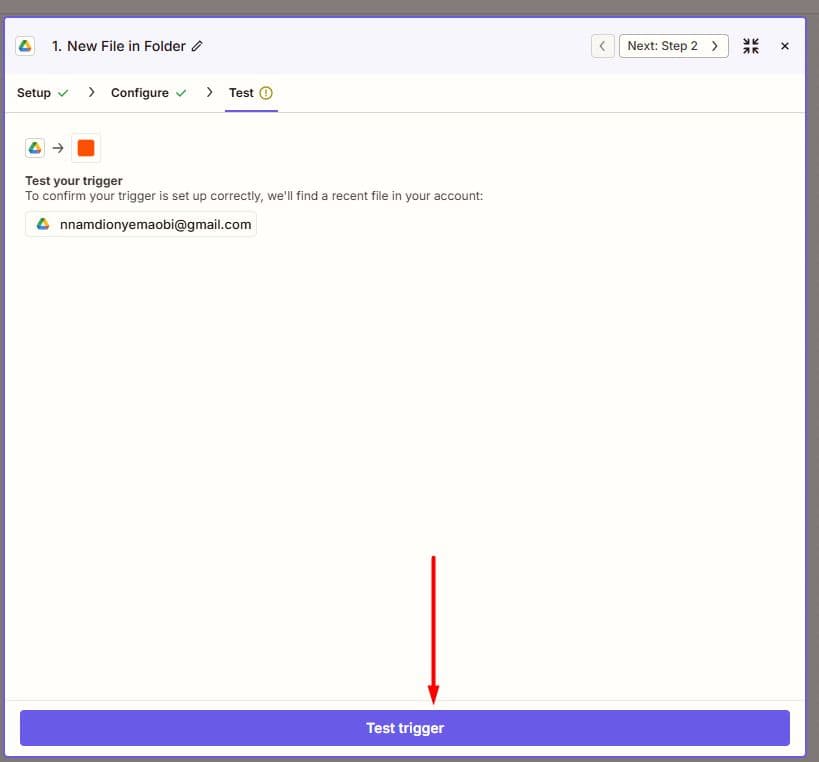
Step 5: Test the Google Drive Trigger
What this step does
This step checks that Zapier can find a sample file from the selected Google Drive folder.
Instructions
- Click Test trigger.
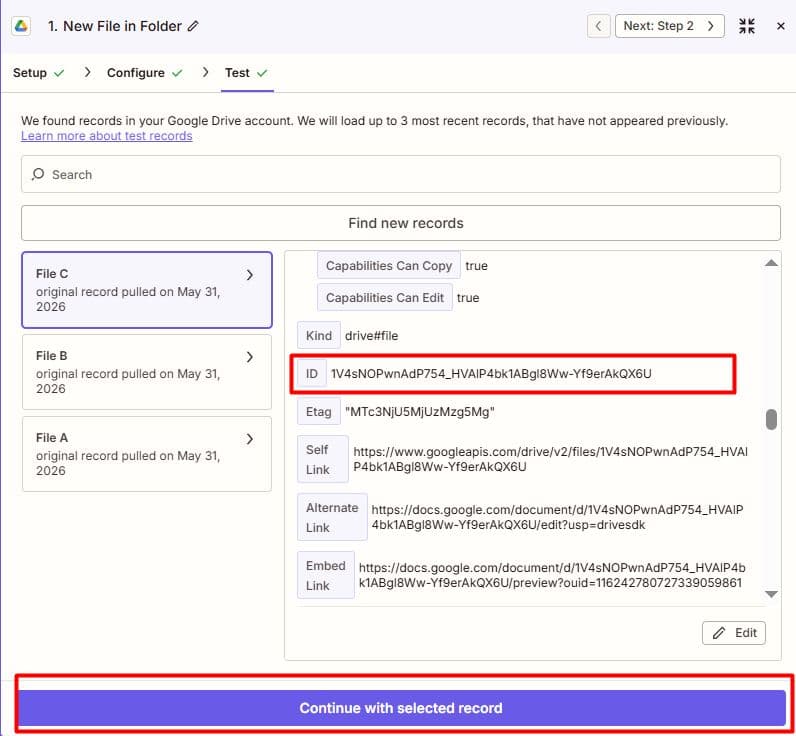
- Zapier will search the selected folder for a recent file.
Look for the file ID in the test result. This ID will be used later to build the Google Sheets export URL.
Step 6: Add the PDF.co Action
What this step does
This step sends the Google Sheets file information to PDF.co so it can be converted into a PDF.
Instructions
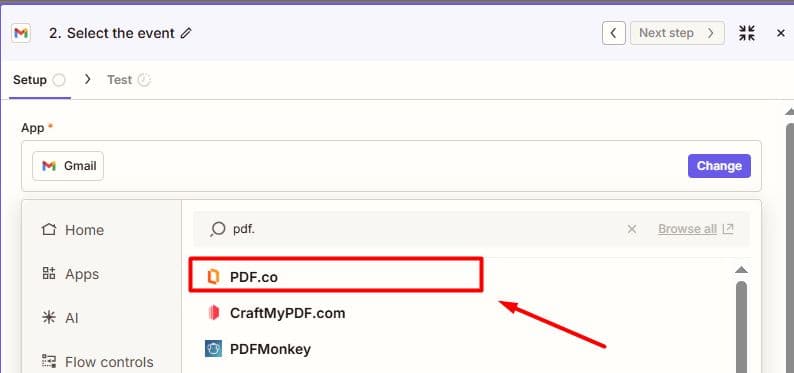
- Click the + button to add the next step.
- Search for PDF.co.
- Select PDF.co.
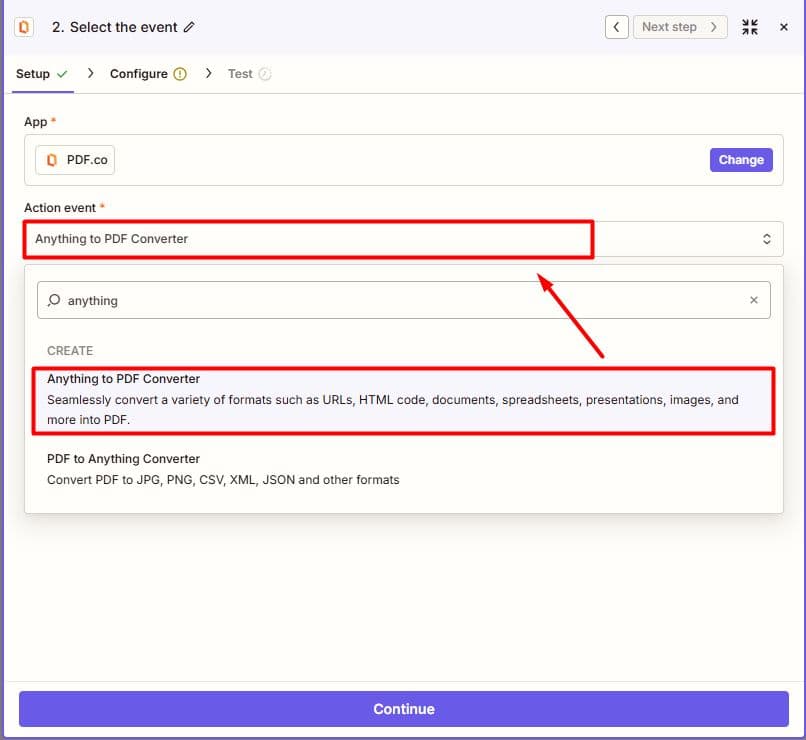
- For the action event, choose Anything to PDF Converter.
Step 7: Connect Your PDF.co Account
- In the PDF.co action’s Account field, select an existing connection or click Connect a new account.
- Sign in to your PDF.co account when prompted.
- Authorize Zapier to access your account through OAuth.
- Return to the Zap editor, select the connected account, and continue.
Step 8: Configure the PDF.co Conversion Action
What this step does
This step tells PDF.co what file to convert and how to convert it into a landscape PDF.
Instructions
In the PDF.co action setup, configure the fields as follows.
Input Format
Choose: URL to a XLS or XLSX spreadsheet file, or a PDF.co file token (filetoken:// link)
This tells PDF.co that the source file will come from a URL.
Input Source
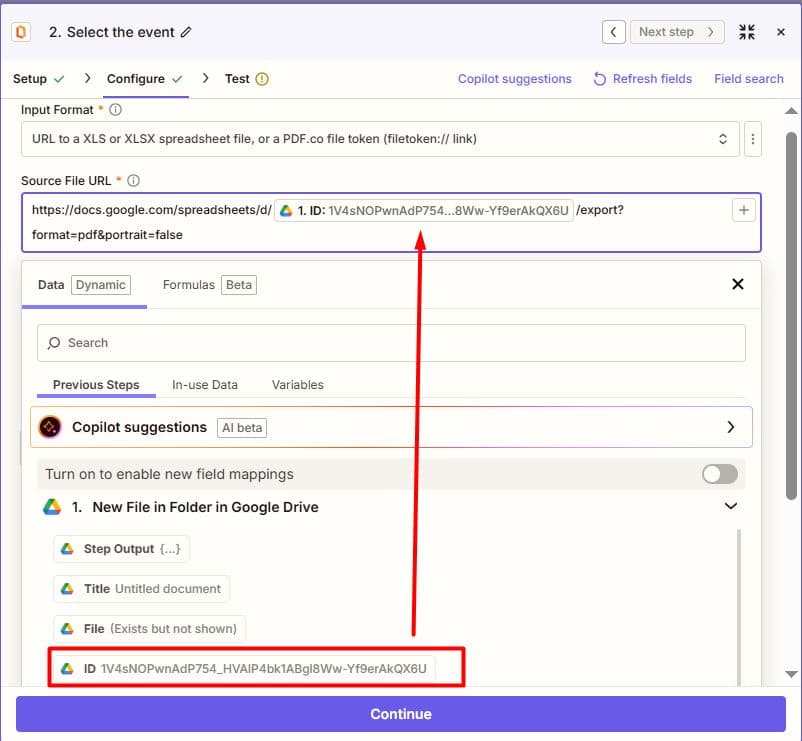
In the Input Source field, enter the Google Sheets export URL below:
https://docs.google.com/spreadsheets/d/INSERT_FILE_ID/export?format=pdf&portrait=false
Then replace INSERT_FILE_ID with the dynamic File ID from the Google Drive trigger.
Your final mapped URL should look like this:

Do not type the file ID manually unless you are testing with one specific file only. For an automated Zap, insert the File ID field from the Google Drive trigger using Zapier’s field picker.
Why portrait=false is important
The portrait=false part tells Google Sheets to export the file in landscape orientation.
If you want portrait orientation instead, remove this part from the URL:
&portrait=false
Step 9: Test the PDF.co Action
What this step does
This step confirms that PDF.co can read the Google Sheets export URL and create the landscape PDF.
Instructions
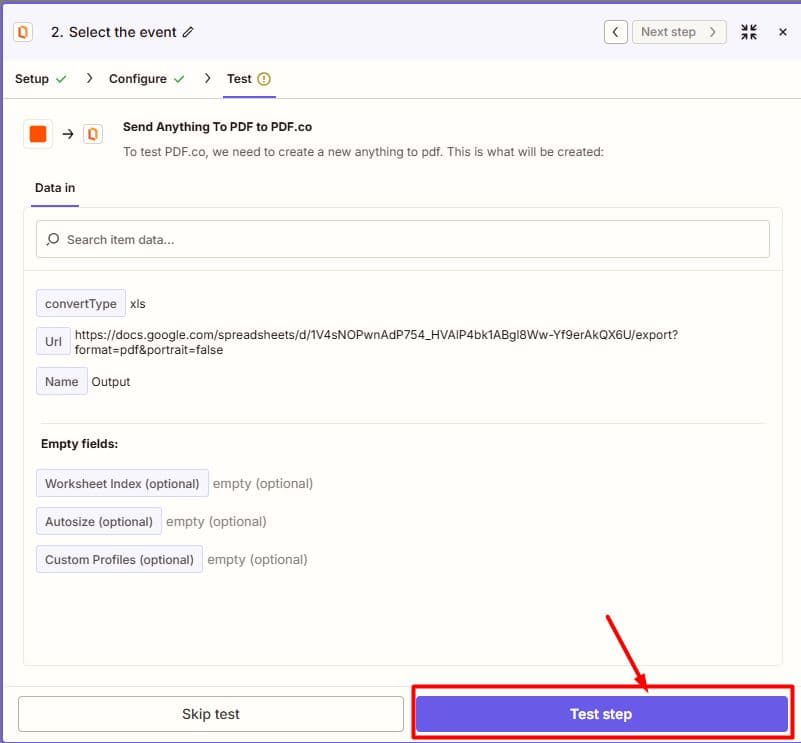
- ClickTest step.
- Wait for Zapier to send the file to PDF.co.
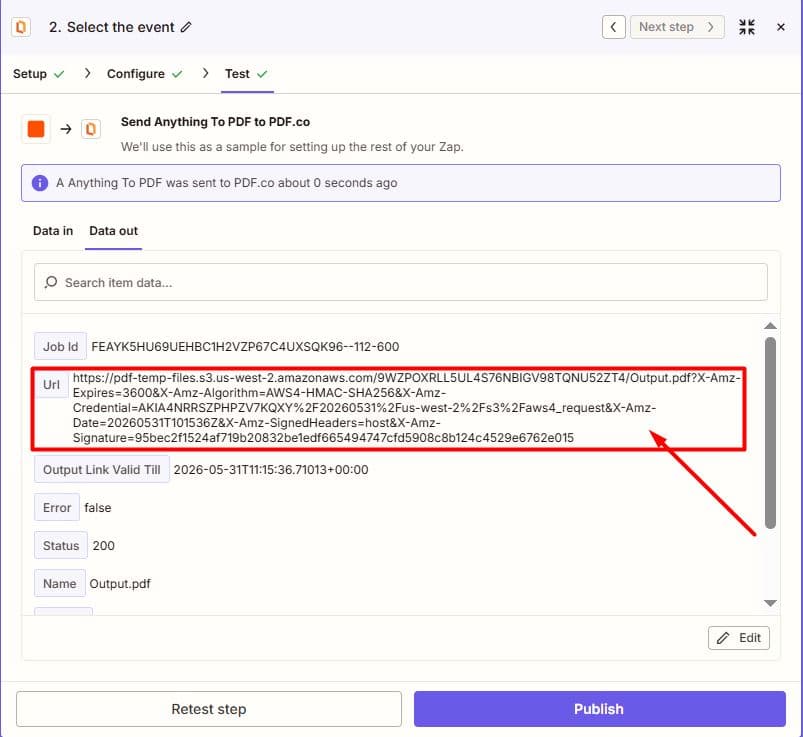
- Review the test result.
- Look for the PDF.co output URL.
- Open the output URL in a new browser tab.
- Confirm that the file opens as a PDF in landscape orientation.
If the test fails, check that:
- The Google Sheets file is accessible.
- The correct File ID was inserted into the URL.
- The export URL contains
format=pdf&portrait=false. - Your PDF.co API Key is valid.
Step 10: Save the PDF to Google Drive
What this step does
This step saves the PDF.co output file permanently in Google Drive.
PDF.co output links are temporary, so it is best to add a storage step instead of relying only on the temporary output URL.
Instructions
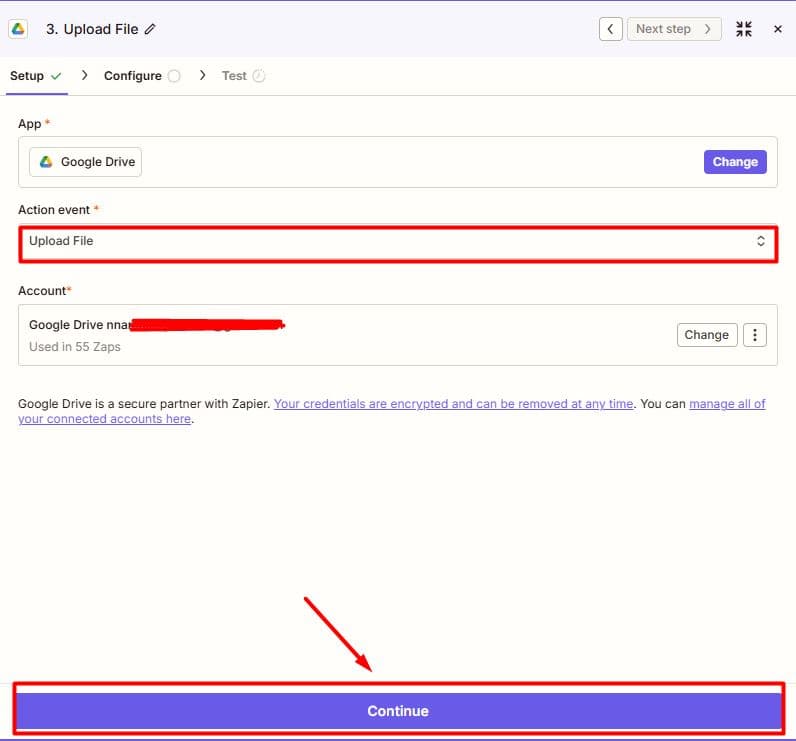
- Click the + button to add another action step.
- Search for Google Drive.
- Select Google Drive.
- For the action event, choose Upload File.
- Click Continue.
- Select your Google Drive account.
- Choose the destination folder where the converted PDF should be saved.
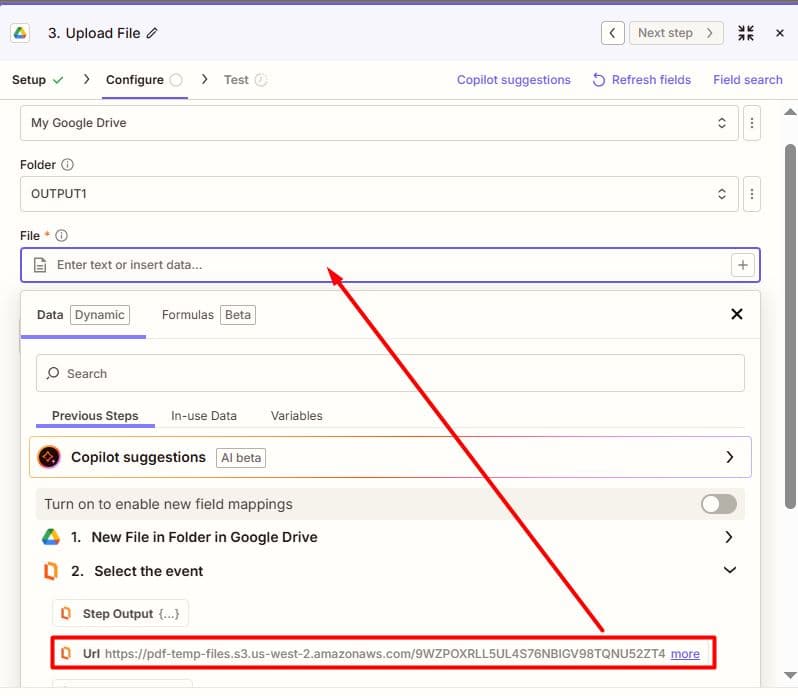
- In the File field, select the PDF output URL returned by the PDF.co step.
Step 11: Test the Google Drive Upload
What this step does
This step confirms that the converted PDF is successfully saved to Google Drive.
Instructions
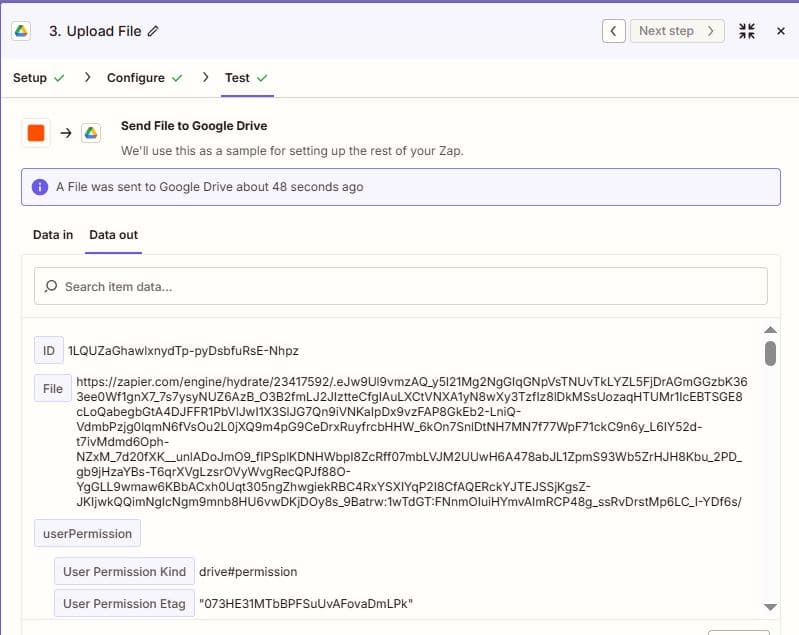
- Click Test step.
- Open the destination folder in Google Drive.
- Confirm that the PDF file was uploaded.
- Open the uploaded PDF.
- Make sure the spreadsheet was saved as a landscape PDF.
Step 12: Publish the Zap
What this step does
This step turns on the automation so it can run automatically.
Instructions
- Review the trigger and action steps.
- Make sure each test was successful.
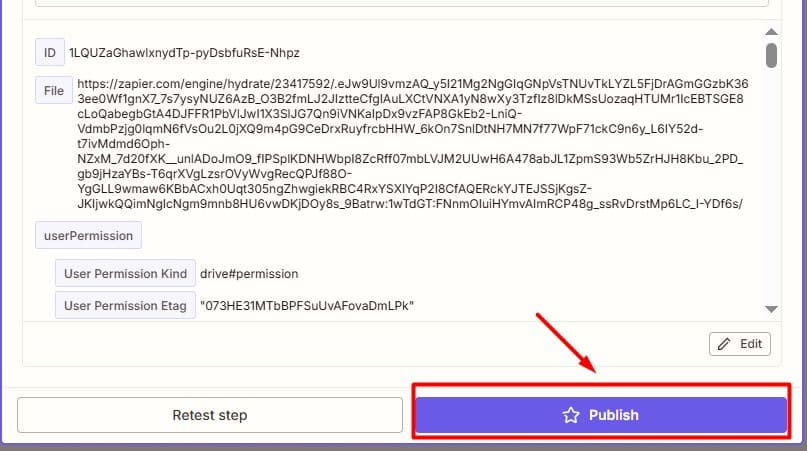
- Click Publish.
- Zapier will turn on the Zap.
From now on, when a new Google Sheets file is added to the selected Google Drive folder, Zapier will send it to PDF.co, convert it into a landscape PDF, and save the final PDF in Google Drive.
Final Output
Summary
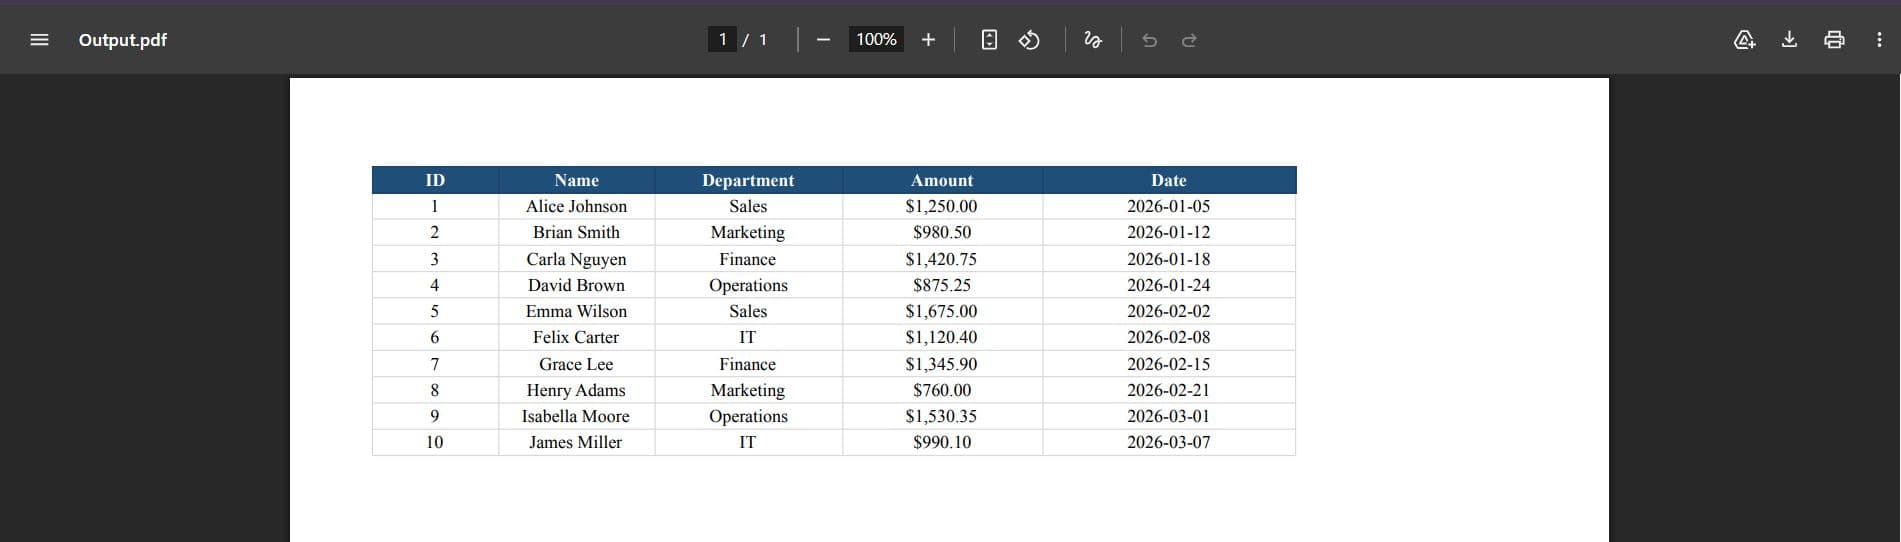
In this tutorial, you created a Zap that automatically converts a Google Sheets file into a landscape PDF using PDF.co and Zapier.
The workflow starts when a new file is added to a Google Drive folder. Zapier then sends the file information to PDF.co’s Anything to PDF Converter action, which uses the Google Sheets export URL to generate a landscape PDF. Finally, the converted PDF is saved back to Google Drive for permanent storage.
This setup helps users automate spreadsheet-to-PDF conversion without manually opening Google Sheets, changing export settings, or downloading files one by one.
Related Tutorials
