Generate a Service Summary PDF from a Notion Button with Make and PDF.co
If you manage service requests in Notion, you may need to generate a PDF summary after completing a job. Manually copying the customer details, service date, and work notes into a separate document takes time and creates opportunities for errors.
With Make and PDF.co, you can automate the process. A button in Notion starts the workflow, Make retrieves the latest record details, and PDF.co converts the service summary into a PDF. The scenario then stores the completed document and adds its permanent link to the original Notion record.
In this tutorial, you'll build the workflow from scratch using a Notion database button, Make, and PDF.co. You'll also configure duplicate prevention so repeated button clicks don't generate unnecessary copies.
Prerequisites
Before starting, you'll need:
- A Notion workspace with access to database buttons and webhook actions.
- A Notion API integration with permission to read and update the intended database.
- A Make account.
- A PDF.co account with an API key and available credits.
- An approved storage destination, such as a private Google Drive folder.
- Permission to create a Make data store for tracking document requests.
Notion's Send webhook action is available on eligible paid plans. The action sends an HTTP POST request and can include custom headers.
This workflow generates a PDF from selected Notion database properties. It does not export the entire Notion page, its blocks, or any embedded attachments.
IN THIS TUTORIAL
Step 1: Prepare Your Notion Database
Create a database for your service records, or update an existing database with the following properties.
- Customer: Title property containing the customer's name.
- Service Date: Date property containing the date of service.
- Work Completed: Rich text property describing the completed service.
- Contact: Email property containing the customer's contact email.
- Request Version: Number property that identifies the requested document revision.
- Generated Version: Number property that identifies the latest successfully generated revision.
- PDF Link: URL property containing the stored document link.
- PDF Status: Status property that tracks document generation.
Create these options in the PDF Status property:
GeneratingReadyFailed
Initialize Request Version to 1 and Generated Version to 0 for a new record.
For example, a service record might contain:
- Customer: Example Customer
- Service Date: November 5, 2026
- Work Completed: Replaced a damaged office door hinge and tested the door.
- Contact: customer@example.com
- Request Version: 1
- Generated Version: 0
- PDF Status: Not yet generated
Increment Request Version whenever you intentionally request a new PDF revision. A repeated click for the same version should not be treated as a new revision.
The examples below assume these exact property names and types. If your database uses different names, update the Make mappings and Notion API request bodies accordingly.
Step 2: Create the Notion API Integration
You'll need an integration that allows Make to retrieve and update database records.
- Open your Notion integration settings.
- Create an integration or choose an existing one.
- Enable the capabilities needed to read and update pages.
- Copy the integration token into your approved credential-management system.
- Give the integration access to the database containing your service records.
Do not include the token in the document, webhook payload, or HTML template.
You'll also need the database's data source ID. This workflow uses the Notion API version 2025-09-03, which distinguishes a database from its underlying data source.
The scenario will verify that the requested page belongs to the allowed data source before processing it.
For additional information, see the Notion API documentation.
Step 3: Create a Make Scenario with a Custom Webhook
Sign in to Make and create a new scenario.
- Add Webhooks > Custom webhook.
- Name the module
Receive PDF request. - Create a webhook named
Notion Service Summary Request. - Save the webhook and copy its URL.
- Leave the scenario inactive while completing the remaining modules.
The webhook will receive the request generated by the Notion button.
Configure the webhook's supported access controls. Where appropriate, use a shared-secret header configured on both the Notion webhook action and the Make webhook.
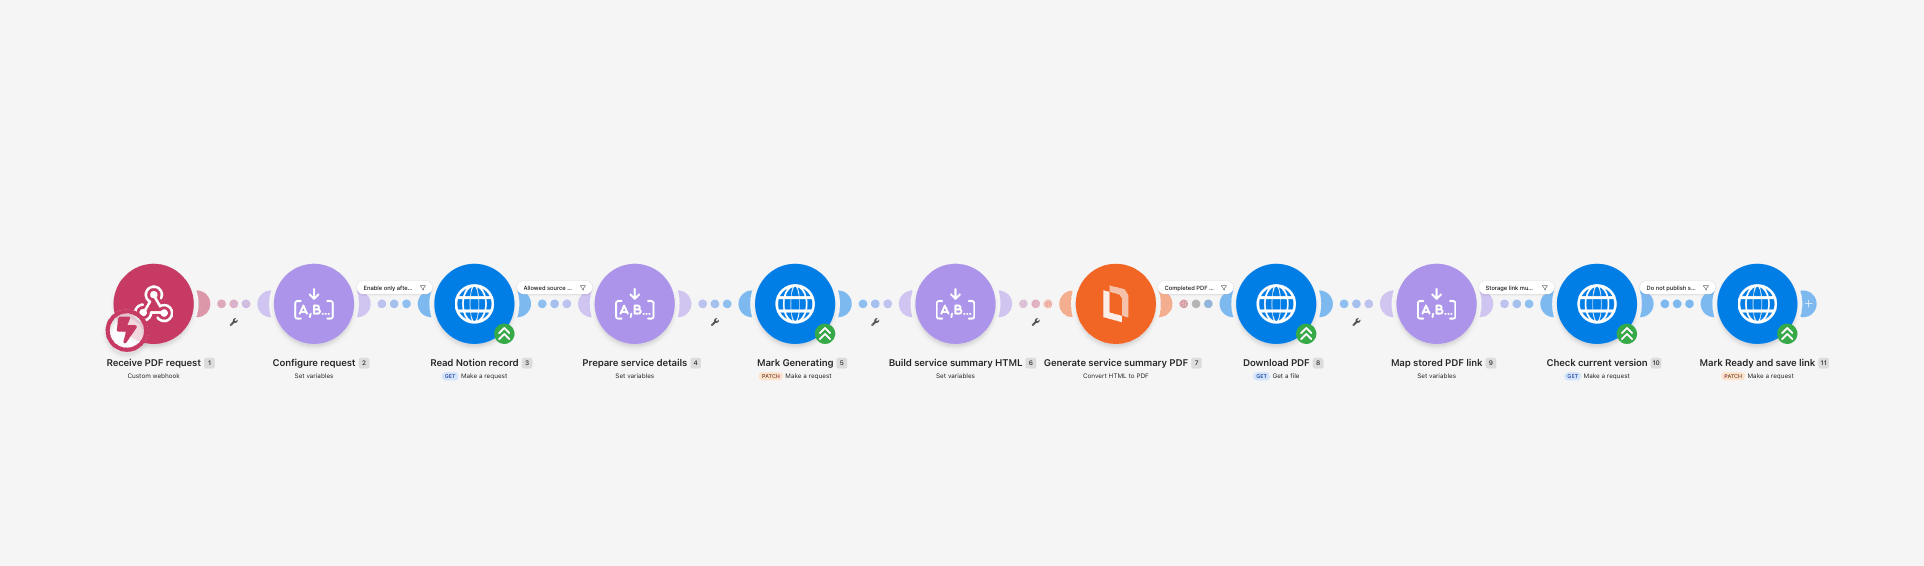
Step 4: Add a Button to the Notion Database
Return to your Notion database.
- Add a property of type Button.
- Name it
Generate PDF. - Open the button's automation settings.
- Add a Send webhook action.
- Enter the Make webhook URL.
- Configure the custom header required by your Make webhook, if applicable.
- Save the button.
Click the button on a test service record while Make's webhook is listening.
Open the webhook's output in Make and inspect the received JSON.
The next steps need the original Notion page ID. Notion database-button webhooks do not offer a selector for arbitrary property values, so use the actual request structure shown by your test, rather than assuming fields named page_id or requested_version are present.
For the default workflow below, Make obtains the current Request Version from Notion after retrieving the page. If your trusted webhook source explicitly supplies a requested version, you can also compare that value against Notion's current version.
Do not use a customer name or email address as the page identifier.
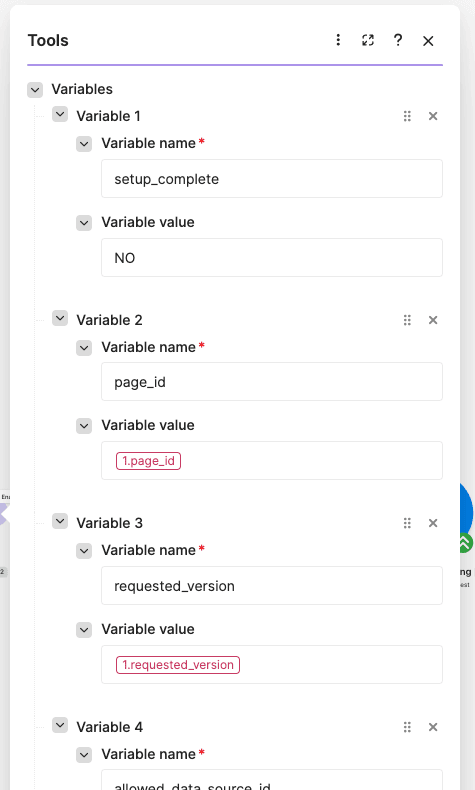
Step 5: Configure the Request Variables
Add Tools > Set multiple variables after the webhook.
Name this module Configure request.
Set the variable lifetime to One cycle and add:
page_id: Map the actual Notion page ID from the webhook output.allowed_data_source_id: Enter the ID of the data source containing your approved service records.
If your webhook source supplies a trusted version, you may also define:
requested_version: Map the requested revision number.
Otherwise, you'll retrieve Request Version from the current Notion record in the next steps.
Make sure the page ID is a valid Notion UUID before making the API request. Invalid or missing IDs should stop the scenario rather than continuing with an empty identifier.
Step 6: Retrieve the Current Notion Record
Add an HTTP > Make a request module.
Name it Read Notion record.
Configure:
- Method: GET.
- URL:
https://api.notion.com/v1/pages/{{2.page_id}} - Notion-Version header:
2025-09-03 - Response parsing: Enabled.
- Timeout: 120 seconds, where supported.
- Redirect handling: Follow standard redirects.
- TLS certificate verification: Enabled.
Use a secure HTTP connection or credential configuration to send your Notion authorization. The request requires an Authorization header using the Bearer scheme.
A corresponding HTTP request has this structure:
GET /v1/pages/PAGE_ID HTTP/1.1
Host: api.notion.com
Authorization: Bearer YOUR_NOTION_INTEGRATION_TOKEN
Notion-Version: 2025-09-03
YOUR_NOTION_INTEGRATION_TOKEN is a placeholder. Store the actual credential securely in Make rather than including it in a shared scenario export.
Run the scenario up to this point and inspect the returned page properties.
Verify that:
- The returned page ID matches the requested page.
- The page's
parent.data_source_idmatches the configured allowed data source. - Customer, Service Date, Work Completed, and Contact are available.
- Request Version is a positive integer.
- Generated Version contains the previous generated revision, or
0for a new record.
Reject requests for pages outside the allowed data source.
Step 7: Prepare the Service Details
Add Tools > Set multiple variables and name it:
Prepare service details
Map the service fields from the Notion response.
Customer
Notion Title properties can contain multiple text fragments. Use Make's map() and join() functions to combine them:
{{join(map(3.data.properties.Customer.title; "plain_text"); emptystring)}}Save the result as customer.
Service Date
Create service_date and map:
{{3.data.properties.`Service Date`.date.start}}Work Completed
Create work_completed and combine the rich-text fragments:
{{join(map(3.data.properties.`Work Completed`.rich_text; "plain_text"); emptystring)}}Contact
Create contact and map:
{{3.data.properties.Contact.email}}Document Version
Create version.
For a native button request, map the current Notion property:
{{3.data.properties.`Request Version`.number}}If an upstream webhook supplied an explicit requested_version, compare that value with the retrieved Request Version and stop when they differ.
Also verify that:
- Request Version is a positive integer.
- The page belongs to the approved data source.
- Generated Version is not equal to the requested version.
Do not continue when the same revision has already been generated.
The workflow now has a snapshot of the service fields needed for the PDF.
If your database contains unusually large title or rich-text properties, review Notion's paginated page-property API. A basic page response may not contain every fragment for those properties.
Step 8: Prevent Duplicate PDF Generation
A double click or repeated webhook request should not generate several copies of the same revision.
To prevent this, use a Make data store.
Open Data stores in Make and create a data store named:
notion_service_pdf_requests
Create fields for:
state: Processing, completed, failed, or superseded.stored_url: The permanent link after the PDF has been archived.snapshot: The approved service fields used to generate that revision.
Each record needs a unique key combining the canonical Notion page ID and the requested version.
For example:
b55c9c91-384d-452b-81db-d1ef79372b75:1The ID and number above are examples. Build the actual key dynamically from the current page ID and version.
In the scenario settings, enable Process data in order so this scenario handles requests sequentially.
After preparing and validating the service details, add Data store > Check the existence of a record and map the unique request key.
Handle the result:
- Record does not exist: Add a record with the key, set
statetoprocessing, and save the service snapshot. Use Add/Replace a Record with overwrite disabled so an existing key cannot be silently replaced. - Record is completed: Stop processing; the document already exists.
- Record is processing: Hold the request for investigation or recovery. Do not begin another conversion.
- Record failed: Use an explicit retry path based on the saved snapshot.
- Record has a stored URL but the Notion update failed: Reuse that stored URL and retry the Notion write-back without generating another PDF.
Use Get a record to inspect existing records and Update a record to change their state.
Keep the same request key through conversion, storage, and write-back. Sequential processing protects this scenario, but it does not act as a distributed lock across independent scenarios or other systems. If multiple workflows can process the same records, they must coordinate through shared duplicate-prevention logic.
Step 9: Mark the Notion Record as Generating
Add another HTTP > Make a request module.
Name it Mark Generating.
Configure:
- Method: PATCH.
- URL:
https://api.notion.com/v1/pages/{{2.page_id}} - Authorization: Your secure Notion connection.
- Notion-Version:
2025-09-03. - Content-Type:
application/json. - Body type: Raw JSON.
Use this request body:
{
  "properties": {
    "PDF Status": {
      "status": {
        "name": "Generating"
      }
    }
  }
}
This changes the PDF Status without clearing an existing PDF Link or overwriting Generated Version.
Keeping the previous successful PDF link available is important if the new generation attempt fails.
Step 10: Build the Service Summary HTML
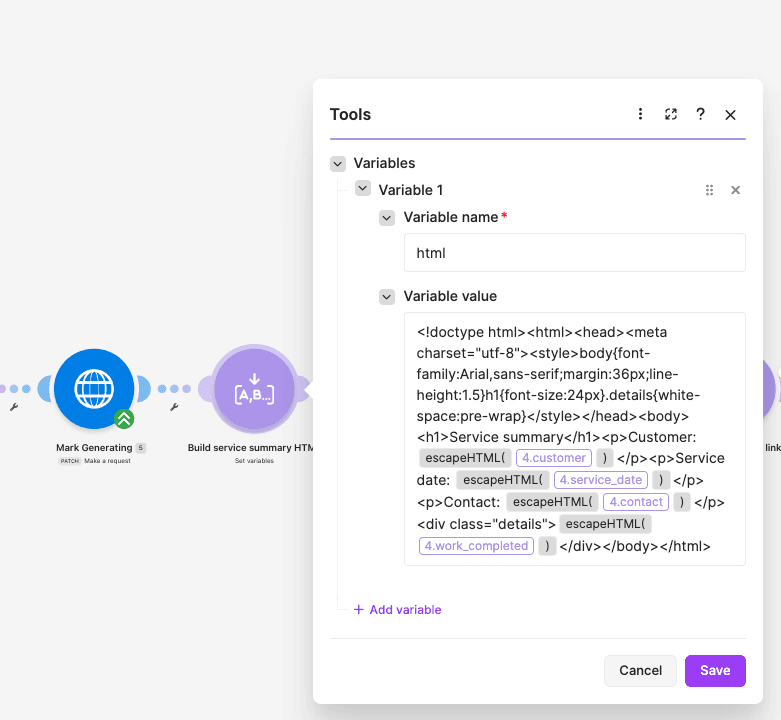
Add Tools > Set multiple variables and name the module:
Build service summary HTML
Create a variable named html.
Paste the following HTML into the value field:
<!doctype html>
<html lang="en">
<head>
  <meta charset="utf-8">

  <style>
    body {
      font-family: Arial, sans-serif;
      margin: 36px;
      line-height: 1.5;
    }

    h1 {
      font-size: 24px;
    }

    .details {
      white-space: pre-wrap;
    }
  </style>
</head>

<body>
  <h1>Service summary</h1>

  <p>
    Customer:
    {{escapeHTML(4.customer)}}
  </p>

  <p>
    Service date:
    {{escapeHTML(4.service_date)}}
  </p>

  <p>
    Contact:
    {{escapeHTML(4.contact)}}
  </p>

  <div class="details">
    {{escapeHTML(4.work_completed)}}
  </div>
</body>
</html>
Select the mapped variables from the Prepare service details module. The number 4 in this example refers to that module in the core flow; if you inserted additional modules before it, use its actual outputs.
The escapeHTML() function prevents customer-supplied characters such as <, >, quotes, and ampersands from being interpreted as HTML markup. The .details style preserves line breaks in the Work Completed text.
For example, a note such as:
Replaced the hinge.
Tested the door & confirmed <no damage>.
will be treated as document text rather than HTML code.
Save the module. Its html output will be passed directly to PDF.co.
Step 11: Generate the PDF with PDF.co
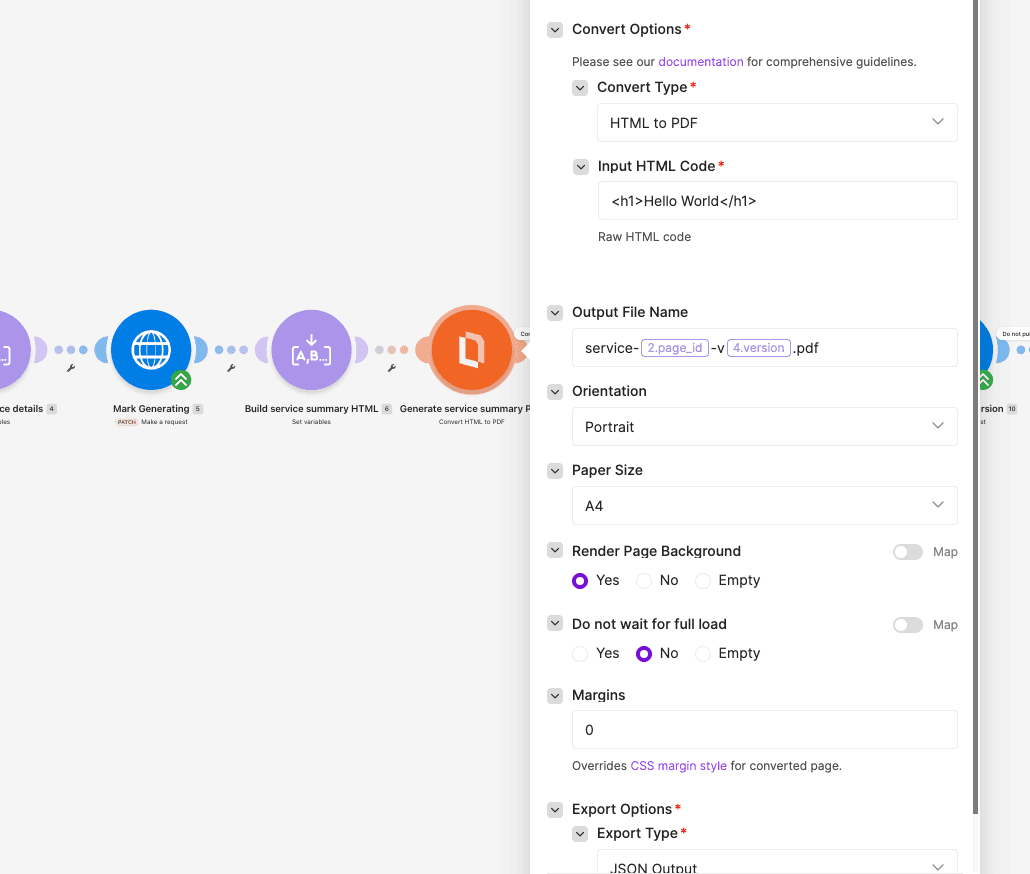
Add the native PDF.co > Convert HTML to PDF module.
Name it:
Generate service summary PDF
Create a PDF.co connection with your API key.
Configure:
- Convert Type: HTML to PDF, using raw HTML input.
- Input HTML Code: Map the
htmlvariable from Step 10. - Output File Name: Use the page ID and version, as shown below.
- Execution Mode: Synchronous.
- Export Type: JSON Output.
- Paper Size: A4.
- Orientation: Portrait.
- Margins:
0. - Render Page Background: Yes.
- Do not wait for full load: No.
- Output Links Expiration:
60.
Use this filename format:
service-{{2.page_id}}-v{{4.version}}.pdfMap the actual page ID and version variables rather than typing the placeholders literally.
In the PDF.co module, select the raw HTML conversion type before mapping the HTML. If the HTML input field is not visible, reselect the conversion type and save the module settings.
Do not select a saved HTML template mode or enter a template ID. This scenario generates its own HTML and sends it to PDF.co directly.
The expected output is one PDF containing the customer name, service date, contact email, and work summary.
Step 12: Download and Verify the PDF
Add HTTP > Get a file or the equivalent current Download a file operation.
Name it Download PDF.
Configure:
- URL: Map the PDF.co module's output
url. - Method: GET, if the operation exposes it.
- Authentication: None for the returned temporary download URL.
- Error handling: Treat failed HTTP responses as errors.
The URL must come from the completed PDF.co result, not from a job submission or a JSON result manifest.
If your PDF.co configuration returns an unfinished asynchronous job, complete the job-status checking process before downloading. This tutorial uses synchronous conversion and does not include asynchronous polling.
Add checks before the storage step to confirm:
- PDF.co reported no conversion error.
- A completed output URL exists.
- The file download returned successfully.
- The downloaded binary appears to be a PDF.
For example, the first five bytes of a typical PDF file begin with:
%PDF-You can use Make's binary functions to inspect the beginning of the downloaded data. One simple prefix check compares the first seven Base64 characters with:
JVBERi0A matching prefix is a useful initial check, not a complete PDF validation. Do not archive an empty response or a failed conversion response as if it were the completed PDF.
Step 13: Store the PDF in an Approved Location
Next, upload the downloaded PDF to your approved document storage.
For example, if your organization uses Google Drive:
- Add Google Drive > Upload a file after the HTTP download.
- Select the approved destination folder.
- Map the downloaded binary file data into the upload's Data field.
- Set the filename using the same page ID and version.
- Keep the folder's existing sharing permissions.
Use a filename such as:
service-b55c9c91-384d-452b-81db-d1ef79372b75-v1.pdfAfter the upload succeeds, retrieve the durable browser link for the stored document.
A Google Drive file link can have this structure:
https://drive.google.com/file/d/STORED_FILE_ID/viewUse the actual uploaded file ID or the authorized browser link returned by your storage provider.
Do not use the temporary PDF.co download URL as the permanent Notion PDF Link. Temporary conversion links may expire. The stored link should follow your organization's normal access controls.
Save the durable URL to the request's data-store record before attempting the final Notion update.
This makes it possible to recover from a failed Notion update without unnecessarily generating or uploading another copy.
Step 14: Map the Stored PDF Link
Add Tools > Set multiple variables and name it:
Map stored PDF link
Create a variable named:
stored_url
Map the durable link returned by the storage step.
Do not leave this value empty.
Before continuing, add a filter requiring stored_url to contain a valid, nonempty link.
This variable is the value that will be written to the original Notion record.
Step 15: Recheck the Requested Version
Before writing the final PDF link, retrieve the Notion record again.
Add HTTP > Make a request and name it:
Check current version
Configure:
- Method: GET.
- URL:
https://api.notion.com/v1/pages/{{2.page_id}} - Authorization: Your Notion connection.
- Notion-Version:
2025-09-03. - Response parsing: Enabled.
After the response, compare the current Notion Request Version with the version stored in the data-store request and service snapshot.
Continue only if they match.
For example:
- Requested version: 1
- Current Notion version: 1
- Result: Continue with the write-back.
If the user changed the record and incremented Request Version to 2 while the original PDF was being generated, the version-1 workflow should not overwrite the newer record's PDF Link or PDF Status.
For a mismatch, mark the data-store request as superseded, retain the stored artifact for review, and stop the write-back.
This check is not an atomic Notion lock. Keep service fields stable during generation, and increment Request Version whenever they change. For strict historical reproducibility, retain the immutable source snapshot associated with each version.
Step 16: Update the Original Notion Record
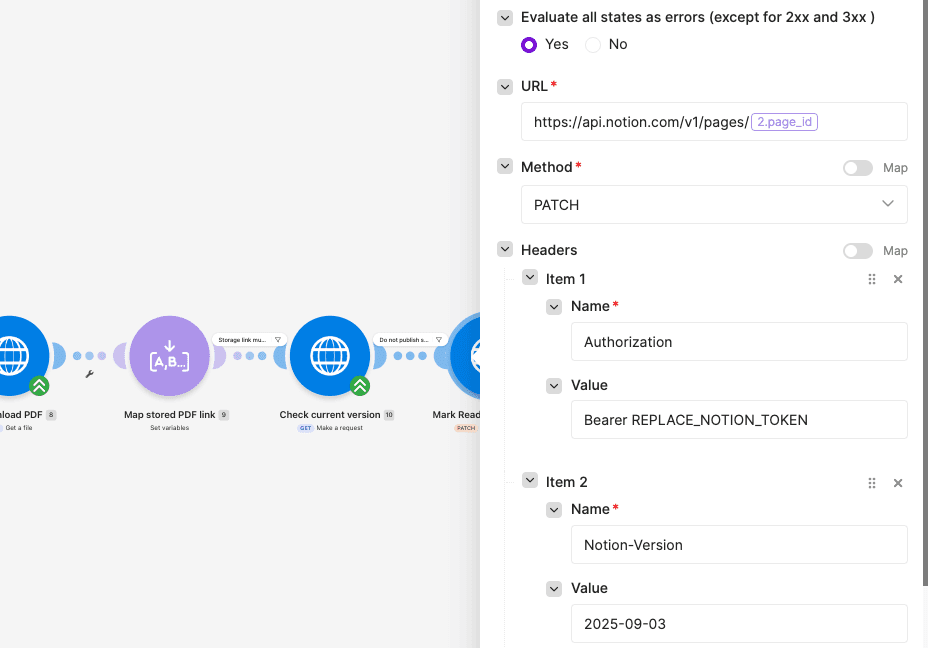
Add another HTTP > Make a request module.
Name it:
Mark Ready and save link
Configure:
- Method: PATCH.
- URL:
https://api.notion.com/v1/pages/{{2.page_id}} - Authorization: Your Notion connection.
- Notion-Version:
2025-09-03. - Content-Type:
application/json. - Body type: Raw JSON.
Map the stored URL and version into the following request body:
{
  "properties": {
    "PDF Link": {
      "url": "{{escapeJSON(9.stored_url)}}"
    },
    "Generated Version": {
      "number": {{4.version}}
    },
    "PDF Status": {
      "status": {
        "name": "Ready"
      }
    }
  }
}
The mapping references 9 and 4 represent the stored-link and service-details modules in the core flow. Use the actual module outputs in your scenario.
The URL is a JSON string and should be escaped appropriately. The version is a number and must not be enclosed in quotation marks.
This request updates the original Notion page with:
- The permanent PDF Link.
- The successfully generated version.
- A PDF Status of
Ready.
After confirming the PATCH succeeded for the intended page, update the corresponding Make data-store record to:
completed
Keep its stored_url and snapshot.
Step 17: Handle Failed Conversions and Storage Errors
Add error-handling routes to the steps that can fail after a valid request has been accepted, including Notion status updates, PDF.co conversion, file download, storage upload, and final write-back.
For a failed generation attempt, update the Make data-store record to failed and record enough context to investigate or retry.
When appropriate, update the original Notion record's PDF Status to Failed using:
{
  "properties": {
    "PDF Status": {
      "status": {
        "name": "Failed"
      }
    }
  }
}
This does not clear PDF Link or overwrite Generated Version. The previously completed document remains referenced if one exists.
Check the failure conditions carefully:
- Invalid or unauthorized page: Stop before changing the record.
- Already completed version: Skip the conversion and leave the existing link intact.
- Conversion or download failure: Mark the accepted request failed. Do not substitute a fabricated PDF URL.
- Upload failure: Do not write a temporary conversion link to Notion.
- Stored file exists, but Notion write-back fails: Preserve
stored_urland retry only the write-back after checking the record's version. - Record version changed mid-run: Treat the older request as superseded instead of overwriting the newer version.
If the attempt to set PDF Status to Failed also fails, preserve the incomplete execution for review. Do not allow an error handler to resume the successful path with missing file data.
Step 18: Test the Complete Workflow
Once all connections, validation filters, data-store routes, storage mappings, and error handlers are in place, test the scenario with two separate Notion records.
Start with one record containing ordinary text. Click the button, wait for the Make execution to complete, then inspect the resulting PDF and original Notion page.
Confirm:
- The correct Notion page was retrieved.
- The allowed data source was verified.
- The customer name, service date, contact, and complete work summary appeared in the PDF.
- The PDF was saved in the approved storage destination.
- The Notion PDF Link points to the stored document, not the temporary PDF.co URL.
- Generated Version matches the version that was processed.
- PDF Status is
Ready. - The matching Make data-store record is
completed.
Next, test the failure and duplicate-prevention cases:
- Double click: Click the button twice without incrementing Request Version. Only one successfully generated PDF should be associated with that page and version.
- New revision: Update a service field, increment Request Version, and generate a new PDF. The new revision should use the new version number.
- Special characters: Include quotation marks, ampersands, angle brackets, and multiline work notes. Confirm they appear as ordinary document text.
- Conversion failure: Test a failure path and confirm the previous successful PDF link remains intact.
- Upload failure: Confirm that a failed upload does not produce a Ready status.
- Write-back failure: Allow storage to succeed, then test the recovery path without blindly generating another PDF.
- Unauthorized record: Request a page outside the approved data source and confirm no protected record is changed.
- Changed version: Update Request Version while a PDF is being generated and confirm the older request does not overwrite the newer state.
Test that the stored document is accessible to its intended readers under the destination's normal permissions.
Only activate the scenario for routine use after these checks pass.
With Notion, Make, and PDF.co, you can generate service-summary PDFs without manually copying customer and service details into a separate document.
A Notion button starts the process, Make retrieves and validates the current service record, and PDF.co converts the prepared HTML into a PDF. The completed file is stored under your normal access controls, and its permanent link is written back to the original Notion record.
By combining version checks, duplicate prevention, and recovery handling, the workflow also helps reduce accidental duplicate documents and prevents unfinished conversions from being marked as successful.
For more document automation examples, explore the PDF.co Make integration documentation and PDF.co tutorials.
Related Tutorials