Fill Multiple Rows in a PDF from a CSV File with Make and PDF.co
Many businesses use standardized PDF forms to record orders, inventory, supply requests, and other structured information. When those forms contain multiple rows, manually copying information from a spreadsheet or CSV file can be time-consuming and prone to errors.
With Make and PDF.co, you can automatically place data from multiple CSV rows into one existing PDF form.
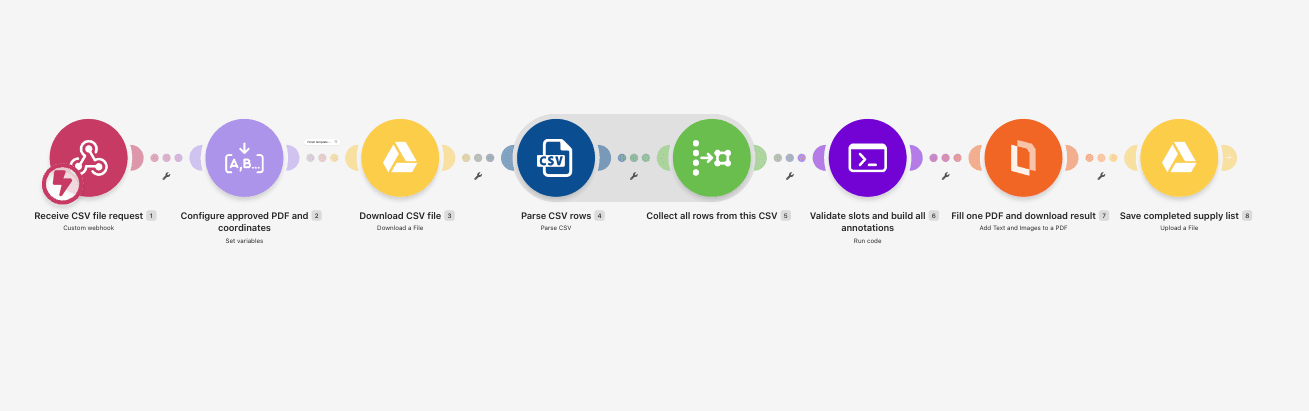
In this tutorial, you'll build a Make scenario that downloads a CSV file from Google Drive, reads its rows, validates the data, and places the values into predetermined positions on a PDF using PDF.co. The completed document is then saved to an approved Google Drive folder.
The workflow processes all CSV rows before editing the PDF, producing one completed document for the entire CSV, rather than a separate PDF for each row.
Prerequisites
Before starting, you'll need:
- A Make account with access to Make Code.
- A PDF.co account with an API key and available credits.
- A Google Drive account containing your CSV files.
- An existing PDF form with space for multiple rows of information.
- A Google Drive folder where completed PDFs can be archived.
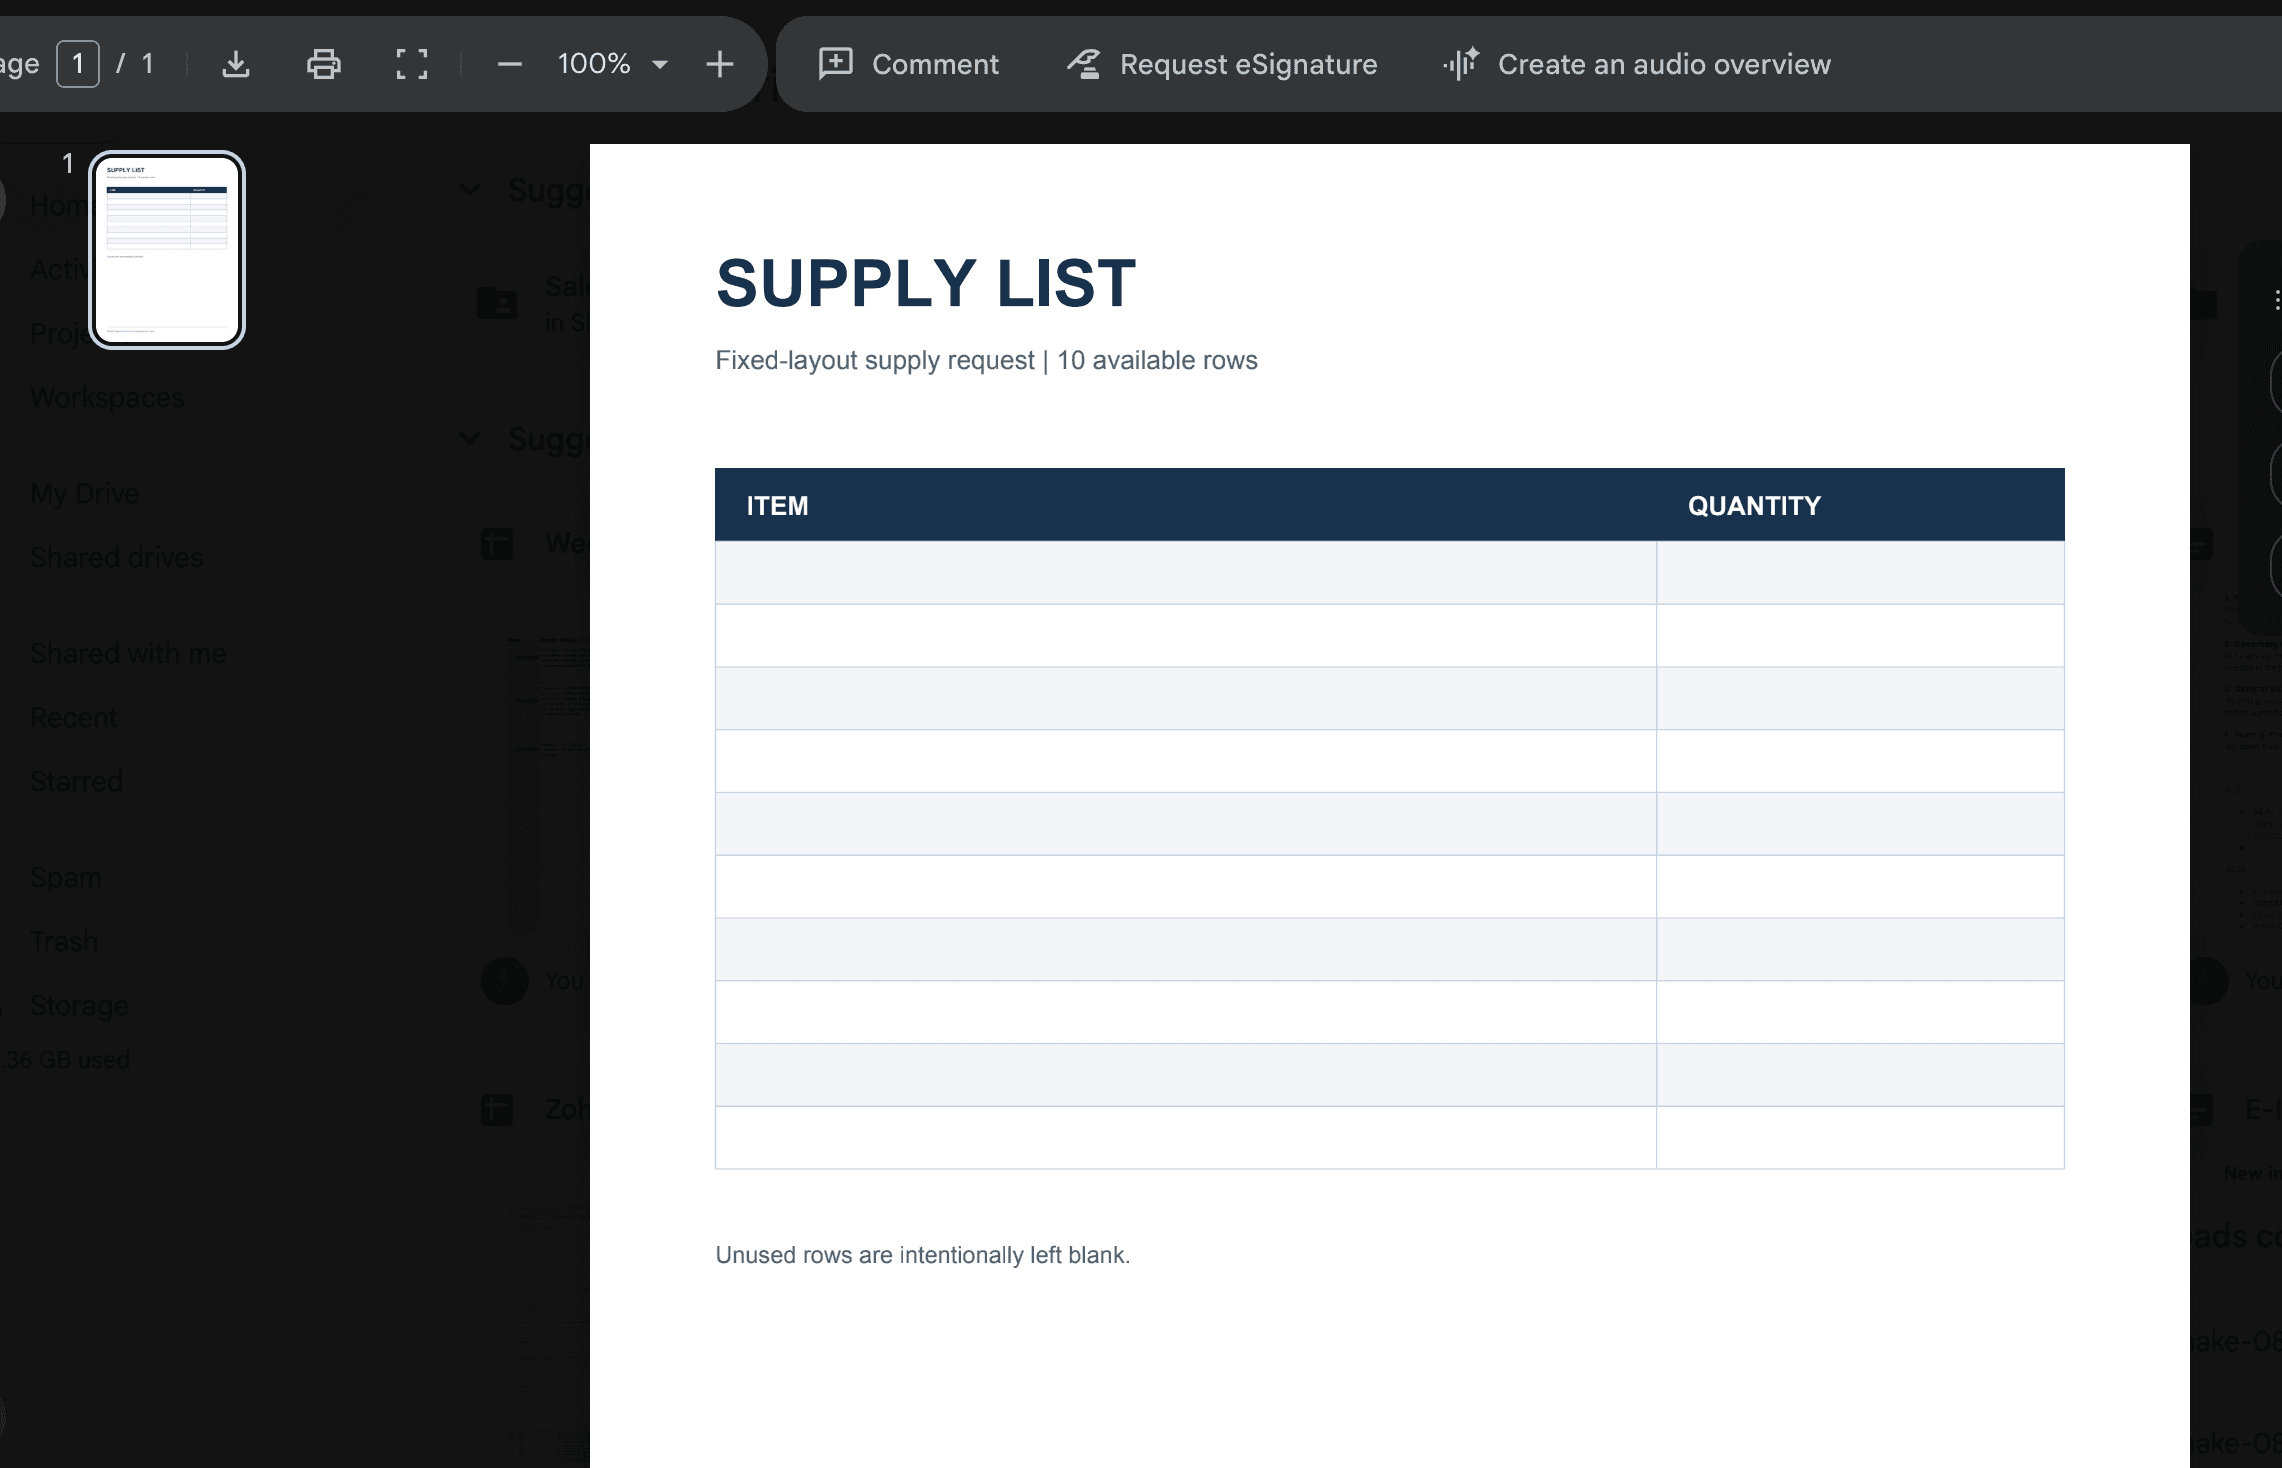
This example uses a supply-list form with two columns: Item and Quantity.
The PDF has space for up to 10 rows, and each CSV record specifies which row to populate.
You'll use PDF.co's Add Text and Images to a PDF module to place text onto the existing PDF. You do not need to create interactive PDF form fields or modify the original document structure.
IN THIS TUTORIAL
Step 1: Prepare Your PDF Template
Start with the PDF document you want to populate.
For example, your supply-list PDF might contain a heading followed by 10 empty rows, with columns for Item and Quantity.
Each row must have enough room for the information you plan to insert.
The workflow will place text at specific X and Y coordinates, so the PDF layout must remain consistent.
Identify the Text Positions
Determine the coordinates for the first row and the spacing between subsequent rows.
For this example, use:
- Item X position:
60 - Quantity X position:
420 - First row Y position:
160 - Vertical spacing between rows:
24 - Font size:
10 - PDF page:
0 - Maximum number of rows:
10
PDF.co uses zero-based page numbering, so page 0 represents the first page.
These coordinates are examples. They must be measured and adjusted for your actual PDF template before using the workflow.
The Y coordinate for each row is calculated as:
Y = first_y + ((slot - 1) * spacing)For example:
- Row 1: Y = 160
- Row 2: Y = 184
- Row 3: Y = 208
- Row 4: Y = 232
- Row 5: Y = 256
- Row 10: Y = 376
The Item and Quantity values share the same Y coordinate but use different X positions.
This approach works best with fixed-layout PDFs. It does not automatically resize columns, wrap long descriptions, or create additional rows or pages.
Make the PDF Available to PDF.co
The PDF.co module will need a retrievable URL for the blank PDF.
If your template is already available through an approved HTTPS URL that PDF.co can access, you can use it directly.
For a private template, download it through an authorized connection and use PDF.co > Upload a File to place it in PDF.co's temporary storage. Then use the returned temporary URL in the editing module.
Do not make confidential templates publicly accessible simply to enable the conversion.
Step 2: Prepare the CSV File
Create a CSV file containing the information that will be inserted into the PDF.
This example uses exactly three columns, in this order:
slot: The row number in the PDF.item: The description to insert in the Item column.quantity: The quantity to insert in the Quantity column.
Use the following sample:
slot,item,quantity
1,Blue folders,4
2,Storage boxes,2
3,Packing tape,3
Save the file as:
sample-supply-list.csv
Upload it to Google Drive.
How the Slot Column Works
The slot value determines where each CSV record appears in the PDF.
For example:
slot,item,quantity
3,Packing tape,3
1,Blue folders,4
2,Storage boxes,2
Although the records are listed in a different order, they will still be placed in PDF rows 1, 2, and 3.
The workflow sorts the rows by slot number before generating the PDF text annotations.
For this example, each slot must be a unique integer between 1 and 10.
CSV Formatting Rules
Keep the column headers and their order consistent.
If an item description contains a comma, enclose it in double quotation marks:
slot,item,quantity
1,"Folders, blue",4
2,Storage boxes,2
The CSV parser can handle properly quoted values.
The example workflow also enforces these rules:
- Item descriptions must contain between 1 and 40 characters.
- Item descriptions cannot contain tabs or line breaks.
- Quantity values must contain 1 to 5 digits.
- Slot numbers cannot be duplicated.
- Slot numbers cannot exceed the PDF's configured capacity.
- The CSV must contain at least one valid data row.
These restrictions help prevent invalid data from being inserted into fixed PDF positions.
A 40-character description may still be too wide for some PDF templates, particularly when using wide characters. Always verify the rendered result.
Step 3: Create a Make Scenario
Sign in to Make and create a new scenario.
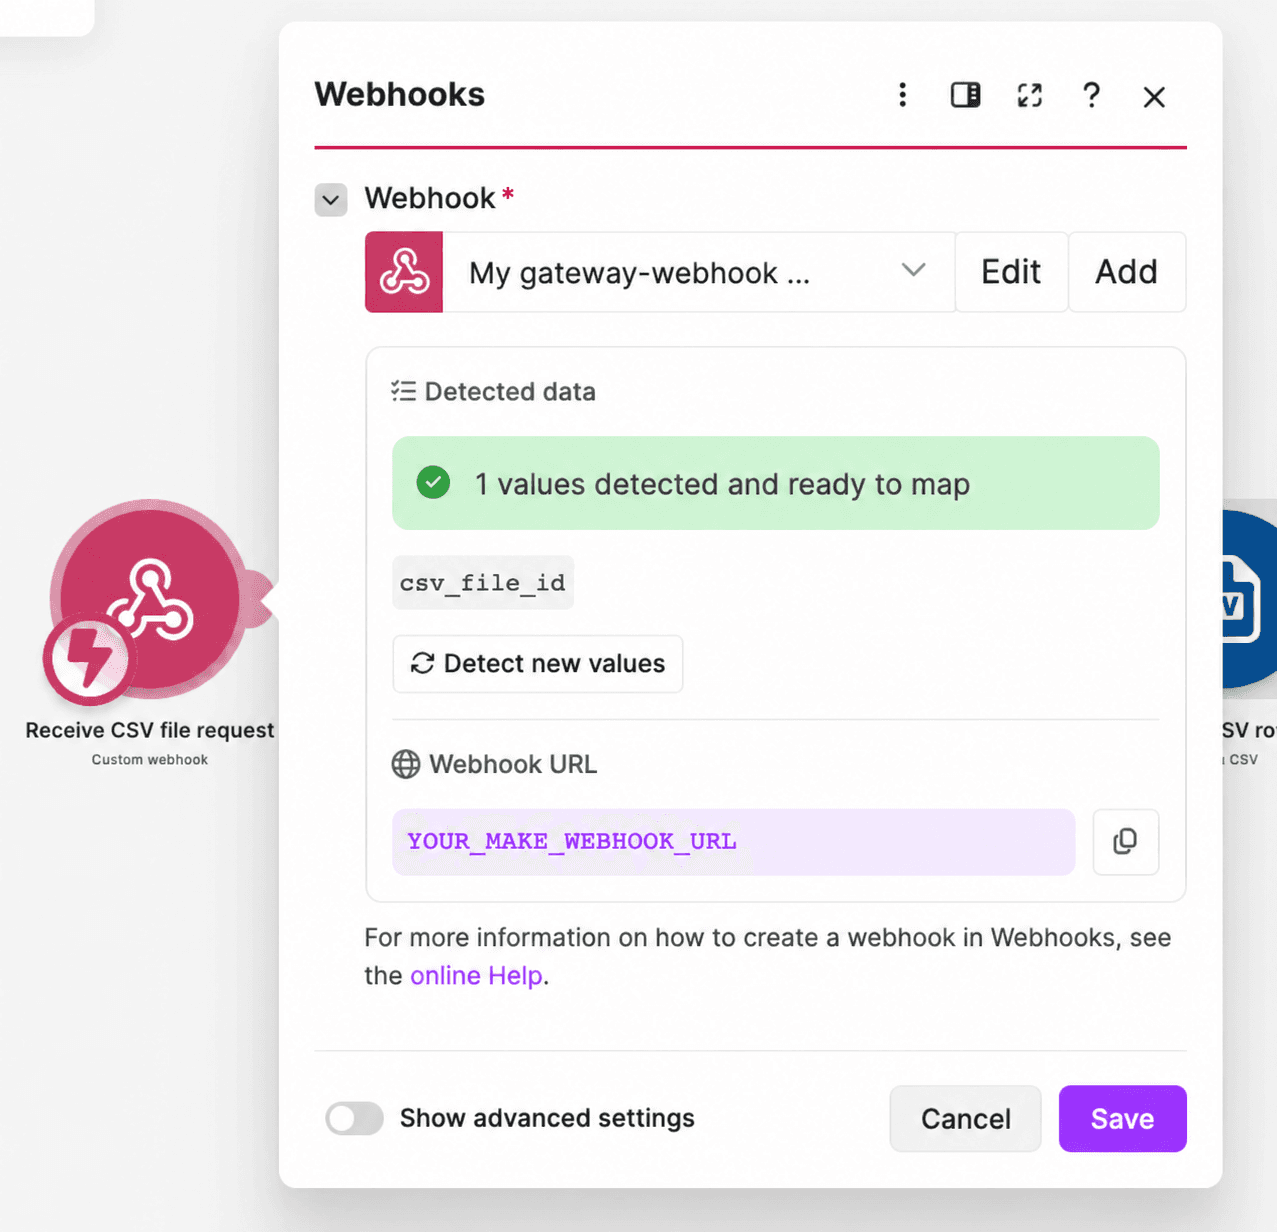
Add Webhooks > Custom webhook as the first module.
Name it:
Receive CSV file request
Create a webhook named:
Supply List PDF Request
Save the webhook and copy its URL.
The scenario will receive the Google Drive file ID of the CSV document to process.
For example:
{
  "csv_file_id": "YOUR_APPROVED_DRIVE_FILE_ID"
}
Replace the placeholder with the ID of an actual CSV file in your approved Google Drive location.
Click Run once and send the JSON request to the webhook using an HTTP POST request.
You can send the request with an API client or a terminal command:
curl --request POST 'YOUR_MAKE_WEBHOOK_URL' \
  --header 'Content-Type: application/json' \
  --data '{"csv_file_id":"YOUR_APPROVED_DRIVE_FILE_ID"}'
Replace both placeholders with your actual values.
Confirm that Make receives the csv_file_id field.
Important: A file ID supplied by a webhook does not prove that the requester is authorized to process that file. Restrict the webhook to trusted callers and verify that requested files belong to an approved source or folder before downloading them.
Step 4: Configure the PDF Template and Coordinates
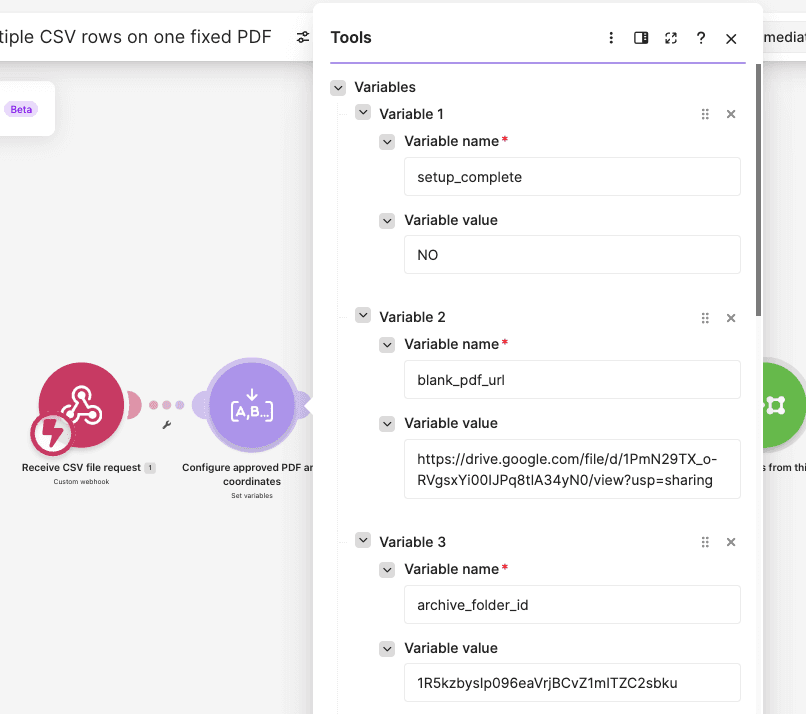
Add Tools > Set multiple variables.
Name the module:
Configure approved PDF and coordinates
Set the variable lifetime to One cycle.
Create these variables:
setup_complete:NOblank_pdf_url: The approved retrievable URL of your blank PDF.archive_folder_id: The Google Drive folder ID for completed documents.capacity:10item_x:60quantity_x:420first_y:160spacing:24
The blank_pdf_url is a fixed configuration value for the scenario.
It should not be taken directly from an arbitrary webhook request.
Likewise, archive_folder_id should point to the destination approved for the generated files.
Configure the Page Layout
Adjust the coordinate variables to match your PDF.
For example, if your Item column begins farther to the right, change item_x.
If the Quantity column begins closer to the center, change quantity_x.
If the PDF uses taller rows, increase spacing.
Keep quantity_x greater than item_x and use positive vertical spacing.
The workflow supports a maximum capacity of 10 rows in this example. Increasing that limit requires reviewing the PDF layout and the validation code.
Enable Processing After Setup
After the PDF URL, Google Drive connections, archive destination, and coordinates have been configured and tested, change:
setup_complete = YESAdd a filter before the CSV download module:
- Filter name: Finish template setup before running.
- Field:
setup_complete. - Condition: Text equals.
- Value:
YES.
This prevents the scenario from continuing while the PDF template configuration is incomplete.
Step 5: Download the CSV from Google Drive
Add Google Drive > Download a File.
Name it:
Download CSV file
Connect your Google Drive account.
Configure:
- File: Map
csv_file_idfrom the webhook. - File selection: Map the supplied ID rather than selecting one fixed file.
The module retrieves the CSV as binary data.
Verify that the requested file is an actual CSV in an approved location.
If the source is a native Google Sheet, export it as CSV using the appropriate Google Drive or Google Sheets operation before proceeding. Downloading a spreadsheet in Excel format does not produce CSV data.
The next module will parse the downloaded file contents.
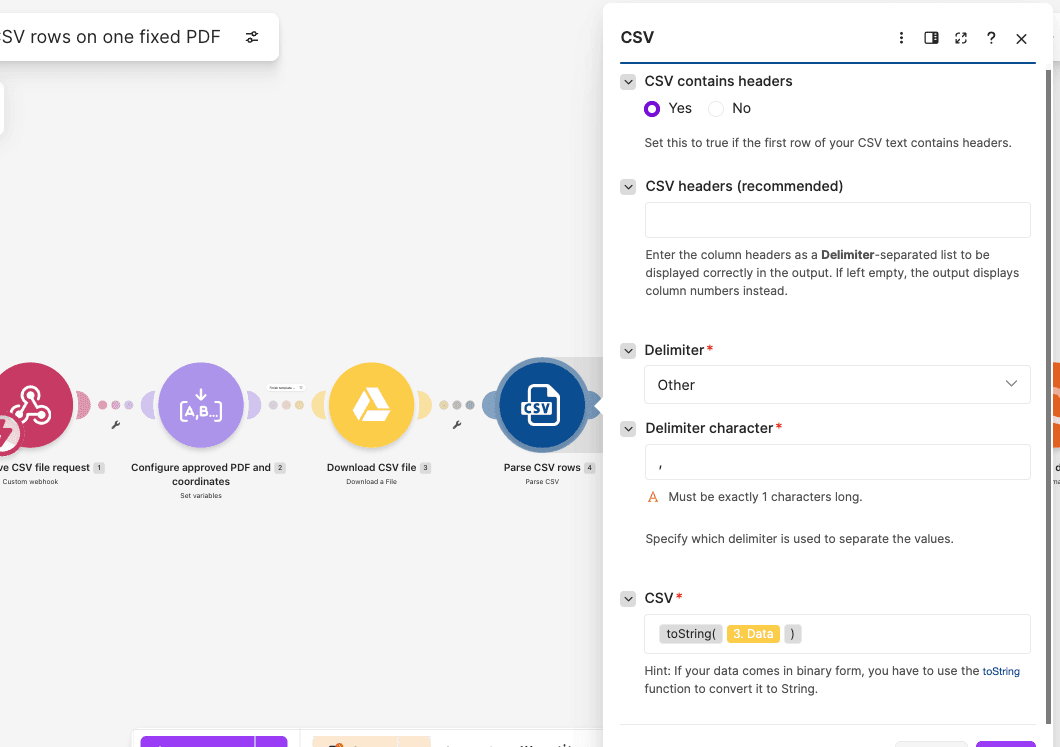
Step 6: Parse the CSV Rows
Add CSV > Parse CSV.
Name it:
Parse CSV rows
Configure:
- CSV: Map the downloaded Google Drive file data, converted to text.
- CSV contains headers: Yes.
- Number of columns:
3. - Delimiter: Comma.
- CSV parsing: Keep strict quoting enabled.
In Make, the CSV input can use:
{{toString(3.data)}}Here, 3.data refers to the binary Data output of the Google Drive download module. If you added other modules, choose the equivalent data output from your download step.
The parser reads the first row as headers and then emits one bundle for each CSV data row.
For the sample CSV, it should produce three bundles.
Each parsed bundle contains:
- Slot.
- Item.
- Quantity.
Depending on how Make presents the parsed CSV fields, the output may expose column positions or named fields.
In the next step, map the actual outputs corresponding to the first, second, and third CSV columns.
The example assumes:
col1: Slot.col2: Item.col3: Quantity.
The numeric column mapping does not independently verify header names. Validate that the uploaded file follows the required column order before accepting it.
Step 7: Collect All CSV Rows
The PDF must be edited once using the complete set of CSV records.
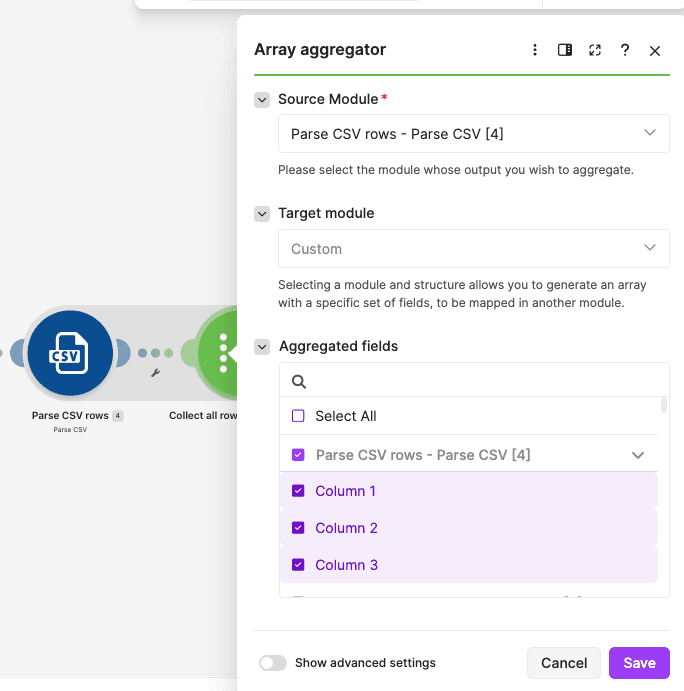
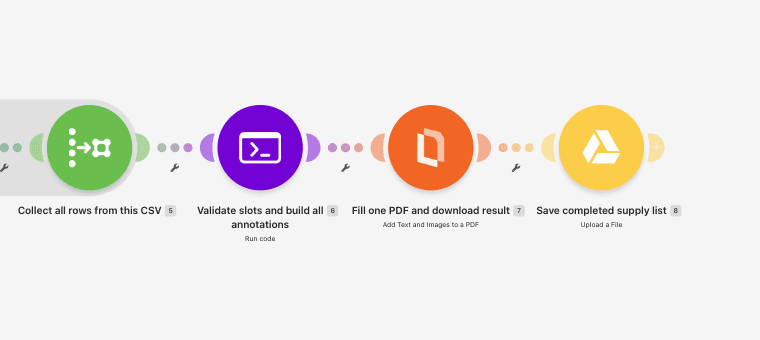
Add Tools > Array aggregator.
Name it:
Collect all rows from this CSV
Configure:
- Source module: Parse CSV.
- Target structure: Custom.
Add these fields:
slot: Map the first parsed CSV column.item: Map the second parsed CSV column.quantity: Map the third parsed CSV column.
For the sample file, the aggregated array should contain:
[
  {
    "slot": "1",
    "item": "Blue folders",
    "quantity": "4"
  },
  {
    "slot": "2",
    "item": "Storage boxes",
    "quantity": "2"
  },
  {
    "slot": "3",
    "item": "Packing tape",
    "quantity": "3"
  }
]
The values may arrive as strings, which the next Code module will validate.
Why Use an Array Aggregator?
Without aggregation, the following PDF.co operation could run separately for each parsed CSV record.
That would create multiple PDFs containing individual rows.
By using the CSV parser as the Array aggregator's source, Make collects all parsed rows into one array.
The next module creates all the required text annotations from that array.
PDF.co will then add every value to the blank PDF in a single editing operation.
Step 8: Validate Rows and Build the PDF Annotations
Add Make Code > Run code.
Name it:
Validate slots and build all annotations
Configure:
- Language: JavaScript.
- Input format: Code editor.
- Additional dependencies: Leave empty.
Create these input variables:
rows: Map the Array aggregator's output array.capacity: Mapcapacityfrom the configuration module.item_x: Mapitem_x.quantity_x: Mapquantity_x.first_y: Mapfirst_y.spacing: Mapspacing.
Paste this complete JavaScript:
const rows=typeof input.rows==='string'?JSON.parse(input.rows):input.rows;
const capacity=Number(input.capacity), firstY=Number(input.first_y), spacing=Number(input.spacing), itemX=Number(input.item_x), quantityX=Number(input.quantity_x);
if(!Number.isInteger(capacity)||capacity<1||capacity>10)throw new Error('Capacity must be an integer from 1 to 10 for this template');
if(![firstY,spacing,itemX,quantityX].every(Number.isFinite)||firstY<0||spacing<=0||itemX<0||quantityX<=itemX)throw new Error('Invalid measured coordinates');
if(!Array.isArray(rows)||rows.length<1||rows.length>capacity)throw new Error('CSV must contain 1 to '+capacity+' rows; no partial output');
const seen=new Set();const clean=rows.map(r=>{
 const raw=String(r.slot??'').trim(), slot=Number(raw), item=String(r.item??''), quantity=String(r.quantity??'').trim();
 if(!/^[1-9][0-9]*$/.test(raw)||!Number.isInteger(slot)||slot>capacity||seen.has(slot))throw new Error('Duplicate or out-of-range slot: '+raw);
 if(!item.trim()||item.length>40||/[\r\n\t]/.test(item))throw new Error('Slot '+slot+': item must be 1–40 characters on one line; review longer text');
 if(!/^[0-9]{1,5}$/.test(quantity))throw new Error('Slot '+slot+': quantity must be 1–5 digits');
 seen.add(slot);return {slot,item,quantity};
}).sort((a,b)=>a.slot-b.slot);
const annotations=clean.flatMap(r=>{const y=firstY+(r.slot-1)*spacing;return [{text:r.item,x:itemX,y,size:10,pages:'0'},{text:r.quantity,x:quantityX,y,size:10,pages:'0'}];});
return {annotations,row_count:clean.length,annotation_count:annotations.length};
This code validates the CSV rows before any PDF editing takes place.
Validate the Row Capacity
The PDF template has a fixed number of available rows.
The script requires the configured capacity to be an integer between 1 and 10.
It also checks that the number of CSV records does not exceed the available capacity.
For example:
- 1 row: Accepted.
- 3 rows: Accepted.
- 10 rows: Accepted.
- 11 rows: Rejected.
This prevents an additional CSV record from being placed outside the intended form area.
Validate Each Slot
Every slot must be:
- A positive integer.
- Within the configured capacity.
- Unique across the CSV.
For example, this CSV is invalid because slot 2 appears twice:
slot,item,quantity
1,Blue folders,4
2,Storage boxes,2
2,Packing tape,3
The scenario stops rather than overwriting or combining those values.
Validate Item Descriptions
Each item description must:
- Contain non-whitespace text.
- Be no longer than 40 characters.
- Fit on one line without tabs or line breaks.
Descriptions that exceed those rules cause validation to fail.
This helps reduce layout problems, but it does not guarantee that every accepted description will fit within your PDF's measured column width.
Validate Quantities
Quantity values must contain 1 to 5 digits.
Examples of accepted quantities include:
1
12
250
10000
Examples of rejected values include:
1.5
12 boxes
100000
These rules are intentionally simple for a fixed supply-list form.
If your PDF supports decimal quantities, units of measure, or longer values, update the validation rules and test the layout accordingly.
Step 9: Understand the Generated Text Annotations
The Code module returns an array named:
annotations
Each CSV row produces two text annotations:
- One for the Item value.
- One for the Quantity value.
For example, slot 1 produces:
[
  {
    "text": "Blue folders",
    "x": 60,
    "y": 160,
    "size": 10,
    "pages": "0"
  },
  {
    "text": "4",
    "x": 420,
    "y": 160,
    "size": 10,
    "pages": "0"
  }
]
Slot 2 uses a Y coordinate of 184, and slot 3 uses 208.
For the three-row sample CSV, the full annotations array is:
[
  {
    "text": "Blue folders",
    "x": 60,
    "y": 160,
    "size": 10,
    "pages": "0"
  },
  {
    "text": "4",
    "x": 420,
    "y": 160,
    "size": 10,
    "pages": "0"
  },
  {
    "text": "Storage boxes",
    "x": 60,
    "y": 184,
    "size": 10,
    "pages": "0"
  },
  {
    "text": "2",
    "x": 420,
    "y": 184,
    "size": 10,
    "pages": "0"
  },
  {
    "text": "Packing tape",
    "x": 60,
    "y": 208,
    "size": 10,
    "pages": "0"
  },
  {
    "text": "3",
    "x": 420,
    "y": 208,
    "size": 10,
    "pages": "0"
  }
]
The array is built automatically by the JavaScript.
You do not need to enter each annotation manually.
The Code module also returns:
row_count: Number of validated CSV rows.annotation_count: Number of generated text annotations.
Because each row contains two values, the annotation count should always equal twice the row count.
For the sample file:
- Row count: 3
- Annotation count: 6
The annotations are structured objects. You do not need to build a raw JSON string containing the CSV values or manually escape commas and quotation marks for the editing module.
Step 10: Fill the PDF with PDF.co
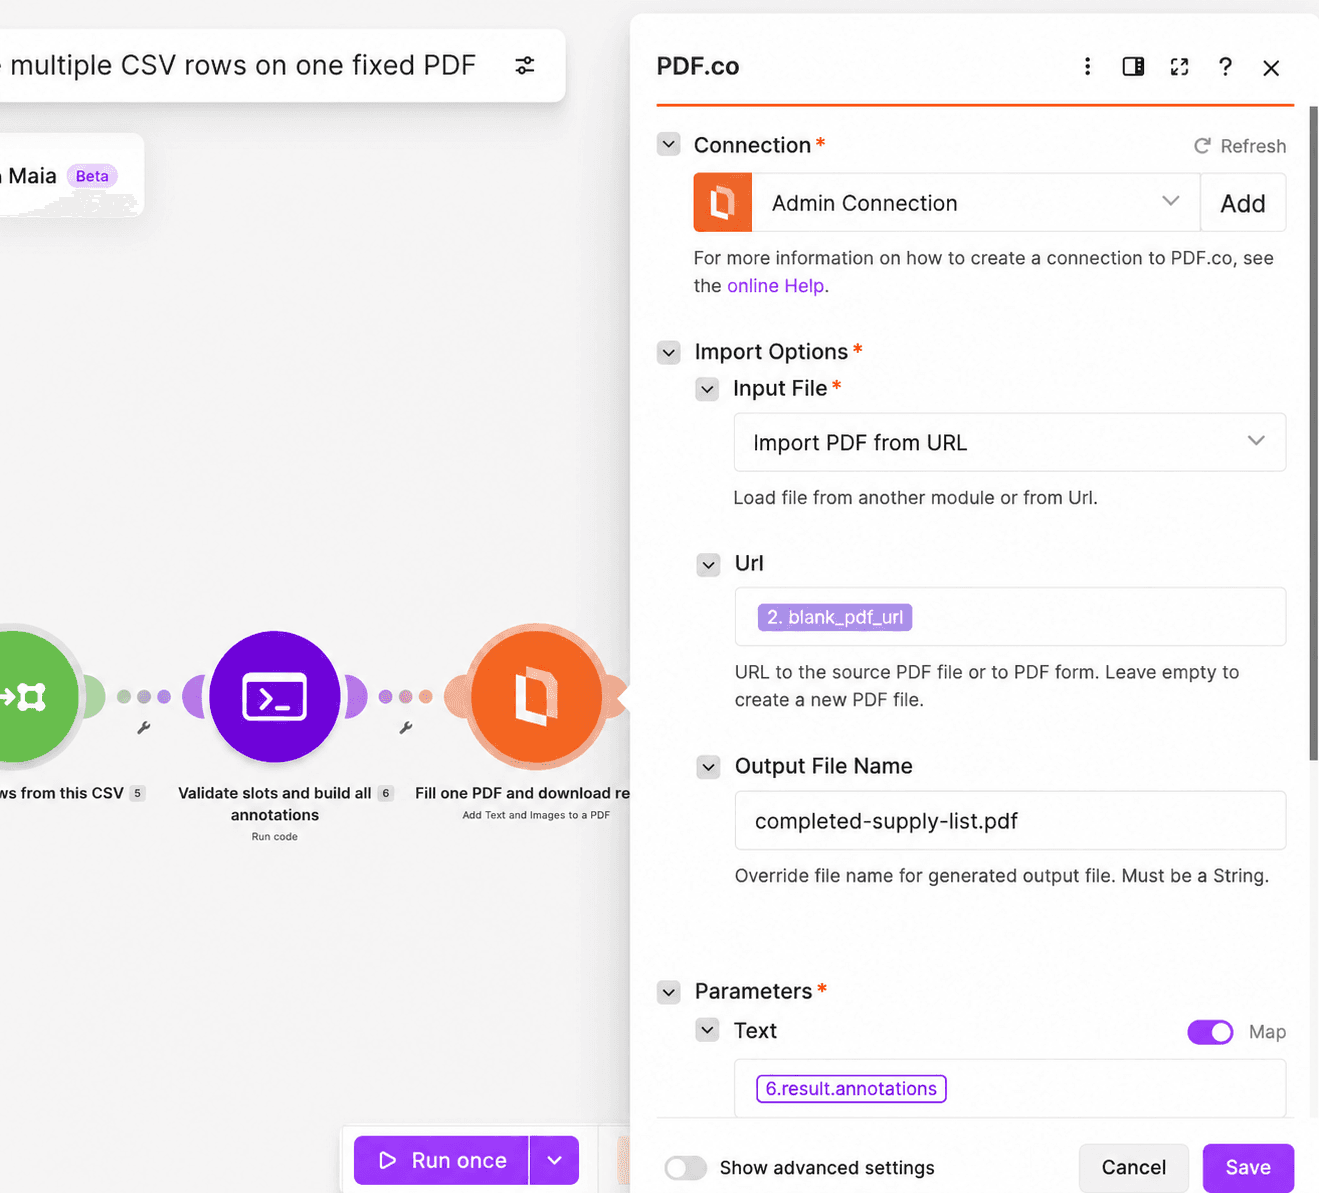
Add PDF.co > Add Text and Images to a PDF.
Name it:
Fill one PDF and download result
Create or select your PDF.co connection.
Configure:
- Input File: URL.
- URL: Map
blank_pdf_urlfrom the configuration module. - Output File Name:
completed-supply-list.pdf - Execution Mode: Sync.
- Export Type: Download a File.
- Output Links Expiration:
60
Map the Text Annotations
Find the module's Text or annotations collection.
Enable mapping for the entire collection.
Map:
annotations
from the previous Make Code module.
The underlying annotation objects contain:
text: The value to place.x: Horizontal position.y: Vertical position.size: Font size.pages: PDF page index.
In this example, every annotation uses page 0.
Important: Map the complete annotation array, not just one annotation or one row.
The PDF editing module should run once after the Array aggregator and Code module have processed all CSV records.
Do not place the PDF.co editing module directly after the CSV parser if your goal is one completed document containing all rows.
Generate the Completed PDF
When the scenario runs, PDF.co retrieves the blank PDF and adds the text annotations at the specified coordinates.
The original layout remains in place.
The completed document is returned using Download a File, so the module provides binary PDF data for the next step.
The output file is named:
completed-supply-list.pdfYou do not need an additional HTTP download module when the native PDF.co operation already returns the completed binary file.
For more information about PDF editing, see the PDF.co Add Text and Images API.
Step 11: Archive the Completed PDF in Google Drive
Add Google Drive > Upload a File.
Name it:
Save completed supply list
Connect the Google Drive account with access to your approved archive folder.
Configure:
- New Drive Location: My Drive.
- New Folder Location: Map
archive_folder_idfrom the configuration module. - New File Name:
completed-supply-list.pdf - File Name:
completed-supply-list.pdf - Data: Map the binary
dataoutput from PDF.co. - Convert a File: No.
This saves the completed PDF without converting it to a Google document.
After the upload succeeds, confirm that Google Drive returned a file ID.
The archived file should contain all validated rows from the CSV in their assigned positions.
If you want each generated PDF to have a unique filename, include a trusted request identifier, source-file version, or date in the filename.
The example uses the same output filename for every execution. Repeated requests may therefore create additional archived copies.
Step 12: Configure Error Handling
A fixed-layout document should not be generated from an incomplete or invalid CSV.
Configure error handling for file retrieval, CSV parsing, row validation, PDF editing, and Google Drive upload.
Invalid CSV Data
If the validation Code module rejects a row:
- Stop PDF generation.
- Preserve the source CSV file ID.
- Record the validation error.
- Route the request for correction or review.
Do not ignore the invalid record and continue with a partial form.
Empty CSV Files
A CSV containing only headers may produce no data bundles from the CSV parser.
In that case, the Array aggregator or validation Code module may not execute.
For workflows that need explicit empty-file reporting, add a separate intake check before parsing or a no-data review route.
Do not treat an execution with no generated PDF as a successful report.
Invalid PDF Coordinates
If the configured coordinates are invalid, the validation script stops processing.
If the coordinates are valid numbers but do not match the actual PDF layout, the document may still be generated with misplaced text.
For this reason, coordinate configuration requires a visual test using the actual blank PDF.
PDF.co Editing Failure
If the PDF cannot be retrieved or edited:
- Stop the workflow before archiving.
- Verify the template URL is accessible to PDF.co.
- Check the annotation-array mapping.
- Review the conversion error.
Do not replace a failed PDF with an empty or partially completed file.
Google Drive Upload Failure
If PDF editing succeeds but the archive upload fails:
- Keep the execution available for recovery.
- Verify the destination folder ID and permissions.
- Retry the upload using the completed PDF data where it remains available.
Avoid unnecessary regeneration when the successfully edited PDF can be reused.
Step 13: Test the Workflow
Before enabling the scenario for routine use, test it with the actual PDF template and sample CSV.
Start with:
slot,item,quantity
1,Blue folders,4
2,Storage boxes,2
3,Packing tape,3
Run the scenario and confirm:
- The webhook receives the correct Google Drive CSV file ID.
- Google Drive downloads the intended CSV.
- The CSV parser produces three data bundles.
- The Array aggregator produces one array containing three rows.
- The Code module validates all rows.
row_countequals3.annotation_countequals6.- PDF.co edits the blank template once.
- Google Drive archives one completed PDF for the request.
Open the saved PDF and check the placement of every value.
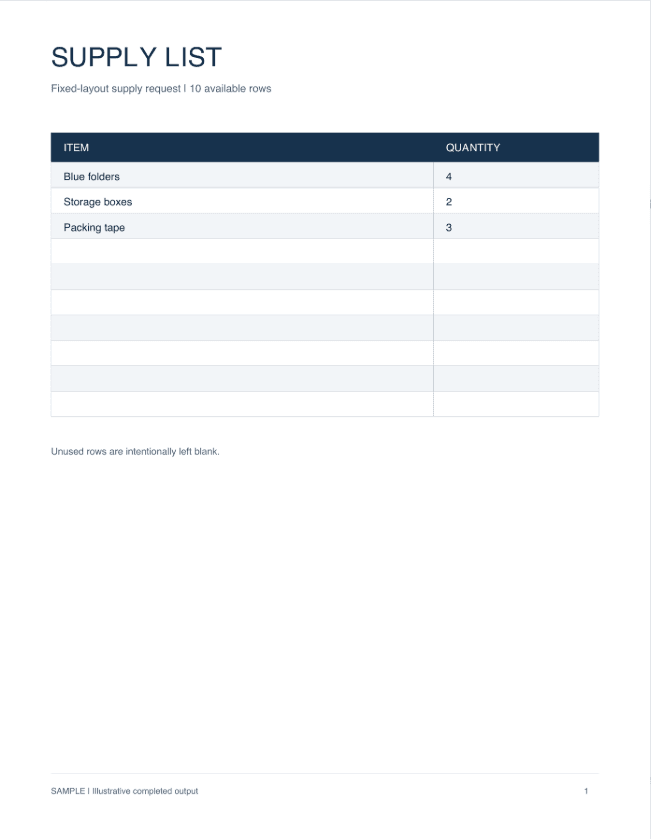
The expected result is:
- Row 1: Blue folders — 4
- Row 2: Storage boxes — 2
- Row 3: Packing tape — 3
All values should appear in the correct cells of the original template.
Test a Single Row
Create a CSV containing one valid record.
Confirm that the scenario produces one PDF with two annotations.
The remaining form rows should stay empty.
Test the Maximum Capacity
Create a CSV with 10 unique slots.
Confirm that all 10 rows are populated and that the last row fits within the intended form area.
The last row uses:
Y = 160 + ((10 - 1) × 24)
Y = 376
Verify the result visually, rather than assuming that the coordinate calculation guarantees alignment.
Test More Rows Than the PDF Supports
Create a CSV with 11 rows.
The validation module should stop with a capacity error.
No partial PDF should be generated.
Test Duplicate Slots
Use two records with the same slot number.
The scenario should reject the CSV before editing the document.
Test Out-of-Range Slots
Try slot values such as 0, 11, or 2.5.
The validation module should reject them.
Test Long Item Descriptions
Enter an item description exceeding 40 characters.
The scenario should stop with a validation error.
Also test descriptions near the permitted limit to ensure they fit inside the PDF column.
Test Quoted CSV Values
Use an item description containing a comma:
slot,item,quantity
1,"Folders, blue",4
Confirm that the CSV parser treats the quoted description as one value and that PDF.co inserts it correctly.
Test a Header-Only File
Use a CSV containing only:
slot,item,quantityVerify that the workflow does not generate a completed PDF.
If your automation needs a visible failure notification for empty input, confirm that the intake/no-data route reports it.
Check the Printed Layout
After testing the values, open the completed PDF at normal viewing size and inspect the printable layout.
Check that:
- Each Item value appears in the correct row.
- Quantities align with their corresponding items.
- Text does not overlap neighboring cells.
- Long descriptions do not cross column boundaries.
- The correct original PDF page was edited.
- Unused rows remain blank.
- The document remains readable when printed.
A successful PDF editing operation does not guarantee that every value fits the physical layout. Visual inspection is required when configuring a fixed template.
Troubleshooting
- The webhook does not receive the CSV ID: Check the request JSON and confirm the file ID is mapped from the correct field.
- Google Drive cannot download the file: Verify the file ID, connection permissions, and approved source folder.
- The CSV parser returns unexpected columns: Confirm the header setting, comma delimiter, and three-column order. Inspect the actual output tokens before mapping them.
- A quoted item is split into multiple columns: Ensure the CSV uses proper double-quote escaping and strict parsing.
- The Array aggregator produces multiple documents: Check that the PDF.co editing module is after aggregation and runs once for the complete array.
- Rows appear in the wrong positions: Confirm the slot values and measured PDF coordinates.
- A row is missing: Review the validation error and ensure that invalid rows are not ignored by an error handler.
- PDF.co adds text to the wrong page: Confirm that the annotation page is
0for the first page. - Only one value appears in the PDF: Verify that the PDF.co Text collection is in Map mode and receives the complete
annotationsarray. - Text overlaps the form: Adjust X positions, first-row Y position, vertical spacing, or font size based on the actual PDF.
- The PDF.co module cannot retrieve the template: Confirm that the input URL is currently accessible to PDF.co, or upload a private template through an authorized connection.
- Google Drive saves an incorrect file: Confirm that its Data field receives the completed PDF.co binary output and that file conversion is disabled.
- Repeated requests create duplicate files: Add persistent request tracking using the source CSV file ID and a version or content identifier.
With Make and PDF.co, you can automatically fill multiple rows in an existing PDF from a CSV file.
The workflow downloads the CSV from Google Drive, parses and validates the records, calculates the text positions, and adds all values to the PDF in one editing operation. The finished document is then saved back to Google Drive.
Because the scenario validates row numbers, quantities, descriptions, and template capacity before generating the PDF, it helps prevent missing or misplaced data from being silently accepted.
You can adapt the same approach to other fixed-layout documents, including inventory sheets, supply requests, inspection forms, and internal order forms.
For more information, explore the PDF.co Make integration documentation and the PDF.co PDF editing API.
Related Tutorials