Create a QR Code Production Traveler PDF with Google Sheets, Make, and PDF.co
Production travelers help manufacturing teams track jobs as they move through different stages of production. They typically include the job number, product details, quantity, required operations, and space for operators to record their work.
Adding a QR code makes a production traveler even more useful. Instead of manually searching for a job, an operator can scan the code to open its corresponding tracking record.
With Make and PDF.co, you can automatically generate production traveler PDFs from Google Sheets, including a scannable QR code and an ordered list of manufacturing operations.
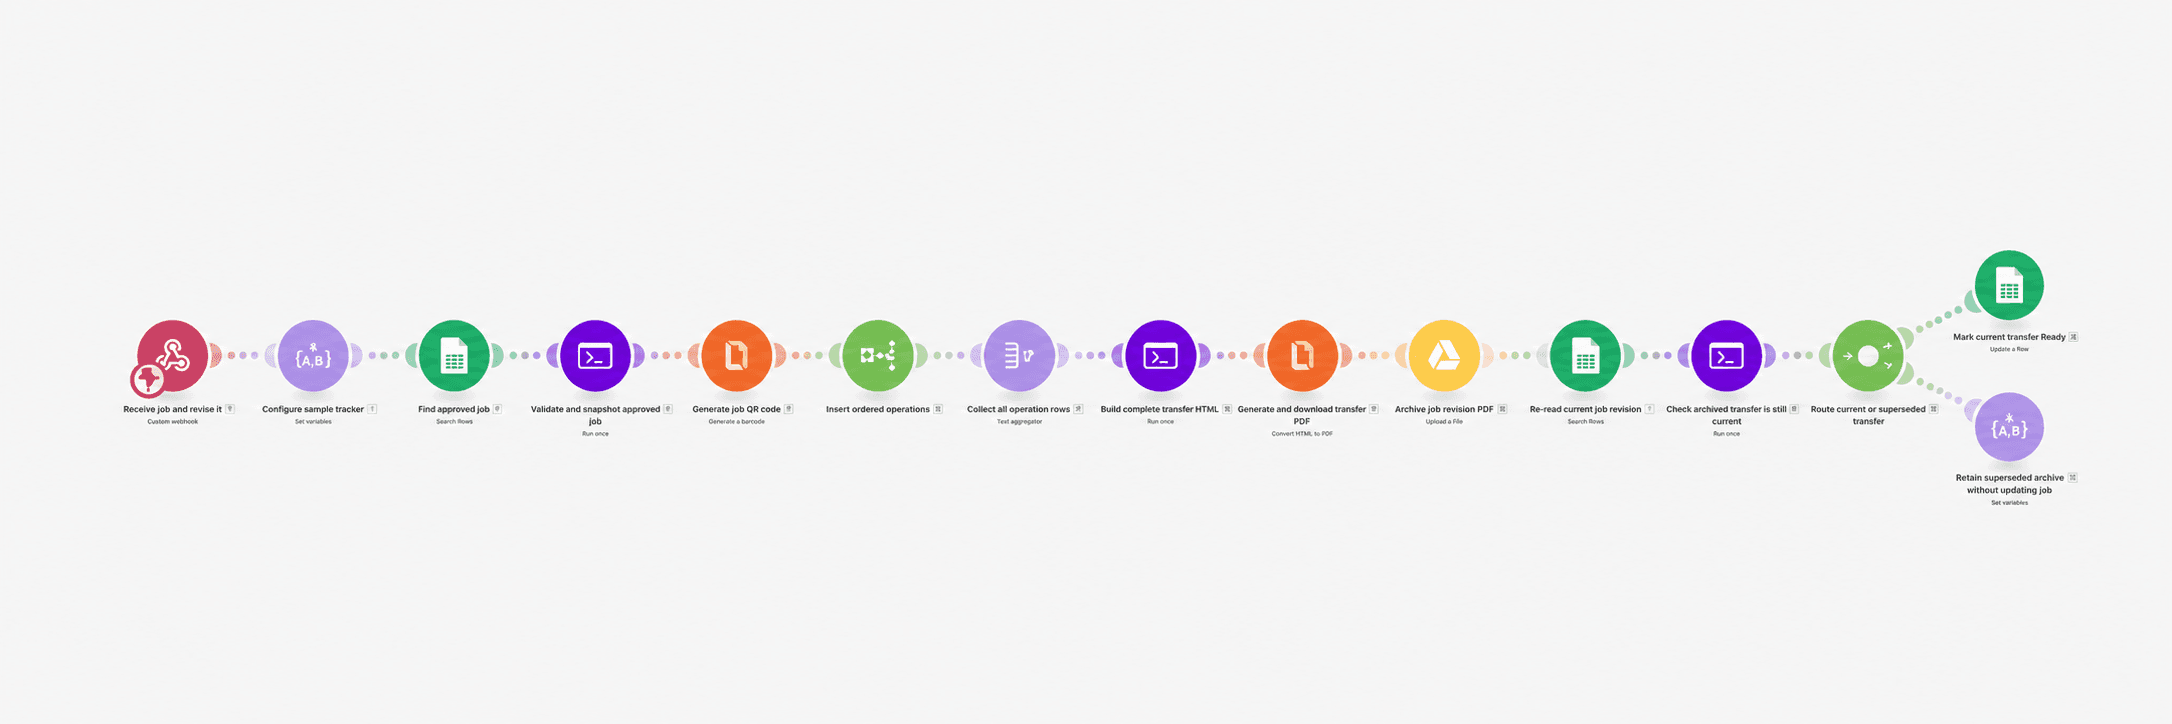
In this tutorial, you'll build a Make scenario that retrieves an approved production job, generates its QR code with PDF.co, creates a formatted PDF traveler, and archives the document in Google Drive. The scenario then verifies that the job has not changed before saving the permanent PDF link back to Google Sheets.
Prerequisites
Before starting, you'll need:
- A Make account with access to Make Code.
- A PDF.co account with an API key and available credits.
- A Google account with access to Google Sheets and Google Drive.
- A Google Sheet containing production job information.
- A Google Drive folder for archiving completed travelers.
- An existing job-tracking website or application where operators can view production records.
The QR code will open an existing job-tracking URL. This workflow does not create a tracking website or automatically record completed manufacturing operations.
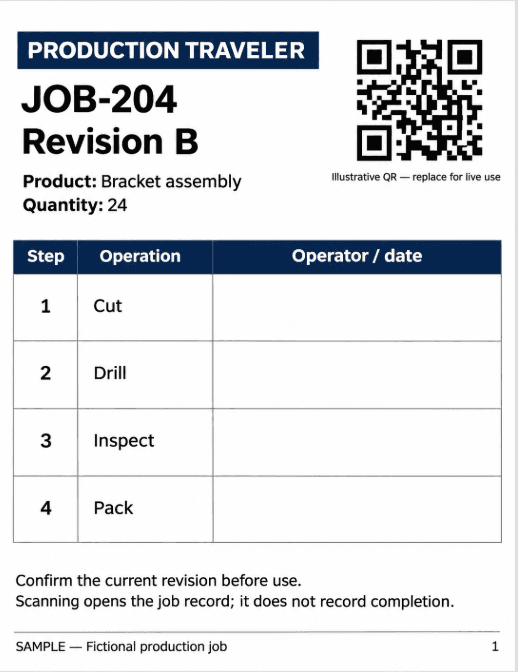
This example generates one PDF traveler per request. Each traveler includes a job reference, revision, product, quantity, QR code, and an ordered list of operations with blank operator/date fields.
IN THIS TUTORIAL
Step 1: Prepare the Google Sheets Production Tracker
Create a Google spreadsheet named:
Production Jobs
Rename its first worksheet tab:
Jobs
In row 1, add the following headers in columns A through J, preserving their order:
- A — job_id: Unique identifier for the production job.
- B — revision: Current job revision.
- C — product: Product name or description.
- D — quantity: Number of units to manufacture.
- E — job_url: URL of the existing job-tracking record.
- F — operations: Ordered manufacturing operations separated by
|. - G — approved: Approval value, using
TRUEfor approved jobs. - H — traveler_status: Current status of the generated traveler.
- I — traveler_url: Permanent URL of the archived PDF.
- J — generated_revision: Job revision represented by the current traveler PDF.
Add a Sample Production Job
Enter the following sample values into row 2:
- job_id:
JOB-204 - revision:
B - product:
Bracket assembly - quantity:
24 - job_url:
https://example.com/jobs/JOB-204 - operations:
Cut|Drill|Inspect|Pack - approved:
TRUE - traveler_status:
Pending - traveler_url: Leave blank.
- generated_revision: Leave blank.
The URL above is only a placeholder. Replace it with an actual URL from your organization's job-tracking system before generating and scanning the QR code.
For this example, the tracking URL must use the following structure:
https://YOUR-HOST/jobs/JOB-IDFor example, if your tracking system uses https://production.example.org, the job URL would be:
https://production.example.org/jobs/JOB-204The tracking system must already support that route.
Keep job IDs unique. The scenario searches for jobs by their stable identifier, not by their spreadsheet row number.
Formatting the Operations Column
Use the pipe character (|) to separate operations:
Cut|Drill|Inspect|PackThe workflow converts this into four numbered operations:
- Cut
- Drill
- Inspect
- Pack
Do not include | within an individual operation name.
When a job's approved details change, increment its revision and set traveler_status to Pending.
The generated revision should always identify the version of the instructions represented by the archived document.
Step 2: Create the Make Scenario
Sign in to Make and create a new scenario.
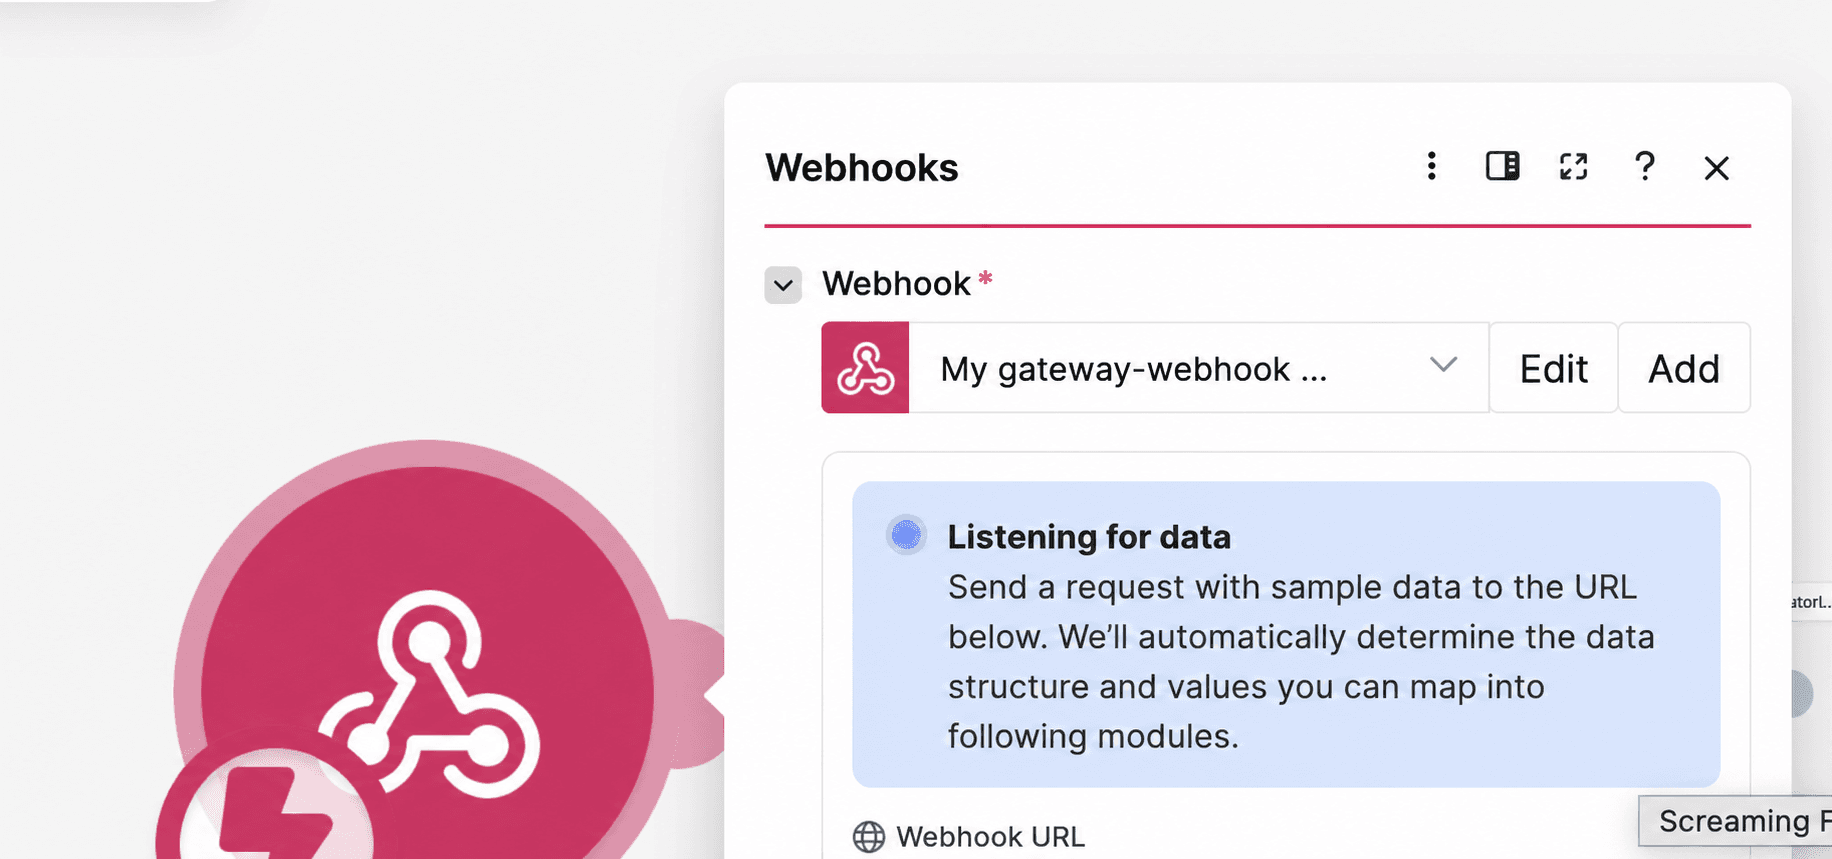
Add Webhooks > Custom webhook as the first module.
Name it:
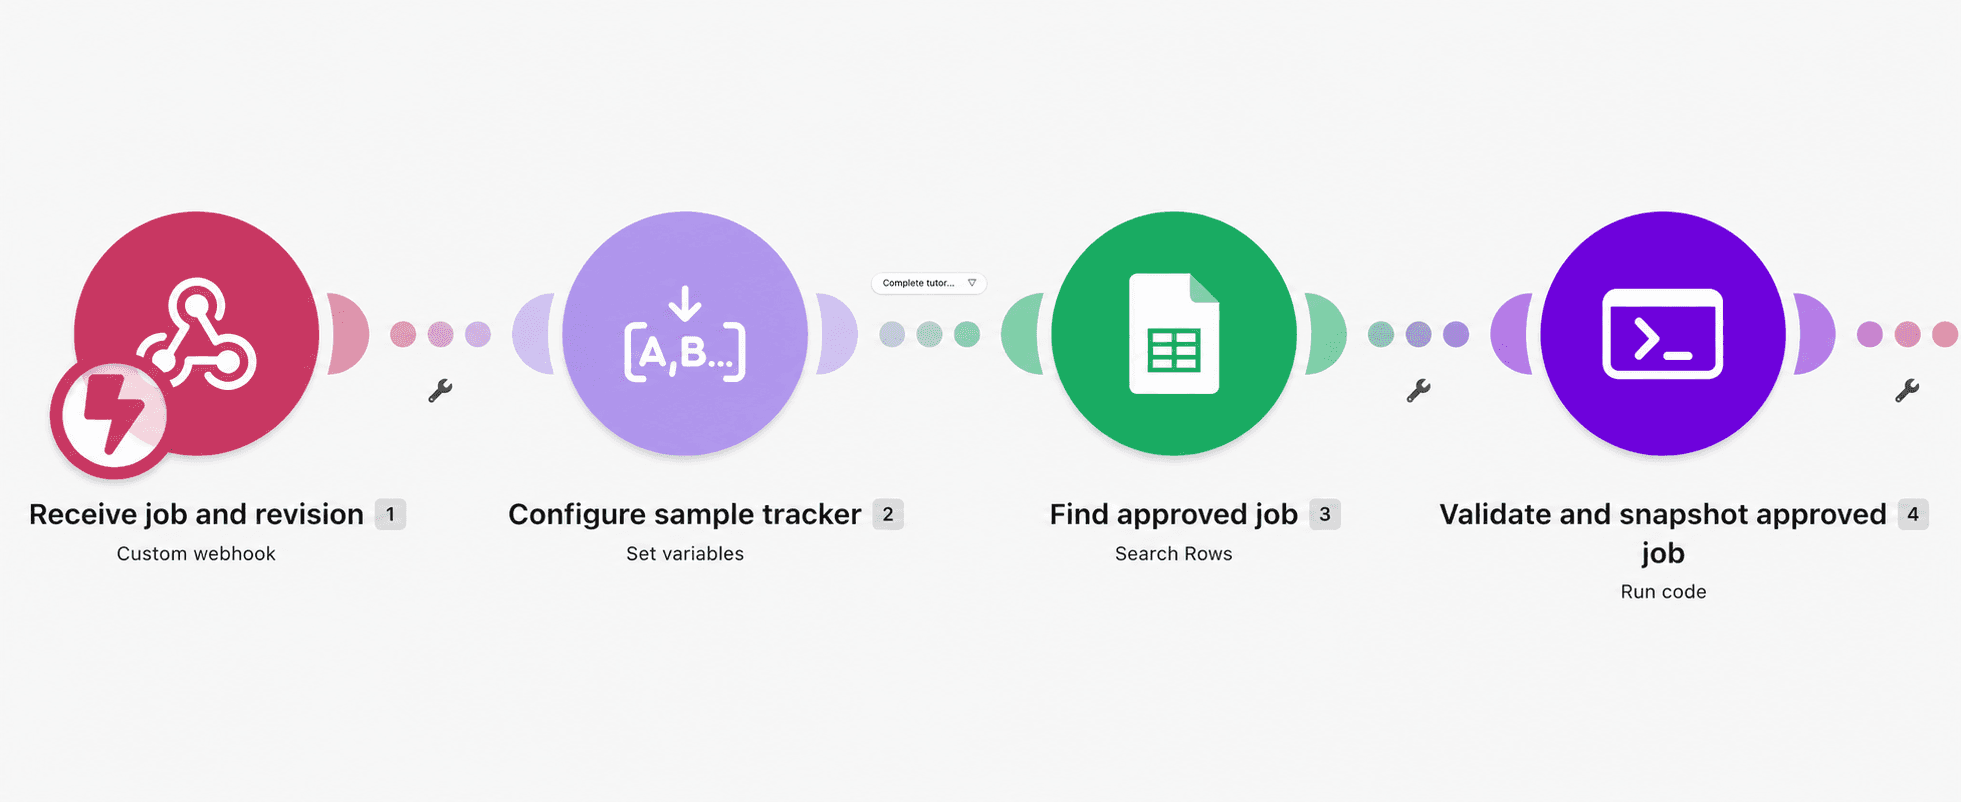
Receive job and revision
Create a webhook named:
Production Traveler Request
Save the webhook and copy its URL.
The webhook will receive two fields:
job_idrevision
For the sample job, use:
{
  "job_id": "JOB-204",
  "revision": "B"
}
Click Run once and send this JSON to the webhook using an HTTP POST request.
You can test it using an API client or a terminal command:
curl --request POST 'YOUR_MAKE_WEBHOOK_URL' \
  --header 'Content-Type: application/json' \
  --data '{
    "job_id": "JOB-204",
    "revision": "B"
  }'
Replace the placeholder with your actual Make webhook URL.
Verify that Make receives both fields.
The webhook identifies the requested job and revision. It does not supply the product, quantity, operations, or approval status.
Those details are retrieved from Google Sheets.
Restrict the webhook to an authorized request source. Do not include API credentials, personal information, or secret tokens in the request or QR-code URL.
Step 3: Configure the Spreadsheet and Archive Destination
Add Tools > Set multiple variables.
Name the module:
Configure sample tracker
Set Variable lifetime to One cycle.
Create these variables:
setup_complete: EnterNOinitially.spreadsheet_id: Enter the ID of your Production Jobs spreadsheet.archive_folder_id: Enter the ID of the approved Google Drive archive folder.allowed_origin: Enter the HTTPS origin of your job-tracking website.
For example:
setup_complete = NO
spreadsheet_id = YOUR_GOOGLE_SPREADSHEET_ID
archive_folder_id = YOUR_APPROVED_DRIVE_FOLDER_ID
allowed_origin = https://production.example.org
The allowed_origin value contains the scheme and hostname, not the individual job path.
The spreadsheet ID can be found in its URL:
https://docs.google.com/spreadsheets/d/SPREADSHEET_ID/editThe Google Drive folder ID is the identifier in the folder's URL.
Keep these destinations controlled by the scenario owner rather than accepting them from the webhook.
Once the connections, mappings, and job-tracking origin have been configured, change:
setup_complete = YESAdd a filter before the next module.
Configure:
- Filter name: Complete tutorial setup.
- Field:
setup_complete. - Condition: Text equals.
- Value:
YES.
This prevents the workflow from proceeding before the required configuration has been completed.
Step 4: Find the Approved Job in Google Sheets
Add Google Sheets > Search Rows.
Name the module:
Find approved job
Connect your Google account.
Configure:
- Spreadsheet: Map the configured
spreadsheet_id. - Sheet:
Jobs. - Table contains headers: Yes.
- Header row: Row 1.
- Column range: Include columns A through J.
- Filter column: Column A (
job_id). - Filter condition: Text equals.
- Filter value: Map
job_idfrom the webhook. - Limit:
2. - Value render option: Formatted value, when available.
The limit of 2 is intended to make duplicate job IDs detectable without retrieving the entire spreadsheet.
Use the standard Search Rows operation rather than Search Rows (Advanced), because the workflow needs the matched row number for its final update.
Check the returned values before proceeding.
The expected columns are:
- Column A: Job ID.
- Column B: Revision.
- Column C: Product.
- Column D: Quantity.
- Column E: Job URL.
- Column F: Operations.
- Column G: Approved.
- Column H: Traveler Status.
- Column I: Traveler URL.
- Column J: Generated Revision.
The next module validates the requested job against the returned record.
Make's Search Rows operation can return multiple bundles. Confirm that your scenario's result-count mapping identifies duplicate matches correctly; merely setting the search limit to 2 does not enforce uniqueness. For a production tracker, protect the source sheet against duplicate IDs.
If no record matches, the native Search Rows path may produce no downstream bundle. Add a separate no-match notification route if a visible failure record is required.
Step 5: Validate and Snapshot the Approved Job
Add Make Code > Run code.
Name it:
Validate and snapshot approved job
Configure:
- Language: JavaScript.
- Input format: Code editor.
- Additional dependencies: Leave empty.
Create these input variables:
matches: Map the number of matches from Search Rows.request_job: Map the webhook'sjob_id.request_revision: Map the webhook'srevision.job_id: Map column A from the matched row.revision: Map column B.product: Map column C.quantity: Map column D.job_url: Map column E.operations: Map column F.approved: Map column G.allowed_origin: Map the configuredallowed_origin.
The supplied scenario uses the Search Rows result-count token __IMTLENGTH__ for matches. Confirm this token's behavior with a single match and a deliberately duplicated job ID in your live Make scenario. If it does not provide a reliable total, add an explicit aggregation/count check before continuing.
Paste this complete JavaScript:
if(Number(input.matches)!==1)throw new Error('Job ID must match exactly one sheet row');
const job=String(input.job_id||'').trim(), revision=String(input.revision||'').trim();
if(job!==String(input.request_job)||revision!==String(input.request_revision))throw new Error('Wrong job or stale revision request');
if(!/^[A-Za-z0-9_-]{1,60}$/.test(job)||!/^[A-Za-z0-9_-]{1,30}$/.test(revision))throw new Error('Invalid job ID or revision');
if(String(input.approved).toUpperCase()!=='TRUE')throw new Error('Job is not approved');
const quantity=Number(input.quantity);if(!Number.isSafeInteger(quantity)||quantity<1)throw new Error('Quantity must be a positive integer');
const product=String(input.product||'').trim();if(!product)throw new Error('Product is required');
const u=new URL(input.job_url), origin=new URL(input.allowed_origin).origin;
if(u.protocol!=='https:'||u.origin!==origin||u.username||u.password||u.search||u.hash||u.pathname!=='/jobs/'+encodeURIComponent(job))throw new Error('Use the approved job route without credentials, query parameters or fragments');
const ops=String(input.operations||'').split('|').map(s=>s.trim());if(!ops.length||ops.some(s=>!s))throw new Error('Supply ordered operation names separated by |');
return {job_id:job,revision,product,quantity,job_url:u.href,operations:ops.map((operation,i)=>({step:i+1,operation})),operations_source:String(input.operations),filename:job+'-rev-'+revision+'-traveler.pdf',qr_filename:job+'-rev-'+revision+'-qr.png'};
This script checks that:
- Exactly one job was found.
- The Job ID matches the requested identifier.
- The revision matches the requested revision.
- The job is approved.
- Quantity is a positive integer.
- Product is not empty.
- The job URL uses HTTPS and the approved origin.
- The URL follows the expected
/jobs/JOB-IDpath. - The URL contains no credentials, query parameters, or fragments.
- The operations list is not empty.
It also converts the operations text into a numbered array.
For the sample job, the output includes:
[
  {
    "step": 1,
    "operation": "Cut"
  },
  {
    "step": 2,
    "operation": "Drill"
  },
  {
    "step": 3,
    "operation": "Inspect"
  },
  {
    "step": 4,
    "operation": "Pack"
  }
]
The script returns two filenames:
JOB-204-rev-B-traveler.pdf
JOB-204-rev-B-qr.png
The PDF filename includes the job's revision, helping preserve the identity of older travelers in the archive.
Step 6: Generate the Job QR Code with PDF.co
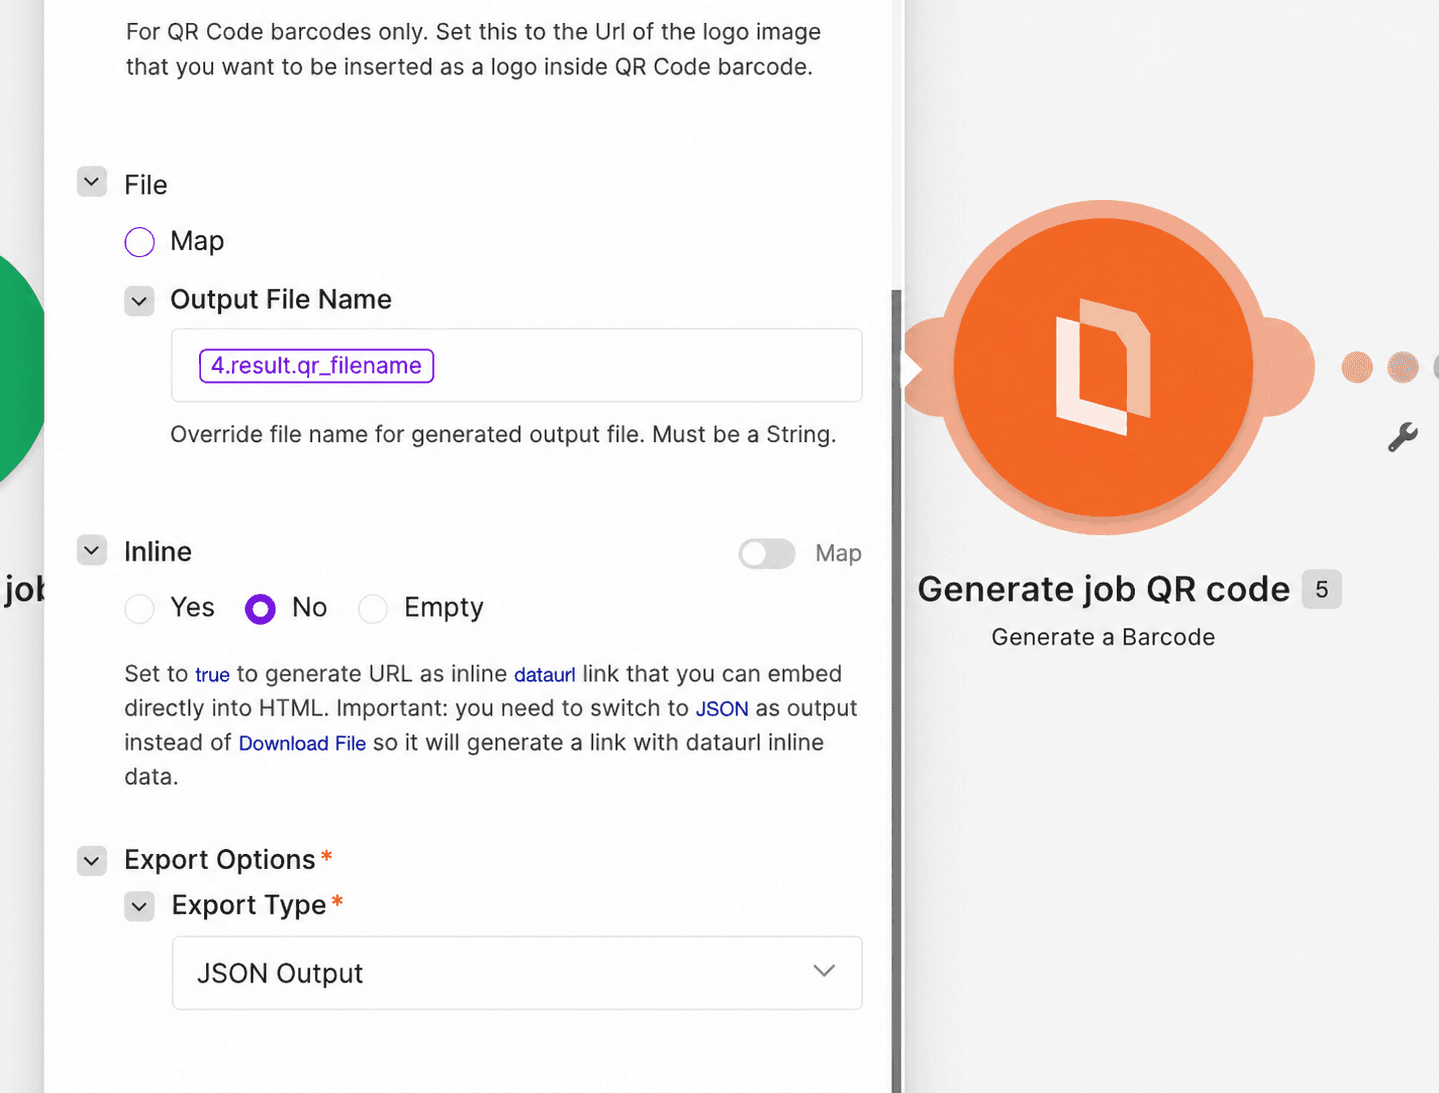
Add PDF.co > Generate a Barcode.
Name the module:
Generate job QR code
Create or select your PDF.co connection.
Configure:
- Barcode Type: QRCode.
- Barcode Value: Map
job_urlfrom the job-validation Code module. - Output File Name: Map
qr_filenamefrom the Code module. - Inline: No.
- Execution Mode: Sync.
- Export Type: JSON Output.
- Output Links Expiration:
60.
The Barcode Value is the job URL that operators should open when scanning the code.
For example:
https://production.example.org/jobs/JOB-204PDF.co generates a QR-code image containing the URL and returns a temporary image URL.
The next Code module places that image in the report HTML.
QR Code Considerations
The QR code must remain square and include sufficient white space around it.
Avoid stretching, cropping, or overlaying text on the image.
The document will contain a caption:
Scan to open job record
A scan opens the configured job URL. It does not automatically record that an operation has been completed.
If your job-tracking system requires authentication, test the QR code using a device that is not already logged in.
Step 7: Iterate Through the Manufacturing Operations
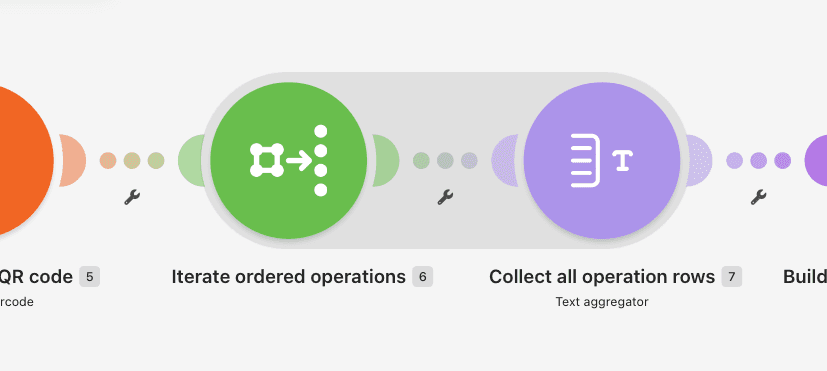
Add Tools > Iterator.
Name it:
Iterate ordered operations
Configure:
- Array: Map
operationsfrom the job-validation Code module.
The Iterator creates one bundle for each operation.
For the sample job, it produces four bundles:
- Step 1: Cut.
- Step 2: Drill.
- Step 3: Inspect.
- Step 4: Pack.
The order comes from the original operations field in Google Sheets.
Do not sort the operations alphabetically. Their sequence represents the intended manufacturing process.
Step 8: Combine Operations into HTML Rows
Add Tools > Text aggregator.
Name it:
Collect all operation rows
Configure:
- Source module: Iterate ordered operations.
- Row separator: Newline.
- Text: Use the HTML row template below.
<tr>
<td>{{6.step}}</td>
<td>{{escapeHTML(6.operation)}}</td>
<td> </td>
</tr>The example mapping uses module 6 as the Iterator. Select the equivalent operation fields from your actual Make mapping panel.
The first cell contains the step number.
The second cell contains the operation name, escaped so special characters are treated as ordinary text.
The third cell remains blank for the operator and date.
For the sample job, the aggregated HTML represents:
- Step 1: Cut.
- Step 2: Drill.
- Step 3: Inspect.
- Step 4: Pack.
Each operation has an empty sign-off cell.
The Text aggregator combines all the rows into one HTML string. The PDF generation module will run after this aggregation, not once for each operation.
If your Make workspace exposes a different expression for HTML escaping, use the supported equivalent and test captions containing special characters.
Step 9: Build the Complete Production Traveler HTML
Add Make Code > Run code.
Name it:
Build complete traveler HTML
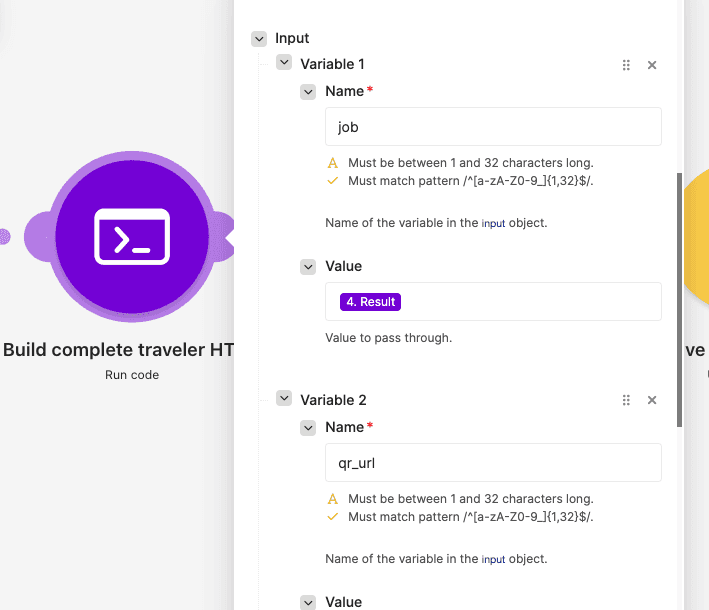
Create these input variables:
job: Map the complete Result object from Validate and snapshot approved job.qr_url: Map the completed image URL returned by Generate job QR code.rows_html: Map the Text aggregator's output text.
Paste this JavaScript:
const job=typeof input.job==='string'?JSON.parse(input.job):input.job;const u=new URL(input.qr_url);if(u.protocol!=='https:')throw new Error('Completed QR image URL required');
const esc=s=>String(s??'').replace(/[&<>"']/g,c=>({'&':'&','<':'<','>':'>','"':'"',"'":'''}[c]));
return {html:`<!doctype html><html><head><meta charset="utf-8"><style>body{font-family:Arial,sans-serif;margin:32px;font-size:12px}header{display:flex;justify-content:space-between;align-items:center}h1{font-size:28px;margin:0}h2{font-size:22px}img{width:150px;height:150px;object-fit:contain;padding:16px;background:white}table{width:100%;border-collapse:collapse;margin-top:24px}th,td{border:1px solid #777;padding:12px;text-align:left}td{height:42px}tr{break-inside:avoid}thead{display:table-header-group}.signoff{width:35%}</style></head><body><header><div><h1>Production traveler</h1><h2>${esc(job.job_id)} - Revision ${esc(job.revision)}</h2><p>Product: ${esc(job.product)}<br>Quantity: ${esc(job.quantity)}</p></div><div><img src="${esc(u.href)}" alt="Open job ${esc(job.job_id)}"><p>Scan to open job record</p></div></header><table><thead><tr><th>Step</th><th>Operation</th><th class="signoff">Operator / date</th></tr></thead><tbody>${input.rows_html}</tbody></table><p>Confirm the current revision before use. Scanning opens the job; it does not record completion.</p></body></html>`};The script combines the validated job details, QR-code image URL, and operation rows into one HTML document.
It also escapes the job ID, revision, product description, and other inserted text.
Report Layout
The generated traveler includes:
- Production Traveler heading.
- Job ID and revision.
- Product name.
- Required quantity.
- QR code.
- Ordered operations.
- Blank Operator / Date cells.
- A reminder to verify the current revision before using the document.
The QR image is displayed at 150 × 150 pixels with white padding.
The HTML also specifies:
img {
  width: 150px;
  height: 150px;
  object-fit: contain;
  padding: 16px;
  background: white;
}
This helps maintain the QR code's proportions and readable border.
The operations table uses:
tr {
  break-inside: avoid;
}

thead {
  display: table-header-group;
}
These styles help keep operation rows together and repeat the table headings when the document spans multiple pages.
The Code module returns one output:
html
This is the complete document that will be passed to PDF.co for conversion.
Step 10: Generate and Download the Traveler PDF
Add PDF.co > Convert HTML to PDF.
Name the module:
Generate and download traveler PDF
Connect your PDF.co account.
Configure:
- Convert Type: HTML to PDF.
- Input HTML Code: Map
htmlfrom the previous Code module. - Output File Name: Map the
filenamefrom the job-validation module. - Execution Mode: Sync.
- Export Type: Download a File.
- Paper Size: A4.
- Orientation: Portrait.
- Margins:
0. - Render Page Background: Yes.
- Do not wait for full load: No.
- Output Links Expiration:
60.
The QR image must still be accessible while PDF.co renders the HTML.
If the QR image's temporary URL expires, generate a fresh QR code before attempting the conversion again.
The PDF.co module creates the traveler and returns the completed PDF as binary data.
For the sample job, the filename is:
JOB-204-rev-B-traveler.pdfWith Download a File selected, you can map the PDF.co binary Data directly into the following Google Drive upload module.
You do not need a separate HTTP download step.
Step 11: Archive the Traveler in Google Drive
Add Google Drive > Upload a File.
Name it:
Archive job revision PDF
Connect the authorized Google Drive account.
Configure:
- New Drive Location: My Drive.
- New Folder Location: Map the configured
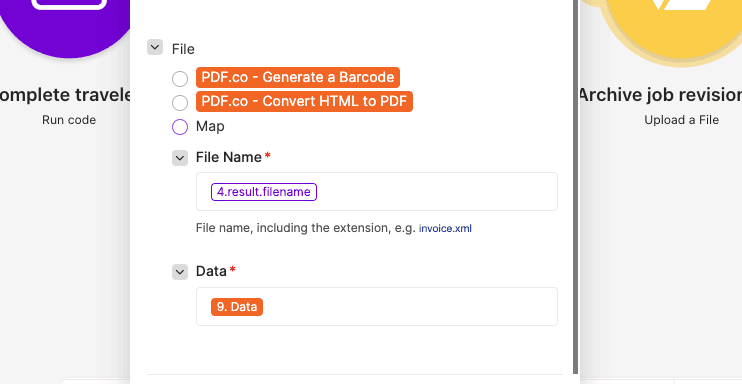
archive_folder_id. - New File Name: Map the job's
filename. - File Name: Map the same filename.
- Data: Map the binary Data output from PDF.co > Convert HTML to PDF.
- Convert a File: No.
This stores the completed PDF in the approved archive folder.
After the upload succeeds, Google Drive returns a file ID.
The archived document can be referenced through a URL such as:
https://drive.google.com/file/d/STORED_FILE_ID/viewThe STORED_FILE_ID placeholder must be replaced with the actual file ID returned by Google Drive.
Do not use the temporary PDF.co output URL as the permanent traveler link in Google Sheets.
Keep older revision PDFs in the archive according to your organization's retention policy.
Step 12: Retrieve the Current Job Again
The job may have changed while the QR code and PDF were being generated.
Before marking the traveler as ready, retrieve the job from Google Sheets again.
Add Google Sheets > Search Rows.
Name it:
Re-read current job revision
Configure:
- Spreadsheet: Map the same
spreadsheet_id. - Sheet:
Jobs. - Table contains headers: Yes.
- Filter column: A (
job_id). - Condition: Text equals.
- Filter value: Map the validated original Job ID.
- Limit:
2.
Use standard Search Rows, not the advanced variant, because the scenario needs the current spreadsheet row number.
The result provides a fresh view of:
- Job ID.
- Revision.
- Product.
- Quantity.
- Job URL.
- Operations.
- Approval state.
- Current row number.
Do not reuse the original row number for the final update.
This second lookup is important because the sheet may have been sorted or changed since the workflow started.
Step 13: Check Whether the Archived Traveler Is Still Current
Add Make Code > Run code.
Name it:
Check archived traveler is still current
Configure JavaScript and Code editor.
Create these inputs:
job: Map the complete validated job snapshot from Step 5.matches: Map the fresh Search Rows result count.job_id: Map column A from the fresh lookup.revision: Map column B.product: Map column C.quantity: Map column D.job_url: Map column E.operations: Map column F.approved: Map column G.row_number: Map the row number returned by the fresh Search Rows operation.file_id: Map the Google Drive file ID returned by the archive upload.
Paste this JavaScript:
const j=typeof input.job==='string'?JSON.parse(input.job):input.job;
if(Number(input.matches)!==1||String(input.job_id)!==j.job_id)throw new Error('Current job lookup is missing or ambiguous');
const current=String(input.revision)===j.revision&&String(input.approved).toUpperCase()==='TRUE'&&String(input.product).trim()===j.product&&Number(input.quantity)===j.quantity&&String(input.job_url)===j.job_url&&String(input.operations)===j.operations_source;
return {current,job_id:j.job_id,revision:j.revision,row_number:input.row_number,stored_url:'https://drive.google.com/file/d/'+input.file_id+'/view'};
This script compares the current job details with the snapshot used to generate the PDF.
It checks:
- Job ID.
- Revision.
- Approval state.
- Product.
- Quantity.
- Job URL.
- Complete operations list.
If the values still match, it returns:
current = trueIf any relevant value has changed, it returns:
current = falseThe script also returns:
job_idrevisionrow_numberstored_url
The stored_url contains the archived Google Drive file link.
The count of fresh Search Rows matches must also be verified against actual Make output, especially when testing duplicate Job IDs.
Step 14: Route Current and Superseded Travelers
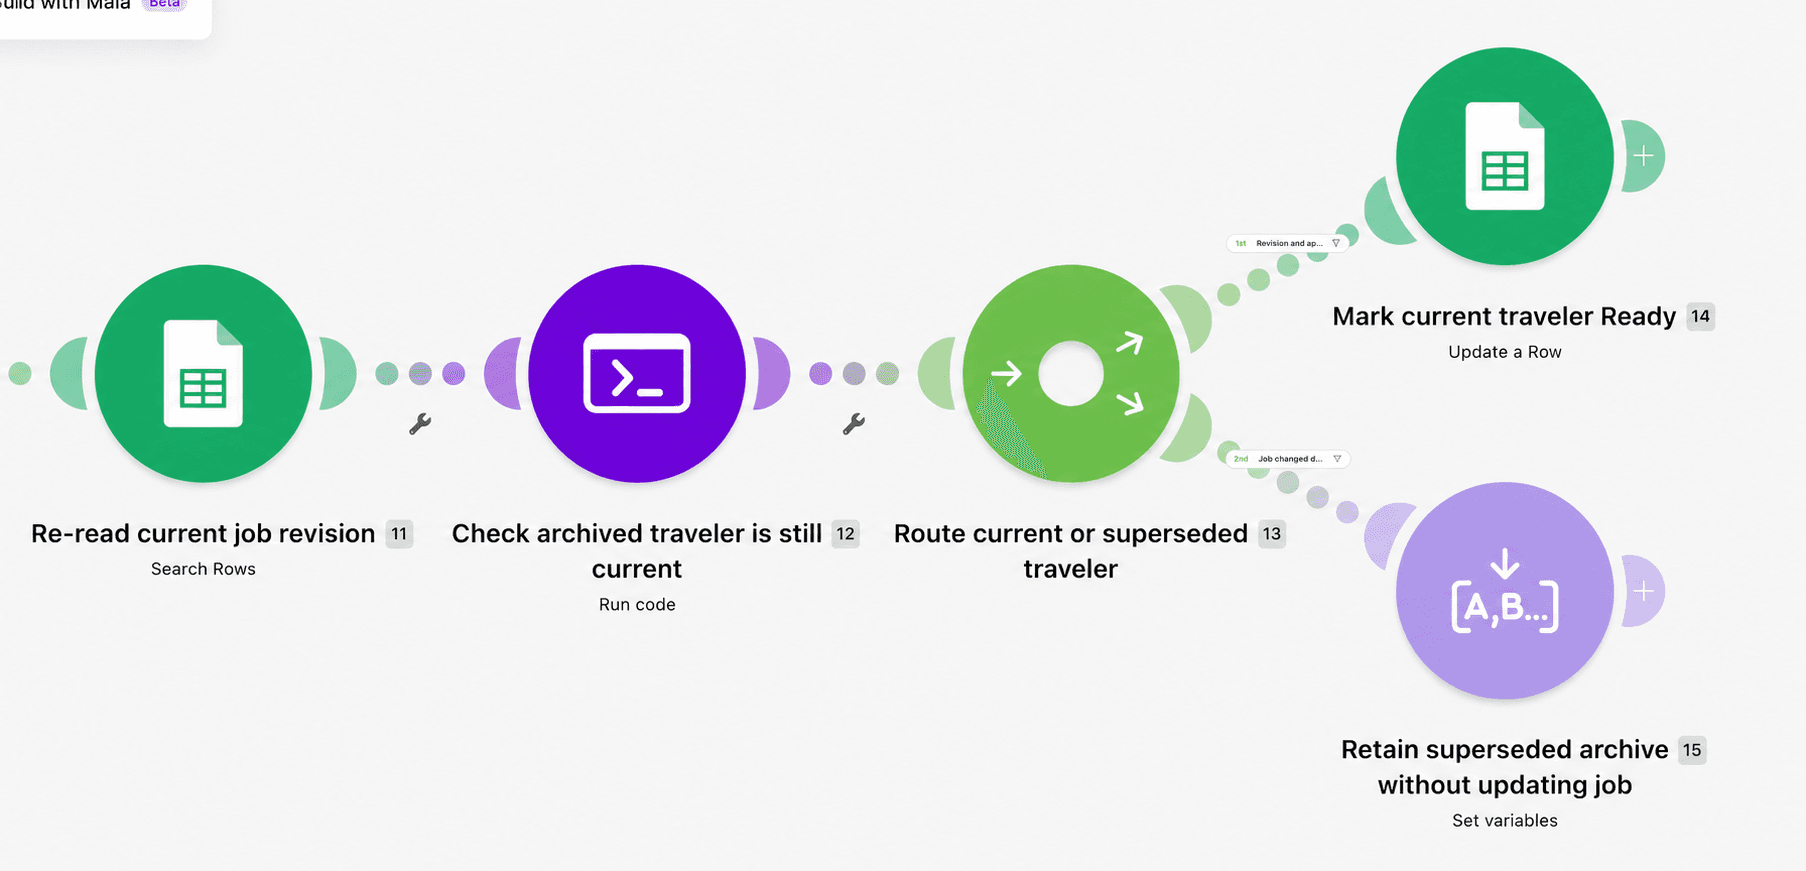
Add Flow Control > Router.
Name it:
Route current or superseded traveler
Create two routes.
Route 1: Job Details Are Unchanged
Add a filter named:
Revision and approved data unchanged
Configure:
- Field:
currentfrom the previous Code module. - Condition: Boolean equals.
- Value:
true.
On this route, add Google Sheets > Update a Row.
Name it:
Mark current traveler Ready
Configure:
- Spreadsheet: Map the configured spreadsheet ID.
- Sheet:
Jobs. - Row number: Map the freshly found row number from Step 13.
- Value input option: RAW.
Map columns A through J:
- A — job_id: Map the fresh Job ID.
- B — revision: Map the fresh Revision.
- C — product: Map the fresh Product.
- D — quantity: Map the fresh Quantity.
- E — job_url: Map the fresh Job URL.
- F — operations: Map the fresh Operations.
- G — approved: Map the fresh Approval value.
- H — traveler_status: Enter
Ready. - I — traveler_url: Map
stored_urlfrom the version-checking Code module. - J — generated_revision: Map the validated Revision.
The original job fields are mapped from the fresh lookup rather than being replaced with values from the webhook.
This example updates the entire A–J row. If your tracker contains additional fields or formulas, review and adapt the update mapping so they are not accidentally overwritten.
Once the update succeeds, the job row should contain:
traveler_status = Ready
generated_revision = B
The traveler_url field should contain the permanent Google Drive link.
Route 2: Job Details Changed During Generation
Add a second filter named:
Job changed during generation
Configure:
- Field:
currentfrom the version-checking Code module. - Condition: Boolean equals.
- Value:
false.
Add Tools > Set multiple variables.
Name it:
Retain superseded archive without updating job
Create:
superseded_file_id: Map the file ID returned by Google Drive.superseded_revision: Map the revision used to generate the PDF.
This route retains the archived file identity for review.
It does not update the job's Traveler Status, Traveler URL, or Generated Revision.
For example, if the workflow generated revision B but the job changed to revision C before completion, the revision-B PDF remains in the archive. The workflow does not mark it as the current traveler.
The source sheet should already identify revision C as Pending if your job-management process correctly updates status whenever the job changes.
Important Limitation
Google Sheets Update a Row is not an atomic compare-and-set operation.
The second lookup reduces the chance of marking an outdated traveler as current, but someone could still edit the sheet between the final lookup and update.
Sequential processing in Make does not lock the spreadsheet against human changes.
For production workflows that require strict revision protection, use controlled sheet editing, a locking process, or a data source that supports conditional updates.
Step 15: Verify the Completed Traveler
After a successful current-version update, open the Google Sheet.
The sample job should have:
- job_id:
JOB-204 - revision:
B - traveler_status:
Ready - traveler_url: The permanent Google Drive PDF link.
- generated_revision:
B
Open the archived PDF.
Confirm that it contains:
- Job ID: JOB-204.
- Revision: B.
- Product: Bracket assembly.
- Quantity: 24.
- Operations: Cut, Drill, Inspect, Pack.
- Operator / date: Blank cells for each operation.
- QR code: A readable code that opens the correct job-tracking record.
The operations should appear in their original sequence, not alphabetical order.
The PDF should contain four operation rows and sufficient blank space for operators to enter their details.
Test the QR Code
Print the completed PDF and scan the QR code with a mobile device.
Confirm that:
- The code can be scanned from the printed document.
- It opens the intended job URL.
- The tracking system requires authentication when appropriate.
- It does not expose secret tokens or sensitive data.
- Scanning the code does not automatically change job status.
- The code remains readable at the printed size.
If the QR code is difficult to scan, review its rendered size, white border, resolution, and printer output.
Do not crop its quiet zone or stretch the image.
Step 16: Add Error Handling
The traveler should not be marked Ready when QR generation, PDF creation, or archiving fails.
Add error-handling routes to the modules that can fail.
Google Sheets Lookup Failure
If the requested job cannot be found:
- Stop processing.
- Record the requested Job ID and revision.
- Do not generate an empty traveler.
If duplicate Job IDs are detected, require the source data to be corrected before continuing.
Approval or Validation Failure
If the job is unapproved, has an invalid quantity, or uses an unsupported tracking URL:
- Stop processing.
- Preserve the requested Job ID and revision.
- Do not bypass the validation rules.
QR Code Generation Failure
If PDF.co cannot generate the barcode:
- Stop before building the PDF.
- Review the Barcode Type and Value mappings.
- Confirm the job URL passed validation.
- Retry with a fresh completed QR image when appropriate.
Do not create a traveler with a missing QR image.
PDF Conversion Failure
If PDF.co fails to convert the HTML:
- Stop before archiving.
- Confirm that the HTML output was mapped correctly.
- Check that the QR image URL was accessible during conversion.
Google Drive Upload Failure
If the PDF was generated but could not be archived:
- Do not mark the Google Sheets row Ready.
- Preserve the completed PDF data or execution for recovery.
- Verify the destination folder ID and permissions.
Revision Change
If the job changes during generation:
- Retain the archived PDF under its original revision filename.
- Do not update the current job with the outdated document.
- Process a new request for the newly approved revision when needed.
Spreadsheet Update Failure
If the PDF was archived but the final Google Sheets update failed:
- Keep the archived file ID.
- Recheck the current Job ID, revision, and approved details.
- Retry only the row update when safe.
- Avoid regenerating the PDF unnecessarily.
A failed final write-back does not mean the archive upload failed.
Step 17: Test Different Production Job Conditions
Before enabling the scenario for regular use, test the workflow with several variations.
Test an Approved Job
Use the sample JOB-204, revision B.
Confirm the complete QR generation, PDF creation, archive, and final row update.
Test an Unapproved Job
Change approved to FALSE.
The validation module should reject the request before generating a QR code or PDF.
Test an Invalid Quantity
Enter a quantity such as:
0The scenario should stop because quantity must be a positive integer.
Test an Empty Operation
Enter:
Cut|Drill||PackThe script should reject the operations list because one operation is empty.
Test a Stale Revision
Keep the job's current revision as B, then send a request for revision A.
The validation module should reject the stale request.
Test a Changed Job During Generation
Start a request for revision B.
Before the final version check, change the job's revision to C and update its approved details.
The archived revision-B document should not be marked Ready for revision C.
Test a Duplicate Job ID
Create a second row using the same Job ID.
Confirm that the search and validation path detects the ambiguity and prevents the job from being processed twice.
If your Make Search Rows configuration emits independent bundles without a reliable total-match count, add an explicit grouping and uniqueness check before allowing conversion.
Test a Different Operation Sequence
Enter:
Inspect|Cut|Pack|DrillConfirm that the PDF uses that exact order.
The workflow must not reorder the operations alphabetically.
Test Special Characters
Use a product or operation name containing characters such as:
Frame assembly & inspection <Stage 2>Confirm that the PDF displays the text correctly and does not interpret it as HTML code.
Test Repeated Requests
Request the same approved job and revision twice.
The supplied workflow may generate another archived PDF on the second request.
If repeated requests are common, add a Make data store keyed by Job ID and revision.
Use it to track:
- The requested job and revision.
- Whether PDF generation is already processing.
- The archived file ID.
- Whether the current job row was updated successfully.
When a valid archived PDF already exists for the same approved revision, reuse it instead of automatically creating another copy.
Test the Printed Traveler
Finally, print the actual PDF.
Check that the job header, operation rows, QR image, and blank sign-off cells are readable.
A successful Make execution does not guarantee that the printed barcode will scan reliably.
Troubleshooting
- The webhook doesn't receive the job: Check the request JSON and webhook URL. Confirm that both
job_idandrevisionare present. - Google Sheets cannot find the job: Verify the spreadsheet ID, Jobs tab, and stable Job ID.
- The job is rejected as unapproved: Check column G and confirm the approval process has set it to TRUE.
- The revision doesn't match: Compare the requested revision with column B. Request the current approved revision.
- The job URL fails validation: Confirm it uses HTTPS, the configured origin, and the expected
/jobs/JOB-IDpath without query parameters or fragments. - The QR code isn't generated: Confirm PDF.co is connected, Barcode Type is QRCode, and Barcode Value maps to the validated Job URL.
- Operations are missing: Check the
|separators, the Iterator input, and the Text aggregator source. - Operation names appear incorrectly: Verify the HTML-escaping expression in the Text aggregator.
- The PDF has no QR code: Confirm the QR image URL was successfully returned and accessible while PDF.co rendered the HTML.
- The traveler PDF isn't generated: Check the HTML mapping, PDF.co conversion response, and completed output.
- Google Drive doesn't save the PDF: Verify that the upload's Data field maps to PDF.co's binary output.
- The wrong Google Sheets row is updated: Confirm that the final Update a Row module uses the row number returned by the second Search Rows operation.
- A previous revision is marked Ready: Review the final version comparison, the sheet's revision-update policy, and any concurrent edits.
- Repeated runs create duplicate PDFs: Add persistent request tracking using Job ID and revision.
- The printed QR code doesn't scan: Check the encoded URL, printed image size, white border, and image resolution.
With Google Sheets, Make, and PDF.co, you can automatically generate production traveler PDFs containing approved job details, ordered manufacturing operations, and scannable QR codes.
The workflow retrieves the requested job from Google Sheets, validates its approval and revision, generates a QR code with PDF.co, and creates a formatted production traveler PDF. The completed document is archived in Google Drive, and its permanent link is written back to the correct job record.
The final revision check helps prevent an outdated traveler from being marked Ready when approved job details change during generation.
By using a QR code to connect the printed document to an existing job-tracking system, manufacturing teams can access the corresponding digital record without manually searching for it.
For more information, explore the PDF.co Make integration documentation, PDF.co Barcode Generator API, and Make Google Sheets documentation.
Related Tutorials