Build a PDF Photo Report from Private Pipefy Attachments with Make and PDF.co
Photos and inspection notes are often stored directly in Pipefy cards. When a card reaches a reporting stage, those attachments may need to be collected into a single PDF for review or archiving.
Instead of downloading each photo and preparing the report manually, you can use Make and PDF.co to automate the process.
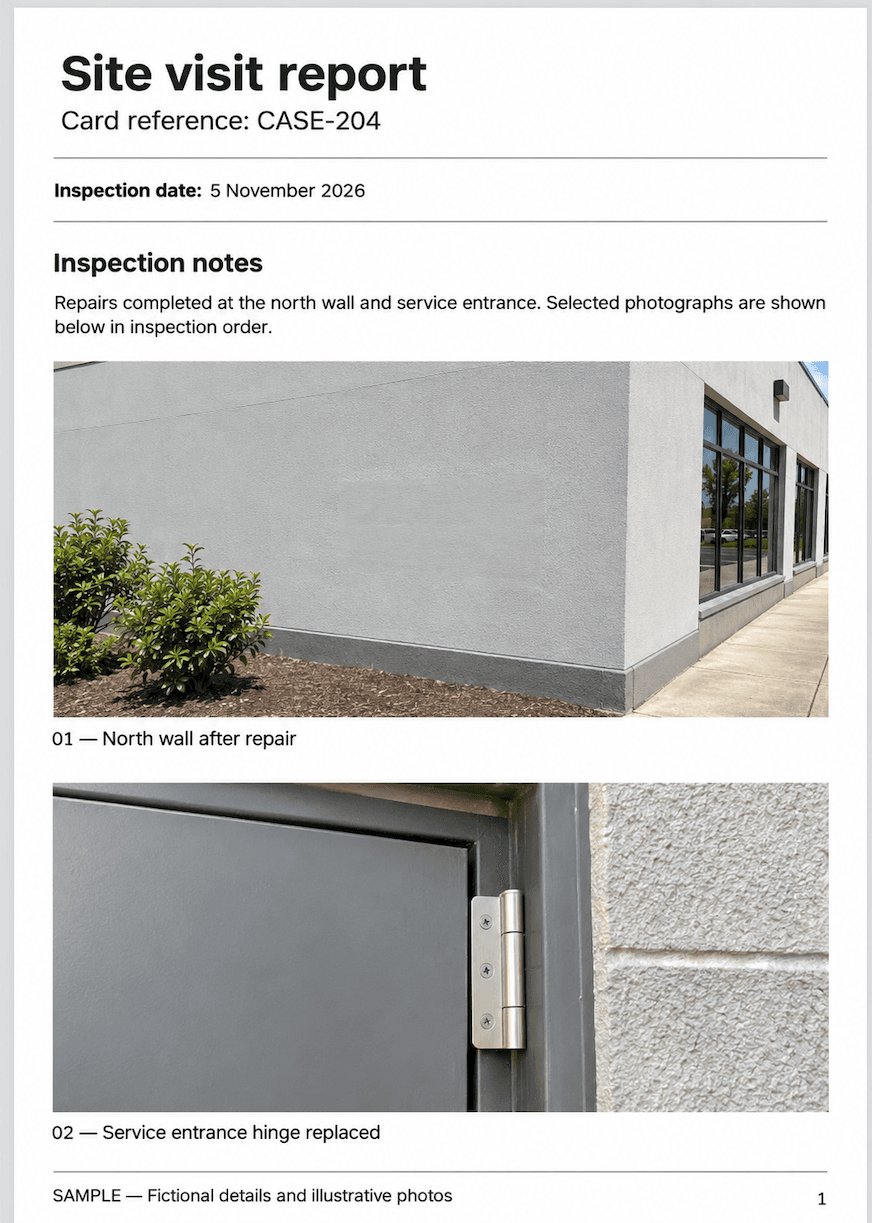
In this tutorial, you'll create a Make scenario that detects when a Pipefy card enters a reporting stage, retrieves its selected attachments, and downloads the images through authorized links. PDF.co will temporarily host the images and generate a PDF report containing the card details and photos in the correct order.
Finally, the scenario will save the PDF to an approved storage location and write the permanent document link back to the original Pipefy card.
Prerequisites
Before starting, you'll need:
- A Make account with access to Make Code.
- A Pipefy account with permission to read the relevant pipe, cards, and attachments and update a report-link field.
- A PDF.co account with an API key and available credits.
- An approved document-storage destination, such as Google Drive.
- A Pipefy process containing a reporting phase and cards with selected photos.
This example supports JPEG and PNG attachments. Every selected photo must have an original attachment identifier, filename, numeric display order, caption, and current authorized download URL.
The scenario stops when no photos are selected or when a required attachment cannot be processed. It does not publish a report with silently missing photos.
IN THIS TUTORIAL
Step 1: Prepare the Pipefy Process
Open the Pipefy pipe that contains the inspection or service records you want to report.
Identify the phase that indicates a card is ready for reporting. For example, your process may have a phase named Ready for Report.
Make sure the cards contain the information needed for the document:
- Card ID: The original card identifier.
- Title: A short description of the inspection or service.
- Selected report text: The notes or findings approved for inclusion.
- Photos: The selected JPEG or PNG attachments.
- Photo order: A numeric value indicating each photo's position in the report.
- Photo caption: A description to appear below each image.
- Report Link: A field where the finished PDF's permanent link can be saved.
The field names can differ in your Pipefy process.
Use the original card ID for updates and error reporting. Do not rely on the card title or browser URL as the record identifier.
Only select attachments that are approved for processing by Make and PDF.co. The original private files do not need to be changed to public access.
Step 2: Create a Make Scenario and Configure the Pipefy Trigger
Sign in to Make and create a new scenario.
- Click the plus (+) button.
- Search for Pipefy.
- Select Watch Moved Cards.
- Create or select a Pipefy connection.
- Select the pipe containing your inspection records.
- Configure the trigger to monitor card movements.
The Watch Moved Cards module detects when a card moves between phases in a selected pipe.
Add a filter that allows processing only when the destination phase is your intended reporting phase.
For example:
- Pipe: Your inspection or service pipe.
- Destination phase: Ready for Report.
- Filter condition: Destination phase ID equals the configured reporting phase ID.
Use phase IDs for the comparison when available. Phase names may change.
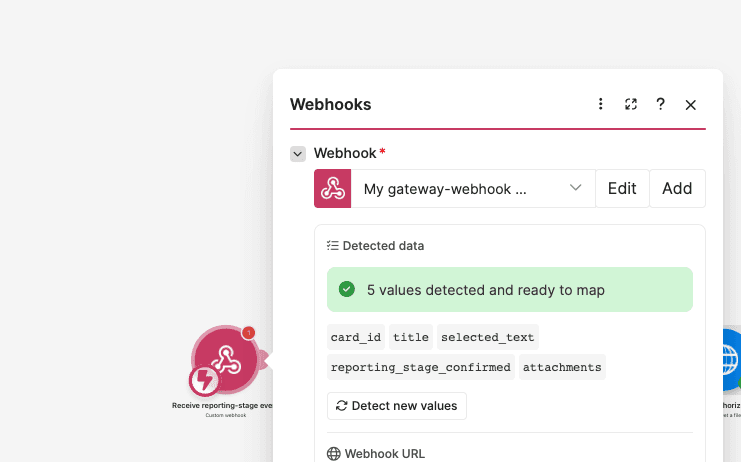
This tutorial uses the native Pipefy trigger. If your process already delivers authenticated reporting-stage events through a webhook, you can use Webhooks > Custom webhook instead and continue with the same card-retrieval steps.
Step 3: Retrieve the Pipefy Card Details
Add Pipefy > Get a Card Info after the trigger.
Configure:
- Connection: Your authorized Pipefy account.
- Card: Map the original card ID from the trigger.
This module retrieves the current details of the card rather than relying only on information included in the movement event.
Inspect its output and identify the actual fields containing the title, report text, current phase, and attachment information.
Before processing, verify that the retrieved card still belongs to the intended pipe and reporting phase.
The attachment mapping must also provide a current authorized download link for every selected image.
Do not substitute a Pipefy card-page URL for an attachment URL. If the card-information output does not contain usable download links, use an authorized Pipefy action or API request to retrieve the required attachment details.
Step 4: Normalize the Card and Selected Attachments
The next step converts the Pipefy response into a consistent structure for processing.
Add JSON > Create JSON, or use Make's equivalent JSON-building operation.
Create a data structure containing:
card_id: Original Pipefy card ID.title: Card title.selected_text: The notes approved for the report.reporting_stage_confirmed: Boolean indicating whether the current phase has been verified.attachments: Array of selected photo objects.
Each attachment object contains:
attachment_id: Original attachment identifier.order: Numeric display order.caption: Photo caption.filename: Original filename.download_url: Current authorized download URL.
For reference, the normalized result should have this structure:
{
  "card_id": "CASE-204",
  "title": "Site visit",
  "selected_text": "Selected inspection notes",
  "reporting_stage_confirmed": true,
  "attachments": [
    {
      "attachment_id": "example-photo-1",
      "order": 1,
      "caption": "North wall after repair",
      "filename": "north-wall.jpg",
      "download_url": "https://example.invalid/replace-with-fresh-authorized-link"
    }
  ]
}
This is an example of the normalized data, not a raw Pipefy API response. The URL is a nonworking placeholder.
Map the actual fields returned by your Pipefy modules. Set reporting_stage_confirmed to true only after verifying the correct reporting phase.
Keep the selected attachment list consistent throughout the execution. If an attachment is missing or cannot be downloaded, stop the report rather than removing it from the list.
Add Tools > Set multiple variables to hold the normalized record.
Configure:
- Variable name:
record_json. - Variable value: Map the output of the JSON-building module.
- Variable lifetime: One cycle.
You can also add a setup variable named setup_complete and filter the next module to proceed only when its value is YES, after all required connections and mappings have been configured.
Step 5: Validate and Sort the Selected Photos
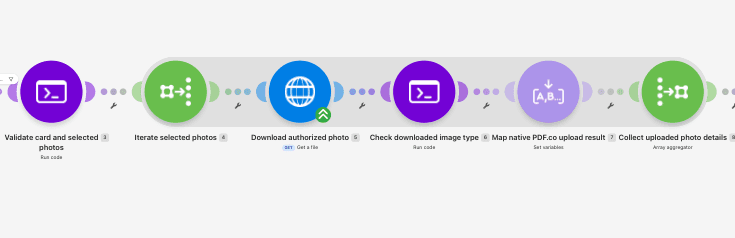
Add Make Code > Run code.
Name the module:
Validate card and selected photos
Configure:
- Language: JavaScript.
- Input format: Code editor.
- Additional dependencies: Leave empty.
Under Input, create:
record: Map therecord_jsonvariable from Step 4.
Paste this JavaScript into the Code editor:
const r = typeof input.record === 'string'
  ? JSON.parse(input.record)
  : input.record;

if (!r || !String(r.card_id || '').trim()) {
  throw new Error('Missing original Pipefy card ID');
}

if (r.reporting_stage_confirmed !== true) {
  throw new Error('Card is not confirmed in the reporting stage');
}

if (!Array.isArray(r.attachments) || !r.attachments.length) {
  throw new Error(`Card ${r.card_id}: no selected photos; no report generated`);
}

const ids = new Set();
const orders = new Set();

const attachments = r.attachments.map(a => {
  const id = String(a.attachment_id || '').trim();

  if (!id || ids.has(id)) {
    throw new Error('Missing or duplicate attachment ID: ' + id);
  }

  if (!Number.isInteger(a.order) || orders.has(a.order)) {
    throw new Error('Missing or duplicate integer photo order: ' + id);
  }

  if (!/\.(jpe?g|png)$/i.test(a.filename || '')) {
    throw new Error('Unsupported image filename: ' + id);
  }

  let u;

  try {
    u = new URL(a.download_url);
  } catch {
    throw new Error('Missing authorized download URL: ' + id);
  }

  if (u.protocol !== 'https:' || u.username || u.password) {
    throw new Error('Invalid download URL: ' + id);
  }

  ids.add(id);
  orders.add(a.order);

  return {
    ...a,
    attachment_id: id,
    caption: String(a.caption || '')
  };
}).sort((a, b) => a.order - b.order);

return {
  card_id: String(r.card_id),
  title: String(r.title || ''),
  selected_text: String(r.selected_text || ''),
  attachments,
  expected_count: attachments.length
};
This script:
- Confirms the card has an identifier and is in the reporting stage.
- Requires at least one selected photo.
- Rejects missing or duplicate attachment IDs.
- Requires unique numeric photo-order values.
- Accepts
.jpg,.jpeg, and.pngfilenames. - Requires HTTPS download URLs without embedded credentials.
- Sorts the selected attachments numerically by display order.
For example, an attachment list with order values 3, 1, and 2 is returned in the order 1, 2, 3.
The script does not download images. It validates the selected attachment metadata before processing begins.
Step 6: Iterate Through the Selected Photos
Add Tools > Iterator.
Name it:
Iterate selected photos
Configure:
- Array: Map
result.attachmentsfrom the validation Code module.
The Iterator creates one bundle for each selected attachment.
Each bundle contains the attachment's ID, numeric order, caption, filename, and authorized download URL.
Step 7: Download Each Photo Through an Authorized Link
Add HTTP > Get a file, or the equivalent Download a file operation.
Name it:
Download authorized photo
Configure:
- URL: Map
download_urlfrom the attachment Iterator. - Method: GET, if exposed.
- Share cookies: No.
- Error handling: Treat unsuccessful HTTP requests as errors.
Fresh signed attachment URLs may be downloadable without adding an Authorization header.
If Pipefy requires authenticated file retrieval, use an appropriate authenticated download action connected to Pipefy. Make sure that credentials are not forwarded to unrelated redirected hosts.
The module must return the actual binary image data.
If a temporary link has expired, retrieve a new authorized link through Pipefy and retry that attachment using a bounded retry policy. If the image is still unavailable, stop the report and retain the original card ID, attachment ID, and failure reason for investigation.
Step 8: Validate the Downloaded Image Type
Add another Make Code > Run code module.
Name it:
Check downloaded image type
Create these inputs:
attachment_id: Map the attachment ID from the Iterator.filename: Map the attachment filename from the Iterator.content_type: Map the Content-Type header from the actual HTTP download response.
Do not map content_type from the filename. It must come from the download response.
If your selected HTTP download operation does not expose response headers, use an HTTP request action that returns both the binary content and headers.
Paste this JavaScript:
const id = String(input.attachment_id);

const mime = String(input.content_type || '')
  .split(';')[0]
  .trim()
  .toLowerCase();

const filename = String(input.filename || '');

const ok =
  (mime === 'image/jpeg' && /\.jpe?g$/i.test(filename)) ||
  (mime === 'image/png' && /\.png$/i.test(filename));

if (!ok) {
  throw new Error(
    `Attachment ${id}: expected JPEG/PNG content type ` +
    `and matching filename; got ${mime || 'missing content type'}`
  );
}

return {
  attachment_id: id,
  filename,
  content_type: mime
};
The script rejects mismatches between the response Content-Type and the expected file extension.
For example:
inspection.jpgwithimage/jpegis accepted.repair.pngwithimage/pngis accepted.inspection.jpgwithtext/htmlis rejected.
Before uploading, also confirm that the download is nonempty and that the bytes have a valid image signature. A Content-Type header alone does not prove the response contains a valid image.
This is particularly important when a failed attachment request returns an HTML login page instead of a photo.
Step 9: Upload Each Private Photo to PDF.co
After validating the downloaded photo, add PDF.co > Upload a File.
Create or select your PDF.co connection using your API key.
Configure:
- Data: Map the binary image data returned by the HTTP download module.
- File Name: Map the original filename from the attachment Iterator.
The upload module transfers the selected image to PDF.co Temporary Files Storage and returns a temporary URL.
PDF.co temporary uploaded files are available for one hour. Use the returned URLs promptly when generating the report.
Check the upload result:
- Confirm the upload completed successfully.
- Verify that the error output does not indicate failure.
- Confirm that a temporary file URL was returned.
Do not continue when an upload fails.
Add Tools > Set variable after the upload.
Name the variable:
temporary_url
Map the successful URL output from PDF.co > Upload a File.
This variable must contain the PDF.co temporary URL, not the original private Pipefy download link.
Keep the PDF.co connection credentials in Make's connection settings.
For more information, see PDF.co Upload a File for Make.
Step 10: Collect the Uploaded Photo Details
Add Tools > Array aggregator.
Name it:
Collect uploaded photo details
Set the Source module to the attachment Iterator from Step 6.
For every selected photo, aggregate:
attachment_id: The original attachment ID from the Iterator.order: The original numeric order.caption: The original caption.url: The PDF.cotemporary_urlvariable.
The source module is important. Select the attachment Iterator, not the PDF.co upload module, so the aggregator follows the original selected-photo iteration.
The output should contain one object for each attachment, preserving the original identity and metadata together with its uploaded URL.
Step 11: Verify Completeness and Build the Report HTML
Add Make Code > Run code.
Name it:
Check completeness and build report
Create these inputs:
rows: Map the Array aggregator's output array.source: Map the complete Result object from the card-validation Code module.
Paste this JavaScript:
const rows = typeof input.rows === 'string'
? JSON.parse(input.rows)
: input.rows;
const source = typeof input.source === 'string'
? JSON.parse(input.source)
: input.source;
if (!Array.isArray(rows) || rows.length !== source.expected_count) {
throw new Error(
`Card ${source.card_id}: expected ${source.expected_count} ` +
`uploaded photos, received ${rows?.length || 0}`
);
}
const seen = new Set();
for (const r of rows) {
const original = source.attachments.find(
a => a.attachment_id === String(r.attachment_id)
);
if (!original || seen.has(String(r.attachment_id))) {
throw new Error('Unexpected or duplicate upload: ' + r.attachment_id);
}
if (
Number(r.order) !== original.order ||
String(r.caption) !== original.caption
) {
throw new Error('Photo metadata changed: ' + r.attachment_id);
}
let u;
try {
u = new URL(r.url);
} catch {
throw new Error('Missing uploaded image URL: ' + r.attachment_id);
}
if (u.protocol !== 'https:' || u.username || u.password) {
throw new Error('Invalid uploaded image URL: ' + r.attachment_id);
}
seen.add(String(r.attachment_id));
}
const esc = s => String(s ?? '').replace(/[&<>"']/g, c => ({
'&': '&',
'<': '<',
'>': '>',
'"': '"',
"'": '''
}[c]));
const figures = [...rows]
.sort((a, b) => Number(a.order) - Number(b.order))
.map(r =>
`<figure><img src="${esc(r.url)}" alt="Selected inspection photo">` +
`<figcaption>${esc(r.caption)}</figcaption></figure>`
)
.join('');
const html = `<!doctype html>
<html>
<head>
<meta charset="utf-8">
<style>
body {
font-family: Arial, sans-serif;
font-size: 12px;
}
figure {
margin: 18px 0;
break-inside: avoid;
}
img {
display: block;
max-width: 100%;
max-height: 650px;
}
figcaption {
margin-top: 7px;
}
.new-page {
break-before: page;
}
.details {
white-space: pre-wrap;
}
</style>
</head>
<body>
<h1>Site visit report</h1>
<p>Card reference: ${esc(source.card_id)}</p>
<h2>${esc(source.title)}</h2>
<div class="details">${esc(source.selected_text)}</div>
${figures}
</body>
</html>`;
return {
html,
card_id: source.card_id,
filename:
'site-visit-' +
String(source.card_id).replace(/[^a-zA-Z0-9_-]/g, '_') +
'.pdf',
photo_count: rows.length
};This script performs several checks before generating the report:
- The number of uploaded photos matches the original selection.
- Every aggregated attachment ID belongs to the original selection.
- No attachment appears more than once.
- Numeric order and captions match the selected metadata.
- Every uploaded image has a usable HTTPS URL.
It then sorts the photos numerically, escapes card text and captions for HTML, and builds the complete document.
For example, the resulting filename for card CASE-204 is:
site-visit-CASE-204.pdfThe HTML uses a separate <figure> element for each photo, with a caption below the image.
CSS limits image dimensions and helps prevent an individual figure from splitting across pages.
The result contains:
html: Complete document HTML.card_id: Original Pipefy card ID.filename: Output PDF filename.photo_count: Number of included photos.
These checks verify the generated HTML structure and uploaded URLs. The PDF still needs to be opened to confirm the images rendered correctly.
Step 12: Convert the HTML into a PDF with PDF.co
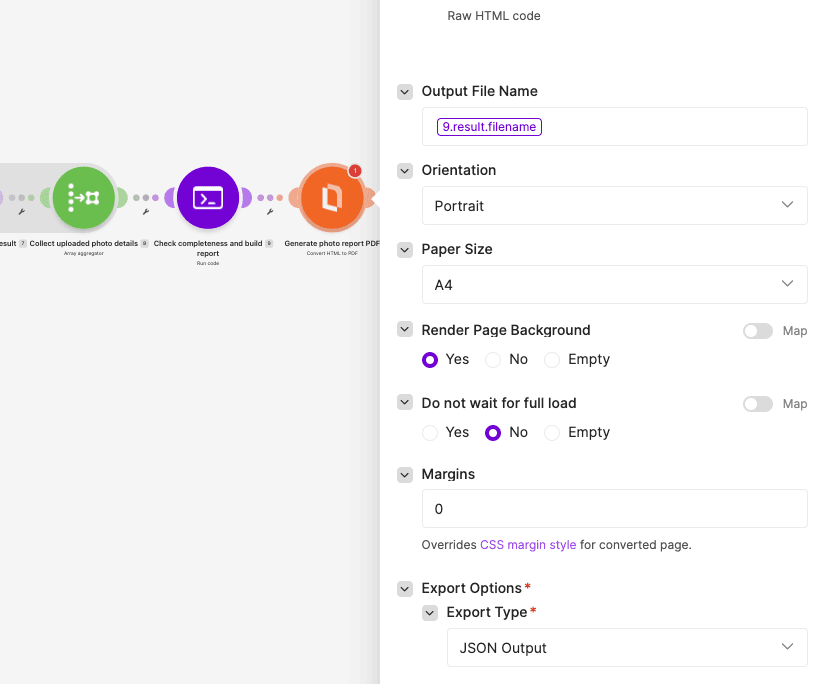
Add PDF.co > Convert HTML to PDF.
Name it:
Generate photo report PDF
Configure:
- Convert Type: HTML to PDF.
- Input HTML Code: Map
htmlfrom the previous Code module. - Output File Name: Map
filenamefrom the previous Code module. - Execution Mode: Sync.
- Export Type: JSON Output.
- Paper Size: A4.
- Orientation: Portrait.
- Margins:
0. - Render Page Background: Yes.
- Do not wait for full load: No.
- Output Links Expiration:
60.
Use raw HTML conversion, not a saved HTML template.
PDF.co uses the temporary image URLs included in the HTML to retrieve the uploaded photos during conversion.
The synchronous mode is suitable for smaller conversion jobs that complete within its supported execution limit.
For larger photo reports, use an asynchronous execution mode with job-status checking and a timeout before downloading the result.
Do not treat a job ID or unfinished response as a completed PDF.
For module details, see Convert HTML to PDF with Make.
Step 13: Download the Completed Report
Add HTTP > Get a file, or the equivalent Download a file operation.
Name it:
Download completed report
Configure:
- URL: Map the PDF.co conversion module's completed
url. - Method: GET, if exposed.
- Error handling: Treat unsuccessful downloads as errors.
Before downloading, confirm the PDF.co conversion did not report an error and returned a completed PDF URL.
The module downloads the PDF as binary data.
Verify that the result is nonempty and contains PDF data rather than a JSON error response or HTML page.
The next step will store this binary PDF in the approved archive.
Step 14: Save the PDF to an Approved Storage Location
Add the upload operation for your approved document-storage provider.
For example, if you use Google Drive:
- Add Google Drive > Upload a file.
- Connect the approved Google Drive account.
- Select the destination folder.
- Map the completed PDF's binary Data from the HTTP download.
- Map the output filename from the HTML-building Code module.
- Leave file conversion disabled.
The storage provider should return a permanent document identifier or browser link.
Use that identifier to retrieve or construct the stored document link, according to the provider's supported format.
For a Google Drive file, a browser link may have this structure:
https://drive.google.com/file/d/STORED_FILE_ID/viewReplace STORED_FILE_ID with the actual uploaded file ID.
Do not change the stored document's permissions to public unless that is explicitly authorized.
The final Pipefy link must point to this stored document, not the temporary PDF.co conversion URL.
Step 15: Prepare the Permanent Report Link
Add Tools > Set variable.
Name the variable:
stored_url
Map the durable document URL returned by the storage step.
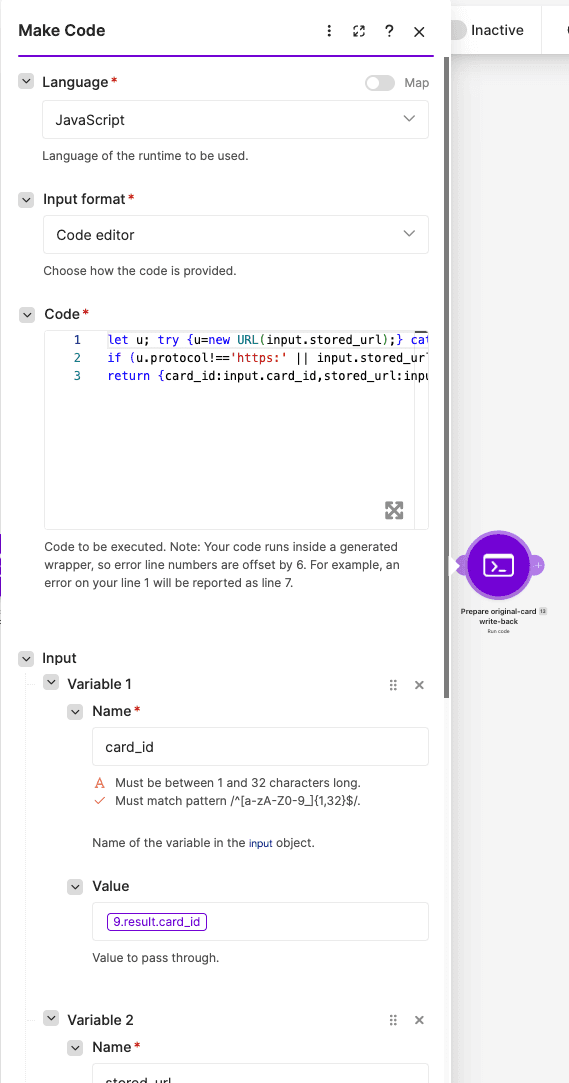
Next, add Make Code > Run code and name it:
Prepare original-card write-back
Create these inputs:
card_id: Mapcard_idfrom the HTML-building Code module.stored_url: Map thestored_urlvariable.temporary_url: Map the completed PDF.co conversion URL.
Paste this JavaScript:
let u;

try {
  u = new URL(input.stored_url);
} catch {
  throw new Error(
    'Map the durable storage link before updating Pipefy'
  );
}

if (
  u.protocol !== 'https:' ||
  input.stored_url === input.temporary_url
) {
  throw new Error(
    'A durable, permissioned storage link is required'
  );
}

return {
  card_id: input.card_id,
  stored_url: input.stored_url
};
This script checks that the stored URL uses HTTPS and is not identical to the temporary PDF.co conversion URL.
It does not independently verify the stored file's sharing permissions or long-term availability. Confirm those using the selected storage provider.
Step 16: Write the Report Link Back to Pipefy
Add Pipefy > Update a Card Field.
Connect the same authorized Pipefy account used earlier.
Configure:
- Card ID: Map
card_idfrom the previous Code module. - Field: Select the Pipefy field designated to store the report link.
- Value: Map
stored_urlfrom the previous Code module.
Save the module.
This updates the original card with the stored document link.
If your Pipefy field expects an attachment rather than a URL, use Pipefy's supported upload or attachment mechanism and the saved PDF file instead.
Do not overwrite unrelated existing attachments.
For this workflow, a successful report requires both a completed archive upload and the intended card-field update.
Step 17: Configure Error Handling
Add error-handler routes to the modules responsible for downloading, validating, uploading, converting, storing, and updating documents.
The error-handling process should preserve the original card ID and, for attachment failures, the original attachment ID.
For each failure, record:
- Original Pipefy card ID.
- Attachment ID, when an image failed.
- Failed processing step.
- Error message.
- Whether the PDF had already been stored.
Configure these behaviors:
- Photo download failure: Retrieve a fresh authorized link and retry a limited number of times. Stop if the attachment remains unavailable.
- Invalid file type: Reject unsupported files rather than attempting to convert them.
- PDF.co upload failure: Stop the report. Do not omit the photo from the document.
- Incomplete photo aggregation: Do not generate the PDF.
- PDF conversion failure: Stop before storage or card update.
- Storage failure: Do not write the temporary PDF.co URL to Pipefy.
- Pipefy update failure: Retain the stored PDF URL and retry the card update without regenerating the report.
Preserve any previous successful report reference when a new run fails.
Use an approved error destination, such as a review queue or a card field, to record the failure. The report should not be presented as successfully completed when a required image is missing.
This workflow does not automatically prevent repeated events from generating duplicate reports. If repeated reporting-stage events are possible, add a request identifier or report-status check before processing to prevent unnecessary regeneration.
Step 18: Test the Complete Workflow
Before enabling the scenario for regular use, prepare a Pipefy card containing several selected photos.
Use deliberately shuffled photo-order values, such as 3, 1, and 2, to verify that the report uses numeric order rather than the original array order.
Move the card into the reporting phase and run the scenario.
Confirm:
- The trigger identifies the correct Pipefy card and phase.
- The current card details are retrieved successfully.
- The normalized attachment list contains every selected image.
- Attachment IDs and numeric order values are unique.
- Photos are downloaded using current authorized links.
- The downloaded files match the expected image formats.
- Every selected photo is uploaded successfully to PDF.co.
- The Array aggregator produces the same number of rows as selected photos.
- The report HTML contains every selected photo once.
- PDF.co generates a completed PDF.
- The PDF is stored in the approved destination.
- The stored link is written back to the original Pipefy card.
Open the stored PDF and verify the photo order, captions, text, and page breaks.
Test Failure Scenarios
Run additional tests with the following conditions:
- No selected photos: The scenario should stop without generating a report.
- Duplicate attachment ID: Validation should reject the selected list.
- Duplicate or missing numeric order: Validation should stop before downloading.
- Unsupported attachment: A non-JPEG/PNG file should be rejected.
- Expired source link: The scenario should acquire a new authorized link or stop with an error identifying the attachment.
- Upload failure: The report should not be finalized with a missing photo.
- Missing temporary PDF.co URL: The completeness check should reject the result.
- Conversion failure: The scenario should not upload or publish an invalid PDF.
- Final Pipefy update failure: The stored PDF should remain available so the write-back can be retried.
Also confirm that the stored document link opens for its intended readers without exposing unrelated private files.
Troubleshooting
- The trigger doesn't run: Verify the selected pipe and that the card actually moved into the reporting phase. Check the scenario's activation and scheduling settings.
- The wrong card is processed: Confirm the trigger's card ID mapping and the phase verification performed after retrieving the current card details.
- Photos aren't available: Check that the attachment data contains a current authorized download URL and that the connected account can access the selected files.
- The download returns HTML instead of an image: The file URL may have expired or require additional authentication. Retrieve a fresh link and use an authorized download action.
- The image validation fails: Verify both the filename extension and actual Content-Type response header. Also inspect the file bytes.
- The PDF.co upload succeeds but a photo is missing: Check the uploaded temporary URLs, aggregation count, and resulting PDF. Complete conversion while the uploaded files remain available.
- The PDF fails to generate: Verify the raw HTML conversion input, PDF.co connection, and conversion result.
- The report link is temporary: Confirm that Pipefy receives the URL from your approved storage provider rather than the PDF.co conversion module.
- The PDF was stored but Pipefy wasn't updated: Retry the original card-field update using the existing stored PDF link instead of generating another report.
Conclusion
With Pipefy, Make, and PDF.co, you can automatically turn selected private inspection photos into a single PDF report.
The workflow retrieves the original Pipefy card, validates the selected images, downloads them through authorized links, and uploads them to PDF.co Temporary Files Storage. After verifying the photo list, it generates an HTML report, converts it into a PDF, and stores the finished document.
By writing the permanent report link back to the original Pipefy card, the workflow keeps the generated document connected to the record that initiated it.
Explore more document automation workflows in the PDF.co Make integration documentation and PDF.co tutorials.
Related Tutorials