To connect your PDF.co account to Zapier, add your API Key. You can obtain the API key in your PDF.co dashboard.
How to Create PDF Reports with Airtable Data using PDF.co and Zapier
11 Minutes Read
Are you tired of spending hours creating reports manually? With PDF.co and Zapier, you can automate the process and save yourself valuable time. By integrating these two tools, you can extract data from Airtable and turn it into a professional-looking PDF report in just a few clicks.
PDF.co offers a wide range of features to help you customize your report, including the ability to add headers and footers, insert images and text, and choose from a variety of formatting options. Meanwhile, Zapier makes it easy to connect your Airtable account and trigger the report creation process automatically based on your specific criteria.
Whether you need to generate weekly sales reports, monthly financial statements, or any other type of report, PDF.co and Zapier make it easy to automate the process and save yourself time and effort. Say goodbye to manual report creation and hello to efficient, automated workflows with PDF.co and Zapier.
In this tutorial, we’ll show you how to automate the process of generating PDF reports using data from your Airtable database. We’ll start by introducing PDF.co and Zapier, and explaining how they can work together to streamline your workflow. Then, we’ll walk you through the steps to set up a Zapier workflow that will trigger PDF.co to generate a customized PDF report whenever new data is added to your Airtable database. We’ll cover everything you need to know, from connecting your accounts to creating your first report. By the end of this tutorial, you’ll have a fully automated workflow that will save you time and effort in generating reports. Let’s get started!
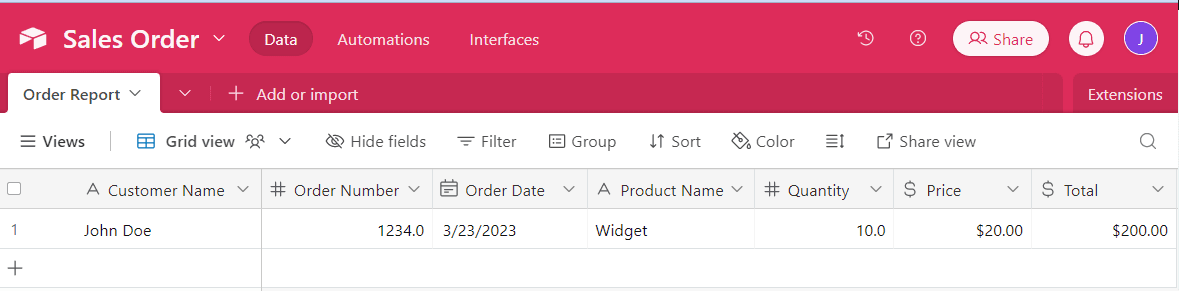
We will use this sample Airtable data and create a PDF report using PDF.co.
Step 1: Create a Zap
- First, log into your Zapier account and click on the Create Zap button.
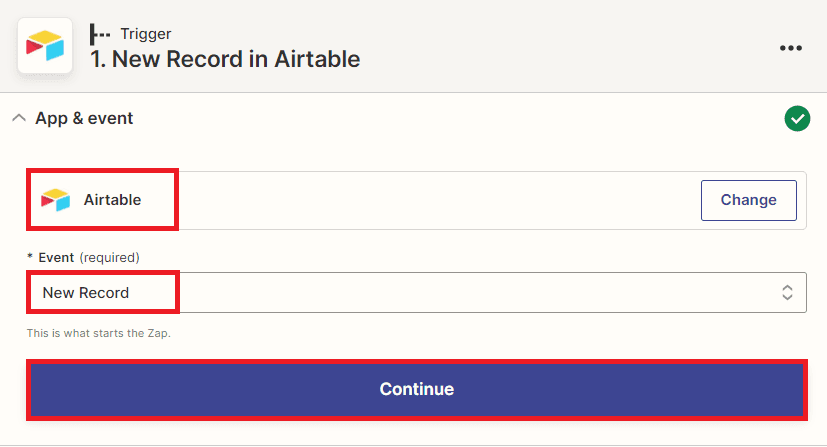
Step 2: Add Airtable App
- The next step is to add the Airtable app to Zapier and select the “New Record” option. This will trigger the automation whenever a new record is added to your Airtable database.
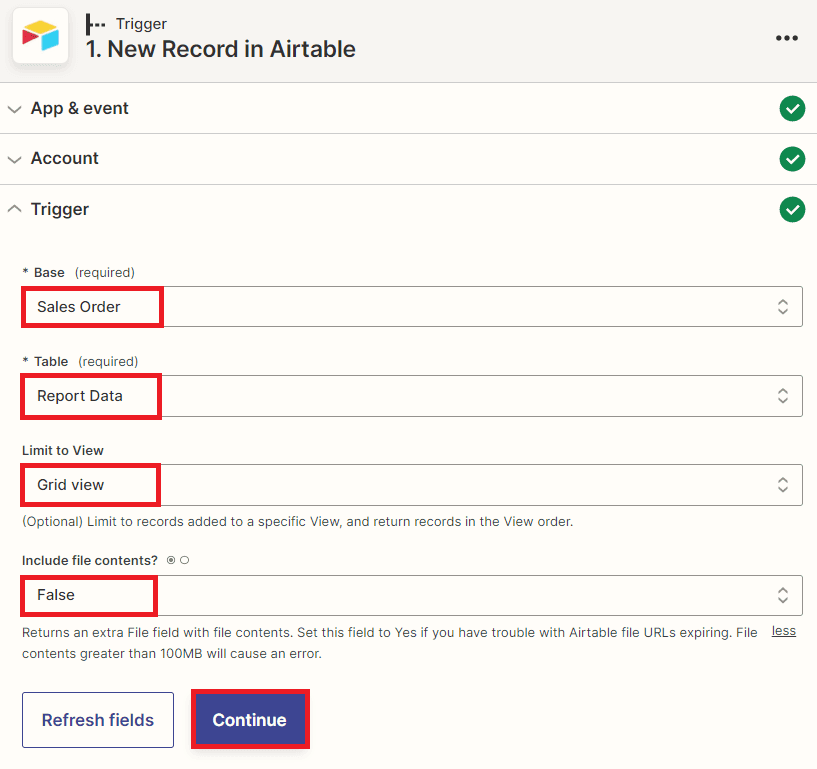
Step 3: Setup Trigger
- Let’s set up the trigger in Zapier. First, in the “Base” field, enter the name of the base you created in Airtable.
- Then, in the “Table” field, select the table where the data for your report is located.
- If you want to limit the automation to specific records, you can enter the name of the view in the “Limit to View” field. This will return records in the order they appear in the view.
- Finally, in the “Include file contents” field, select “false” to avoid errors and return an extra file field with file contents.
Now that we’ve set up the trigger in Zapier, let’s test it to make sure everything is working as expected. By testing the trigger, you can ensure that your Zapier automation is properly configured and ready to generate PDF reports from your Airtable data.
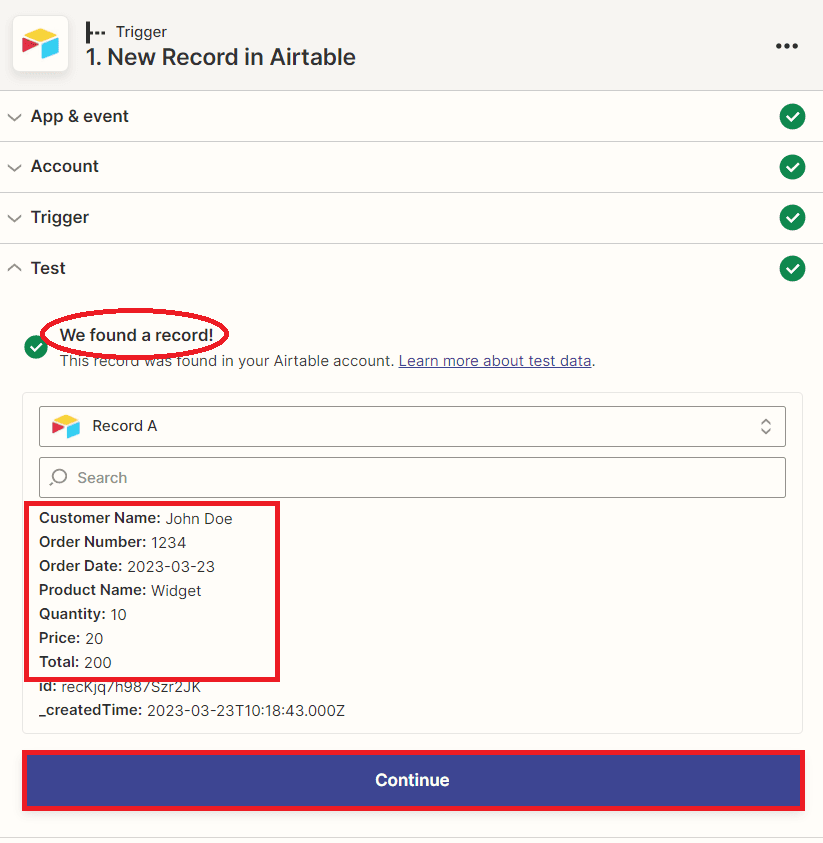
Step 4: Test Trigger Result
- Great! The test trigger was successful, and Zapier has fetched the report data from your Airtable table. Now, let’s move on to the next step, creating a customized PDF report using this data.
Step 5: Add PDF.co App
- In order to create the PDF report from the Airtable data, we need to add another app to Zapier. Let’s select PDF.co and choose the “HTML to PDF Converter” option. This powerful tool allows you to generate PDFs from HTML templates, so you can customize the report with your own branding and formatting.
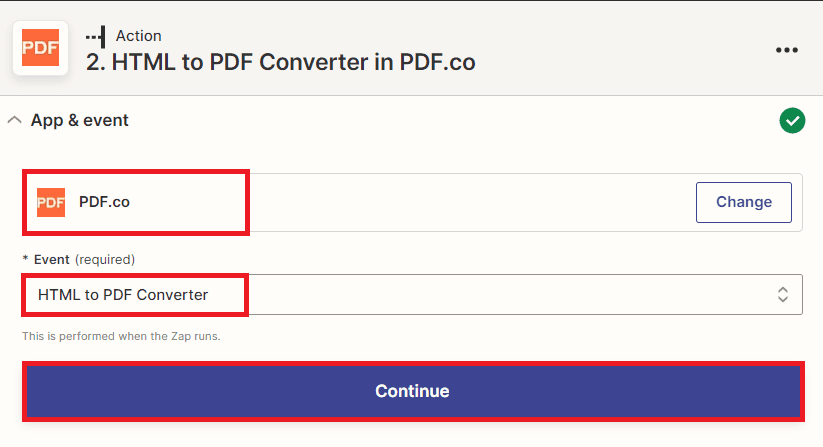
Step 6: Setup Action
Now, we need to set up the action to create the PDF report from the Airtable data.
- In the “Input HTML or URL to Convert” field, we will input the HTML code along with the data from Airtable to create the PDF report.
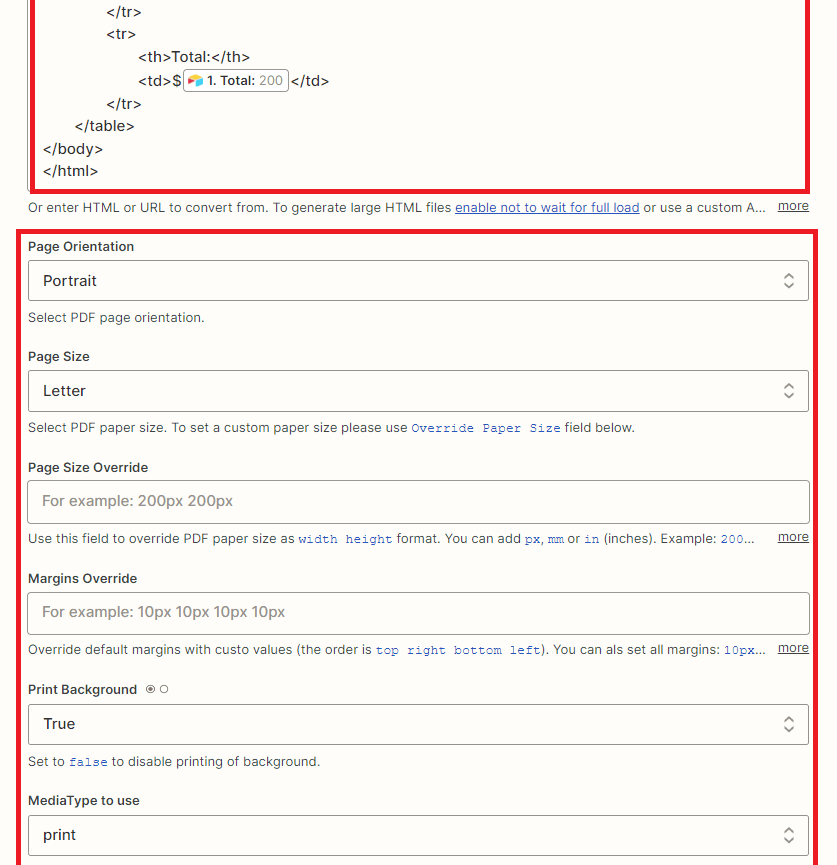
- You can customize the page orientation, size, margins, and other settings as desired, but for this tutorial, we will use the default values.
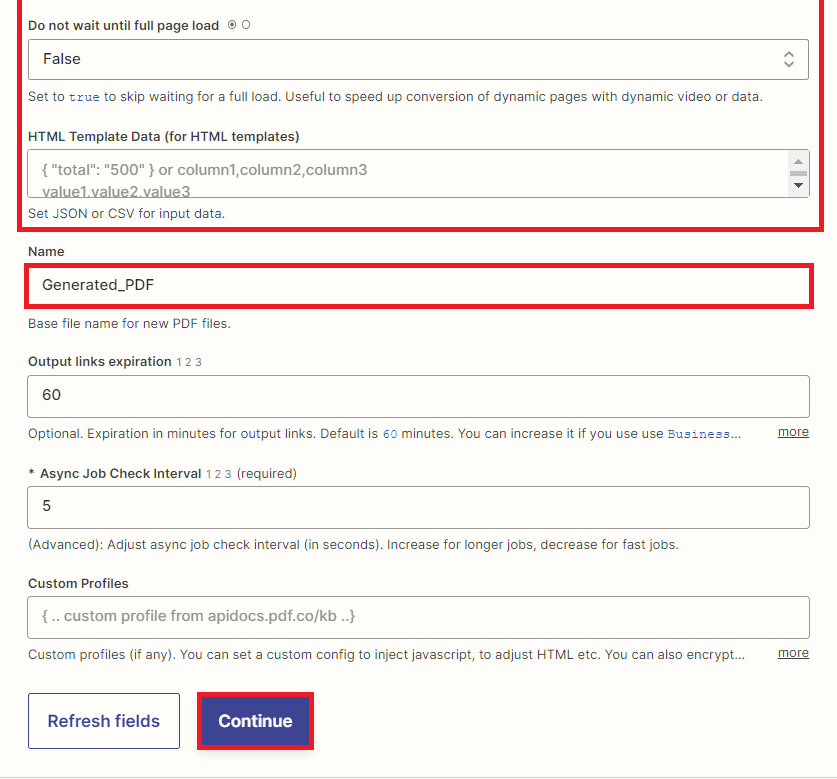
- Next, we need to enter a name for our PDF output file in the “Name” field. This will be the name of the file that we will download and save to our computer or cloud storage.
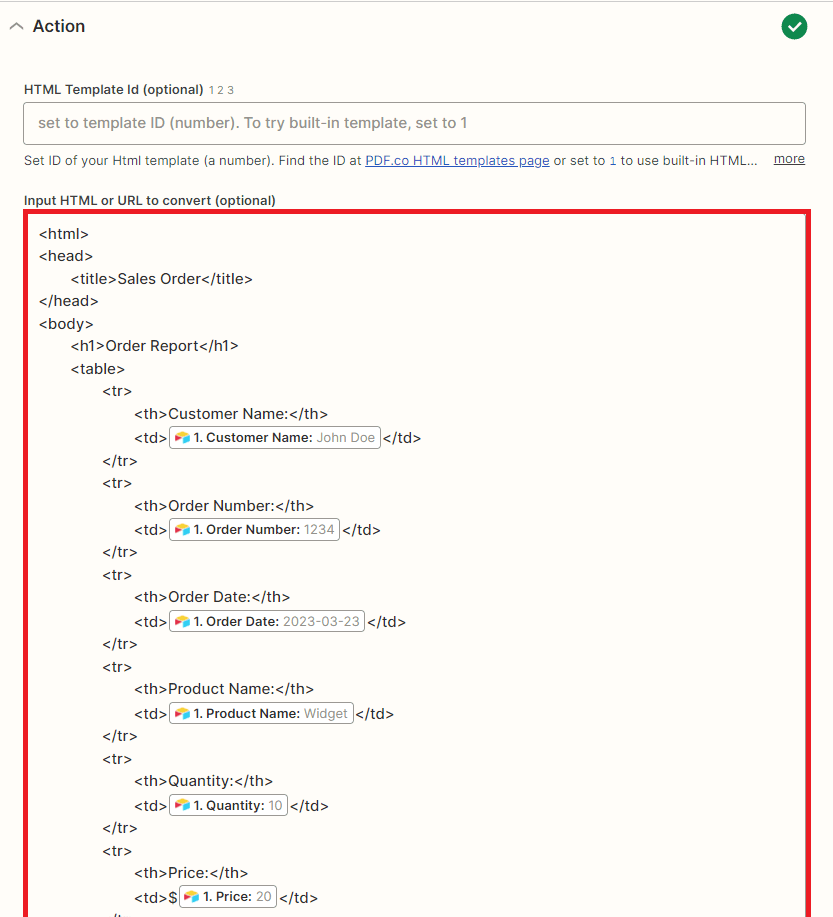
HTML Code
<html>
<head>
<title>Sales Order</title>
</head>
<body>
<h1>Order Report</h1>
<table>
<tr>
<th>Customer Name:</th>
<td>John Doe</td>
</tr>
<tr>
<th>Order Number:</th>
<td>1234</td>
</tr>
<tr>
<th>Order Date:</th>
<td>03-23-2023</td>
</tr>
<tr>
<th>Product Name:</th>
<td>Widget</td>
</tr>
<tr>
<th>Quantity:</th>
<td>10</td>
</tr>
<tr>
<th>Price:</th>
<td>$20</td>
</tr>
<tr>
<th>Total:</th>
<td>$200</td>
</tr>
</table>
</body>
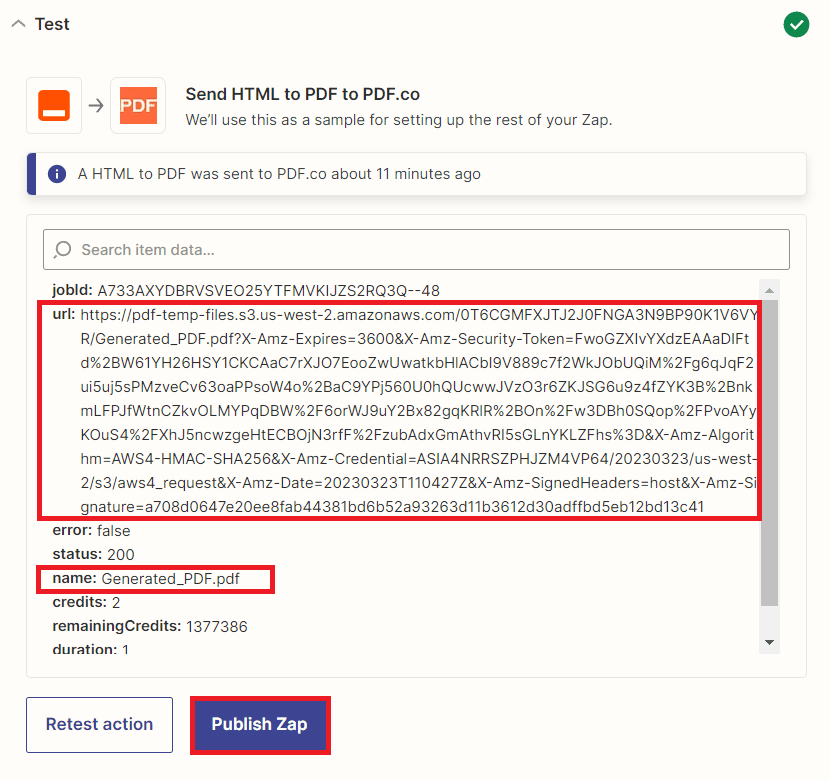
</html>Now, let’s test the action to ensure that everything is working as expected. To do this, we simply need to click the “Test Action” button in Zapier, which will run a test of the workflow and generate a sample PDF report using the data from our Airtable table. We can then review this report to ensure that it contains all of the necessary information and formatting.
Step 7: Test Action Result
- Congratulations! The test action was successful in generating a PDF report containing data from an Airtable table. This is a valuable achievement as it enables you to organize and present your data in a professional and structured manner.
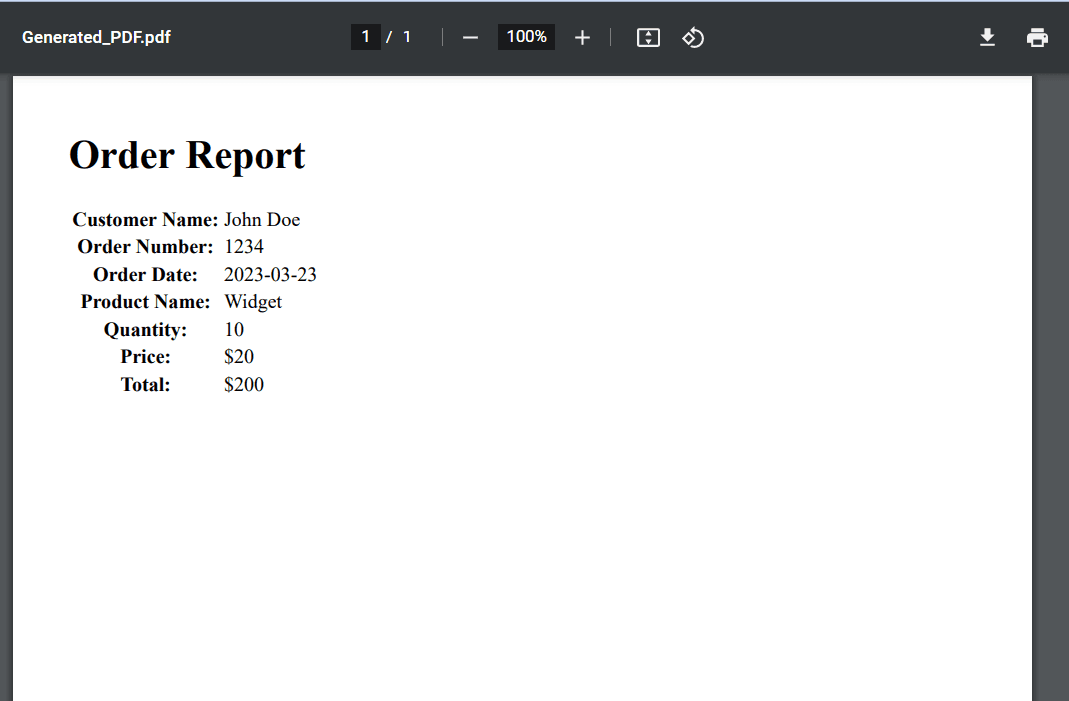
Step 8: Generated PDF Report
- Here is the PDF report that was generated using data from your Airtable table. This report contains valuable insights and information that can be used to make informed decisions and improve overall efficiency.
In this tutorial, you learned how to automate the process of generating PDF reports using Zapier and PDF.co. This can be a valuable skill to have in various industries and can help to streamline workflow processes. You learned how to integrate different software tools, including Airtable, Zapier, and PDF.co. This can help to improve productivity and efficiency in the workplace. You learned how to generate professional-looking PDF reports that are accurate, consistent, and customizable. This can help to enhance the quality of reports and improve decision-making processes.
By automating the process of generating PDF reports, users can save time and effort, allowing them to focus on other important tasks and projects.
Overall, users can gain valuable skills and knowledge from this tutorial that can help them to work more efficiently, produce higher-quality reports, and make more informed decisions.
Video Guide
Related Tutorials
