How to Fill Scanned PDF Forms Using Zapier and PDF.co
In this tutorial, you will learn how to fill in forms on PDF easily using Zapier and PDF.co automation. You will find out how to scan a form and fill it in with text.
What is Zapier?
Zapier is an online automation tool that connects your favorite apps, such as Gmail, Slack, Mailchimp, and over 1,500 more. You can connect two or more apps to automate repetitive tasks without coding or relying on developers to build the integration. It’s easy enough that anyone can build their own app workflows with just a few clicks.
We prepared this step-by-step tutorial with screenshots on how to make a Zap using PDF.co to fill scanned PDF forms. If you need to fill editable PDF form, then please check this tutorial instead.
Due to great variations of input sources, this tutorial will assume you have already set up the trigger phase before the “Do this” part, where PDF.co comes into play.
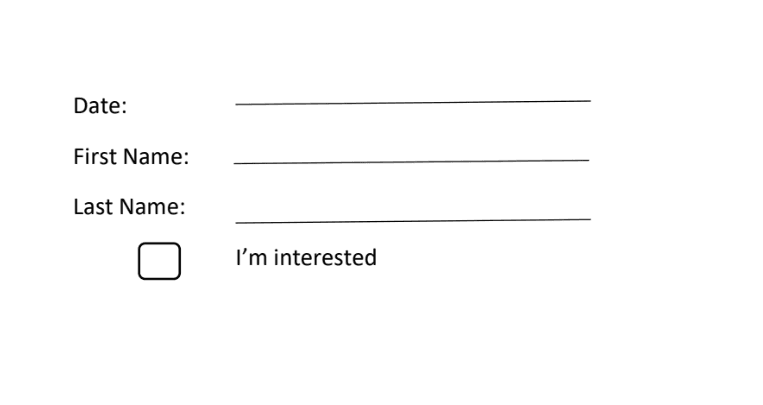
For this task, we will utilize a sample scanned PDF form. Our objective is to fill out this form by adding text to its designated fields.
TL;DR:
- To begin, you can open your Zapier account and proceed with creating a Zap.
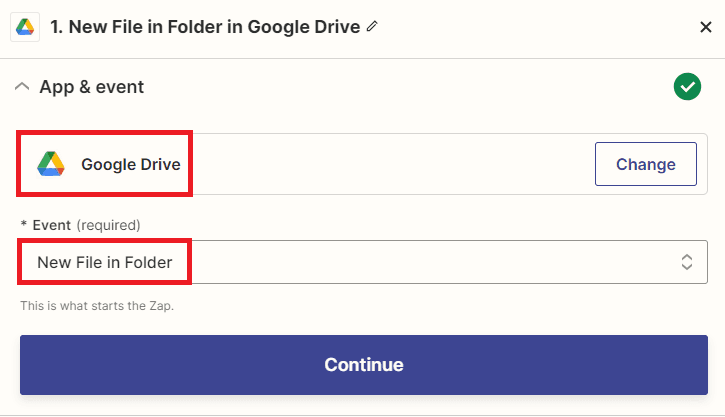
- Next, we can proceed to integrate the Google Drive app or any other cloud storage service of your choice where you have the source PDF file. From there, you can select the New File in Folder option to set up our Zap to trigger whenever a new file is added to a specific folder.
- Now, you can establish a connection between your Zapier account and your Google Drive. This connection will allow Zapier to access and work with the files in your Google Drive account.
- To initiate the trigger setup, begin by selecting My Google Drive as the designated drive to be used. Following that, input the specific file that you wish to fill out.
- Excellent! The test has been successful, and we have successfully retrieved the file from Google Drive. Now, let’s proceed to the next step, which involves filling out the scanned PDF form.
- In this next step, we will incorporate the PDF.co application and select the PDF Filler functionality. This capability allows us to complete a scanned PDF form by inputting text into the appropriate fields.
- Now, connect your PDF.co account to Zapier by adding the API Key. You can obtain the API Key from your PDF.co dashboard or by signing up.
- Let’s configure the action step. In the Source PDF field, enter the Web Content Link from Google Drive. In the Text Objects field, enter the x and y coordinates, page number, and text in this format
X;Y;page;text. - Congratulations! The test was a success, and the scanned PDF form has been successfully filled out. To view the output, please copy the URL provided and paste it into your web browser.
- Here is the scanned PDF form that has been effectively completed.
Step 1. Create a Zap
- To begin, you can open your Zapier account and proceed with creating a Zap.
Step 2: Add Google Drive App
- Next, we can proceed to integrate the Google Drive app or any other cloud storage service of your choice where you have the source PDF file. From there, you can select the New File in Folder option to set up our Zap to trigger whenever a new file is added to a specific folder.
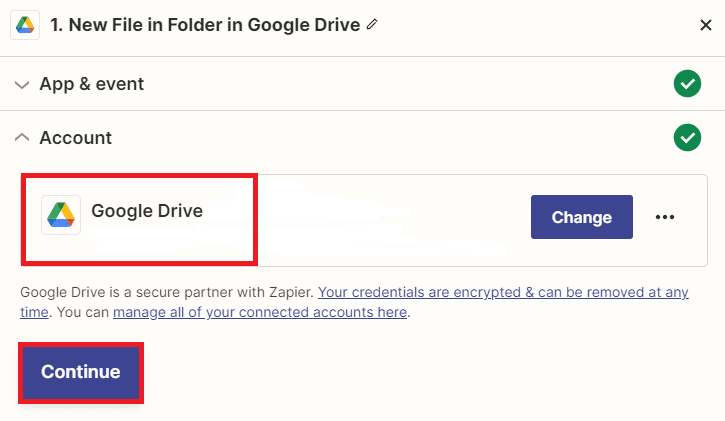
Step 3: Connect Google Drive Account
- Now, you can establish a connection between your Zapier account and your Google Drive. This connection will allow Zapier to access and work with the files in your Google Drive account.
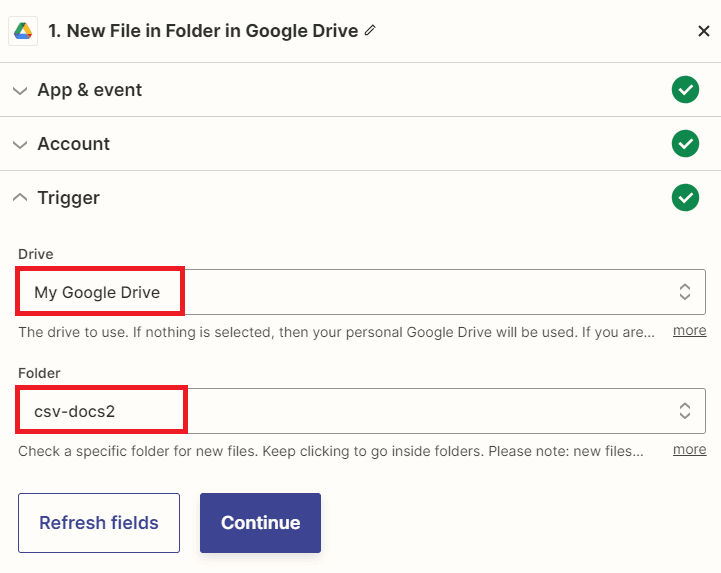
Step 4: Setup Trigger
- To initiate the trigger setup, begin by selecting My Google Drive as the designated drive to be used.
- Following that, input the specific file that you wish to fill out.
Once you have finished setting up the trigger, it is recommended to test it.
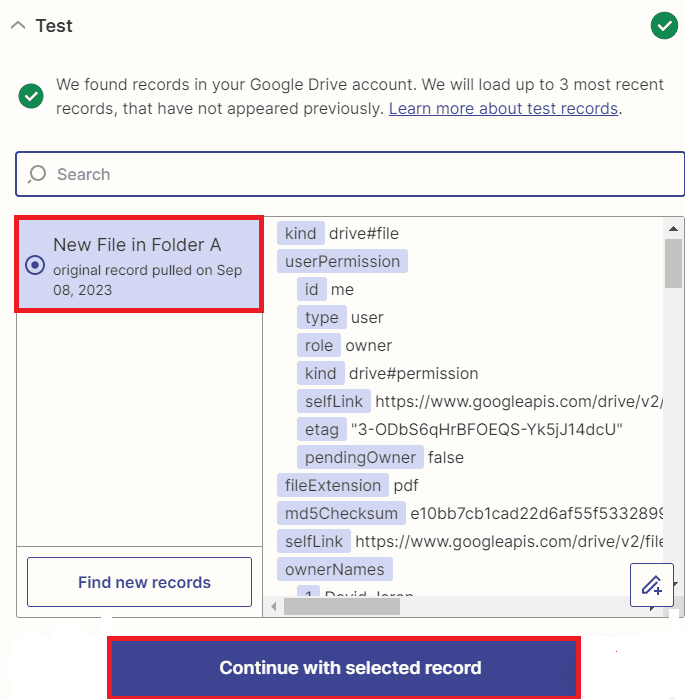
Step 5: Test Trigger Result
- Excellent! The test has been successful and we have successfully retrieved the file from Google Drive. Now, let’s proceed to the next step, which involves filling out the scanned PDF form.
Step 6: Add PDF.co App
- In this next step, we will incorporate the PDF.co application and select the PDF Filler functionality. This capability allows us to complete a scanned PDF form by inputting text into the appropriate fields.
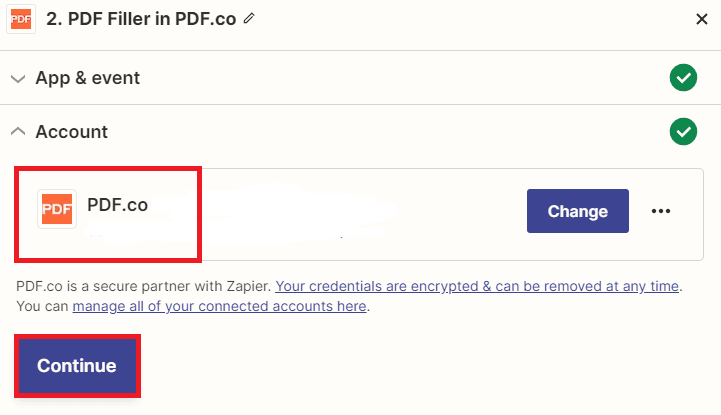
Step 7: Connect PDF.co Account
- Now, connect your PDF.co account to Zapier by adding the API Key. You can obtain the API Key from your PDF.co dashboard or by signing up.
Step 8: Setup Action
- Let’s configure the action step. In the Source PDF field, enter the Web Content Link from Google Drive.
- In the Text Objects field, enter the x and y coordinates, page number, and text in this format
X;Y;page;text. You may also add font size, color, and font name like this:X;Y;page;text;fontsize;fontname;fontcolor.
Note: To find X and Y coordinates, just load your PDF into PDF.co PDF Edit Add Helper that displays coordinates under the cursor:

After completing the setup, simply click on the test step button to populate the scanned PDF with the necessary information.
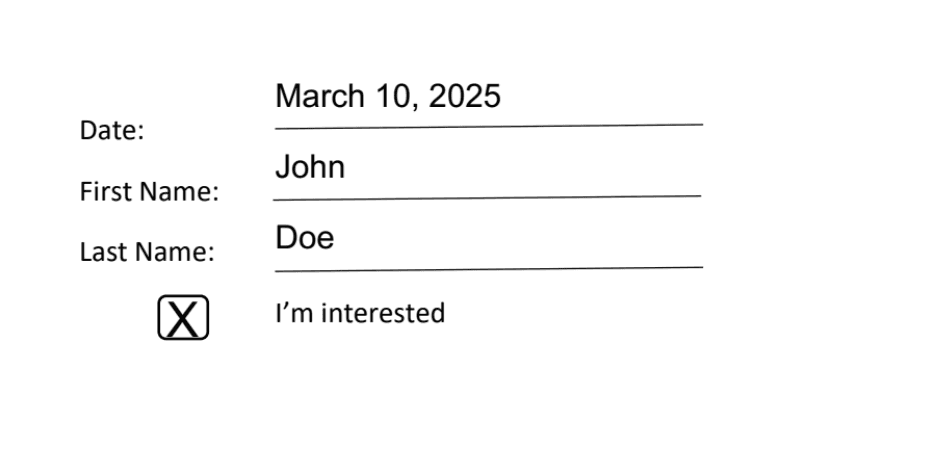
Step 9: Test Result
- Congratulations! The test was a success, and the scanned PDF form has been successfully filled out. To view the output, please copy the URL provided and paste it into your web browser.

Step 10: PDF Filler Output
- Here is the scanned PDF form that has been effectively completed.
Depending on your Zapier plan and settings, your Zaps will trigger, and the output and logs can be found in your Tasks History.
NOTE: If you need to fill out fillable PDF forms, please check this tutorial.
In this tutorial, you’ve learned how to fill out a scanned PDF form with PDF.co and Zapier in a few clicks.


