How to Fill PDF Form Using Automation Anywhere and PDF.co
Automation Anywhere is a technology company headquartered in San Jose, California, USA. It is a provider of an end-to-end Robotic Process Automation (RPA) and Artificial Intelligence (AI) platform for automating any business process. They offer Discovery Bot for fast-track automation, IQ Bot for transforming unstructured and hidden data with AI that can learn on its own, Bot Insight for real-time analytics, and a Bot Store to get pre-built automation solutions.
We prepared this step by step tutorial with screenshots on how to make a Bot using PDF.co to fill PDF Form data.
In this tutorial, we assume that you have already had a Community or Enterprise version of Automation anywhere with chrome extension as well as client agent already installed. We also assume that you have basic knowledge of how to create a simple bot and have it executed on your machine.
Bot Creation
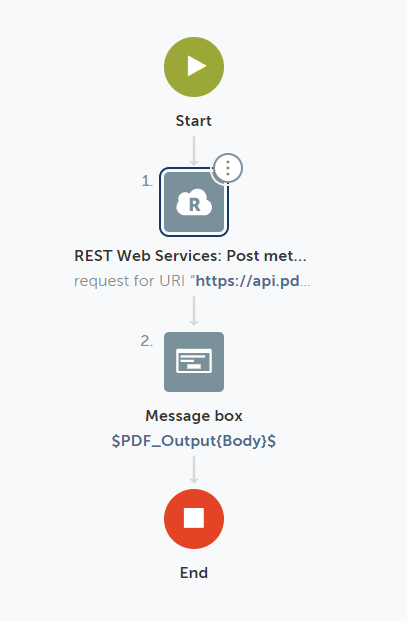
In Automation Anywhere cloud Control Room, create a new Bot for filling PDF form data. We’ll be using “Rest Web Service: Post Method” action to consume PDF.co /pdf/edit/add API endpoint. We’ll also have the “Message Box” action attached to the output of the API call. The final bot structure will be as follows.
URI Configuration
Configure URI to “https://api.pdf.co/v1/pdf/edit/add” in “Rest Web Service: Post Method” action.
Header Configurations
Configure the Header key with the name “x-api-key” with the API key for PDF.co. This API key is essential for consuming PDF.co APIs. API keys can be obtained from https://pdf.co.
Request Input Configuration
Configure input data to the REST Web API call. Here, we’ve configured basic service request data in JSON format as follows.
{
    "name": "f1040-form-filled",
    "url": "bytescout-com.s3-us-west-2.amazonaws.com/files/demo-files/cloud-api/pdf-form/f1040.pdf",
    "fieldsString": "1;topmostSubform[0].Page1[0].f1_02[0];John A. Doe|1;topmostSubform[0].Page1[0].FilingStatus[0].c1_01[1];true|1;topmostSubform[0].Page1[0].YourSocial_ReadOrderControl[0].f1_04[0];123456789"
}
Property “fieldsString” in request data includes the form field name and value to be assigned. Multiple field values are separated by pipe (‘|’) delimiter.
Configure Rest API Output
Generate an output variable of type dictionary holding the response of API call.
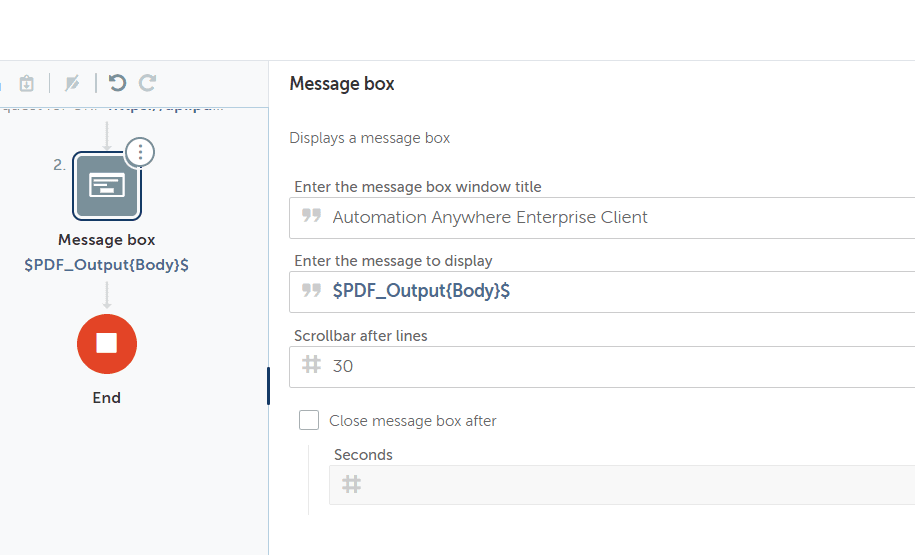
Configure Message Box
Drag and Drop the “Message box” action and attach it after the “REST Web Service: Post Method” action. Here, we’ll configure “message to display” with the “Body” property of the output variable.
Execute Bot and Review Output
With these settings done, we’re now ready to execute the bot and see the output message box.
If we open URL retrieved in JSON output, we’ll find that form fields are filled as per request data.
Video Guide
Related Tutorials
