How to Fill PDF with Data Submitted from Wix Forms using PDF.co and Zapier
We prepared this step-by-step tutorial with screenshots to teach you how to fill PDF with data submitted from Wix Forms using PDF.co and Zapier.
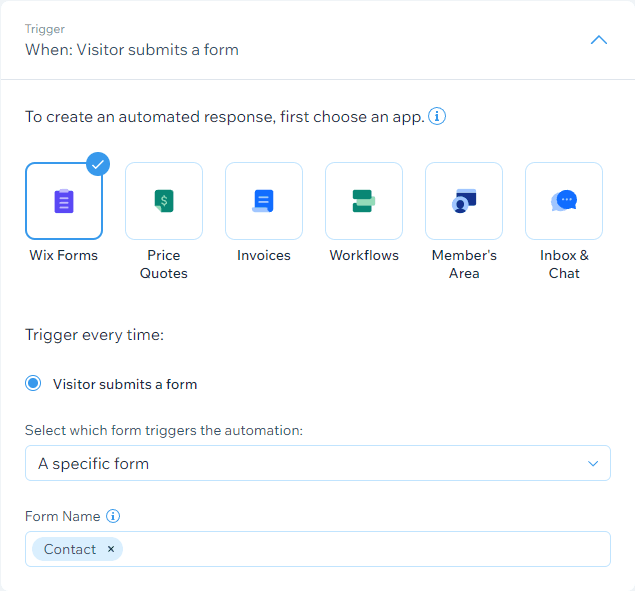
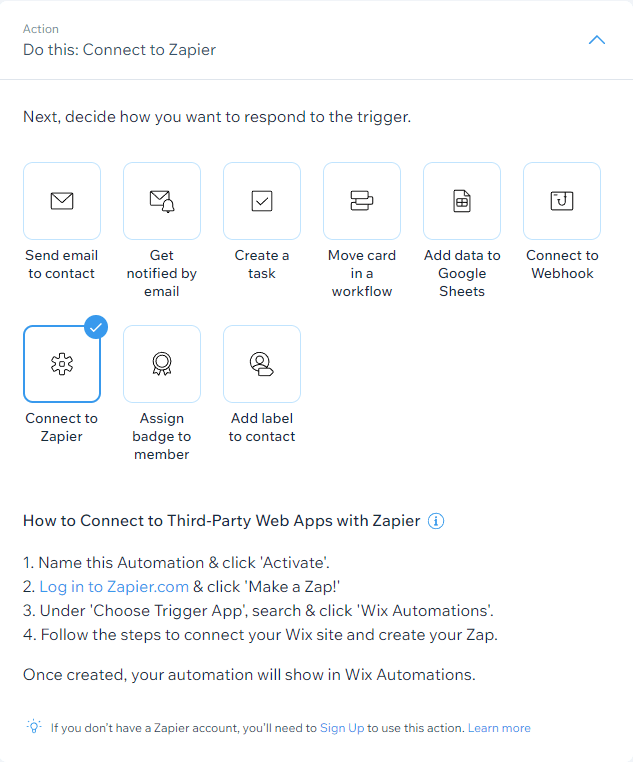
You’ll first need to set up your Wix Automation:
![Screenshot of Wix Automation Trigger](/_next/image?url=https%3A%2F%2Fcdn.sanity.io%2Fimages%2F2niroq9z%2Fproduction%2F033fdffa76a1edda8149a8d6ef623a40952970e0-635x591.png&w=1920&q=75)
![Screenshot of Wix Automation Action](/_next/image?url=https%3A%2F%2Fcdn.sanity.io%2Fimages%2F2niroq9z%2Fproduction%2F68fc355fb96c894865860e89e9c913c8fb3814b9-633x762.png&w=1920&q=75)
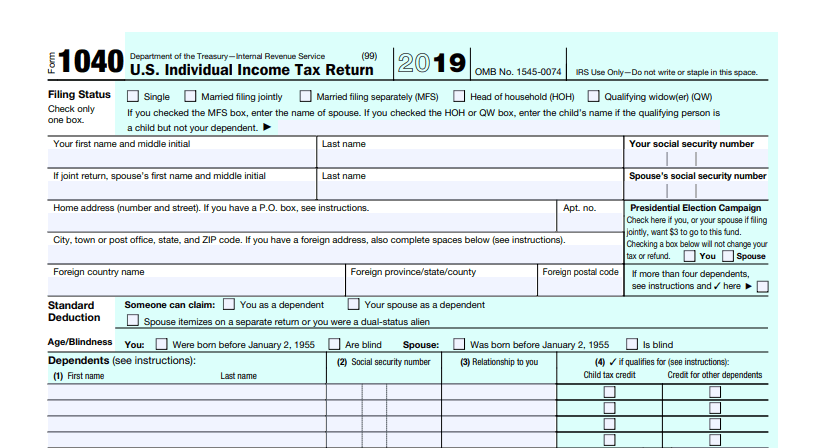
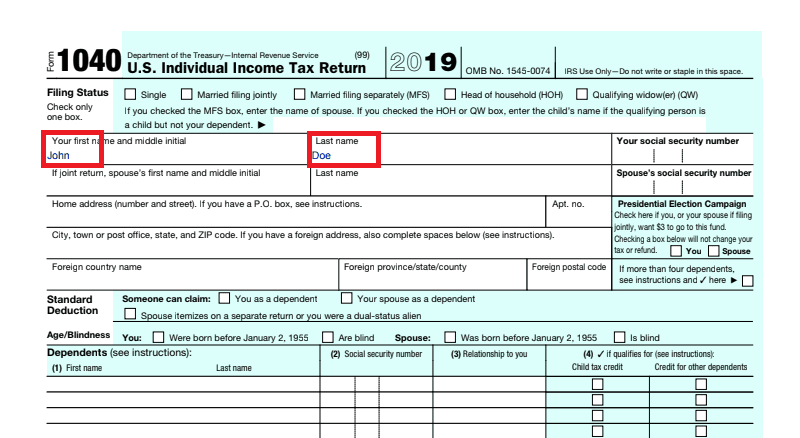
We will use this sample PDF Form for this tutorial:
![Screenshot of the Sample Fillable Form](/_next/image?url=https%3A%2F%2Fcdn.sanity.io%2Fimages%2F2niroq9z%2Fproduction%2F15eb5b6de8ab025f972840d6bc7cd3ff806414d7-815x448.png&w=1920&q=75)
Let’s now start creating our Zap!
Contents
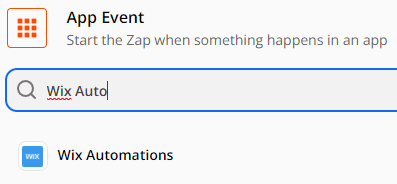
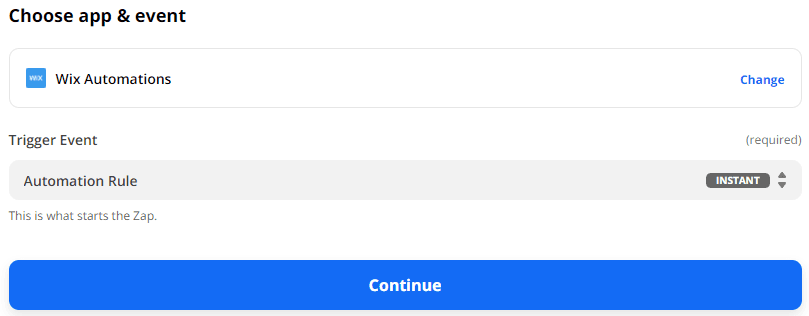
Step 1: Setup Trigger, select Wix Automations as the App Event
- Type in and select Wix Automations from the list of available apps
![Setup Trigger, select Wix Automations as the App Event](/_next/image?url=https%3A%2F%2Fcdn.sanity.io%2Fimages%2F2niroq9z%2Fproduction%2Fa401231062d3492c1d600f1de3abe54cb2fe8a73-397x184.png&w=828&q=75)
Step 2: Choose Automation Rule as the Trigger Event
![Choose Automation Rule as the Trigger Event](/_next/image?url=https%3A%2F%2Fcdn.sanity.io%2Fimages%2F2niroq9z%2Fproduction%2F90e05e5a14becc6a79492bfae96c982da1a00be0-809x316.png&w=1920&q=75)
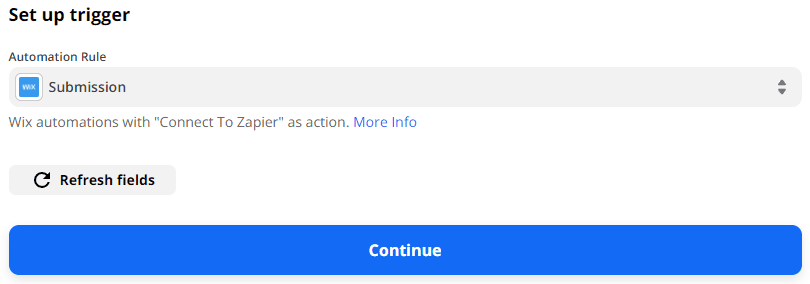
Step 3: Choose an Automation Rule
- Select the Automation Rule that you’re going to use
![Choose an Automation Rule](/_next/image?url=https%3A%2F%2Fcdn.sanity.io%2Fimages%2F2niroq9z%2Fproduction%2F54b81404a85c9a5afb6b828260c53d94808fdea4-810x284.png&w=1920&q=75)
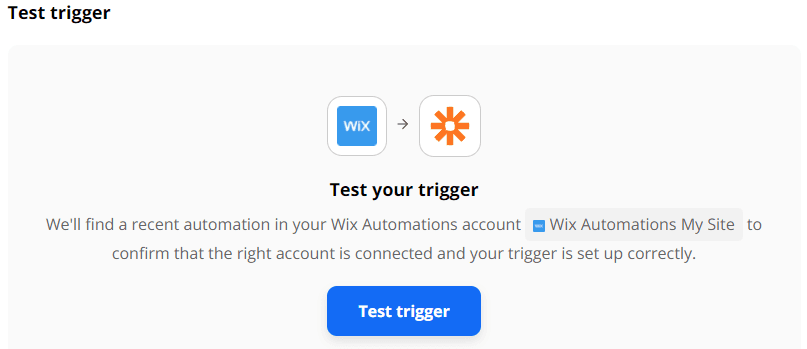
Step 4: Test Trigger
![Test trigger](/_next/image?url=https%3A%2F%2Fcdn.sanity.io%2Fimages%2F2niroq9z%2Fproduction%2F903efab0416ae0e66d8246b78e781997dd7c4478-807x349.png&w=1920&q=75)
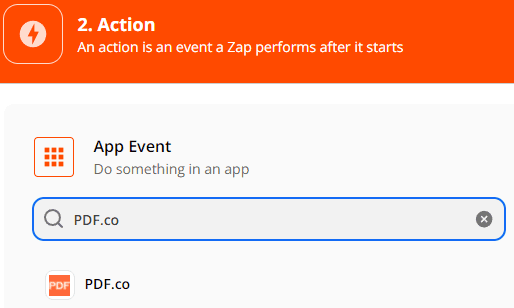
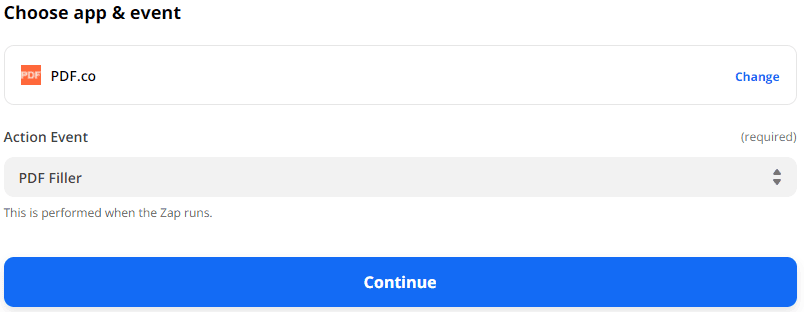
Step 5: Setup Action, select PDF.co as the App Event
- Type in and select PDF.co as the app event from the list of apps
![Setup Action, select PDF.co as the App Event](/_next/image?url=https%3A%2F%2Fcdn.sanity.io%2Fimages%2F2niroq9z%2Fproduction%2F07cecd4de048cac5a9b9d5f0d99b455697ff70d0-514x308.png&w=1080&q=75)
Step 6: Choose PDF Filler as the Action Event
- Choose PDF Filler as the action event from the list of available APIs
![Choose PDF Filler as the Action Event](/_next/image?url=https%3A%2F%2Fcdn.sanity.io%2Fimages%2F2niroq9z%2Fproduction%2F57a5eb1ab84f6859b091a94352723d17a27123a1-804x312.png&w=1920&q=75)
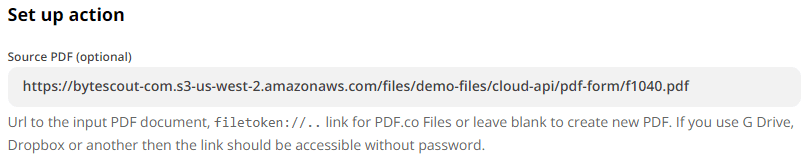
Step 7: Setup PDF.co Action
- For the Source PDF, put the URL of the Fillable PDF Form that you’re going to use
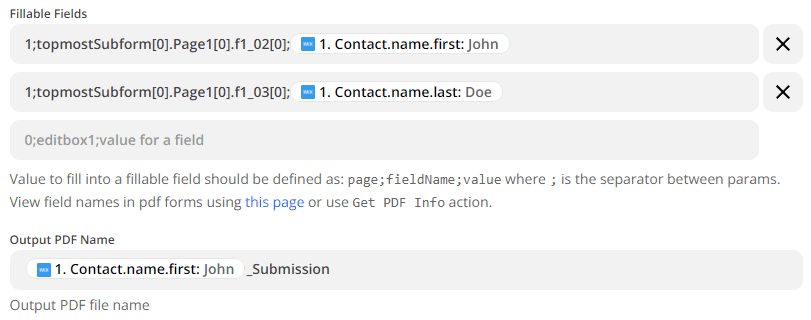
- For the Fillable Fields, set the value of your specified fillable field with this format: Page;FieldName;Value
You can check the information of a fillable PDF form here - You can check the information of a fillable PDF form here
- For the Output PDF Name, it would be best to include the Name of the person that submits the form to make them unique to each other
![Source file URL](/_next/image?url=https%3A%2F%2Fcdn.sanity.io%2Fimages%2F2niroq9z%2Fproduction%2Fe389cee671af9fca6b0e066464529775b9198fe4-810x168.png&w=1920&q=75)
![Fillable fields and output PDF name](/_next/image?url=https%3A%2F%2Fcdn.sanity.io%2Fimages%2F2niroq9z%2Fproduction%2F96bf63a820a5513355bf99da5975fd5456a7e7ef-811x320.png&w=1920&q=75)
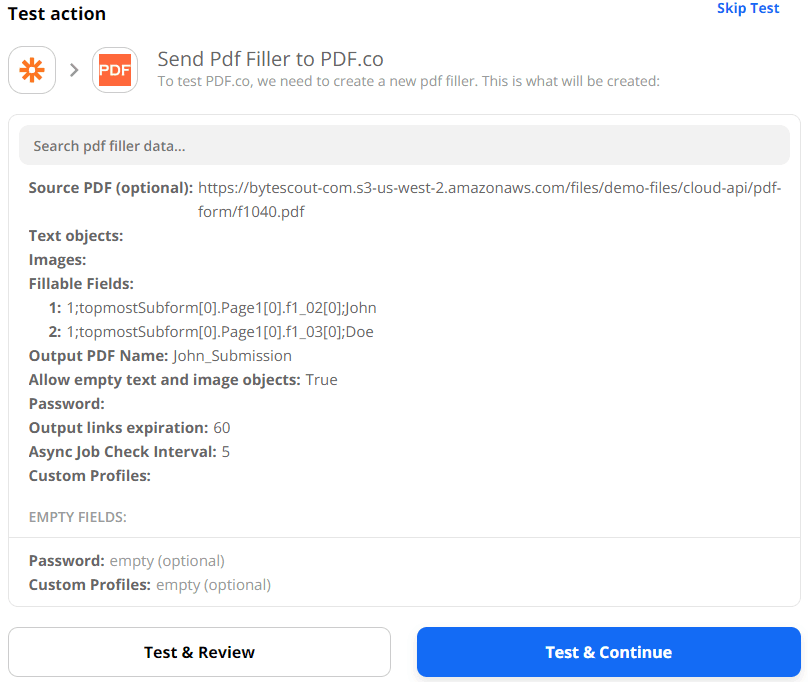
Step 8: Test PDF.co Action
![Test PDF.co action](/_next/image?url=https%3A%2F%2Fcdn.sanity.io%2Fimages%2F2niroq9z%2Fproduction%2F6191738f1156d944bd25df9fbd06db5f42c077e7-808x682.png&w=1920&q=75)
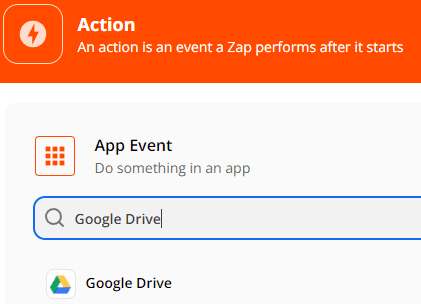
Step 9: Add another Action, select Google Drive as the App Event
- Add another action
- Type in and select Google Drive as the app event from the list of apps
![Add another Action, select Google Drive as the App Event](/_next/image?url=https%3A%2F%2Fcdn.sanity.io%2Fimages%2F2niroq9z%2Fproduction%2F7b0d3421133887e4c1ccc39f442fb73662f75b02-421x304.png&w=1080&q=75)
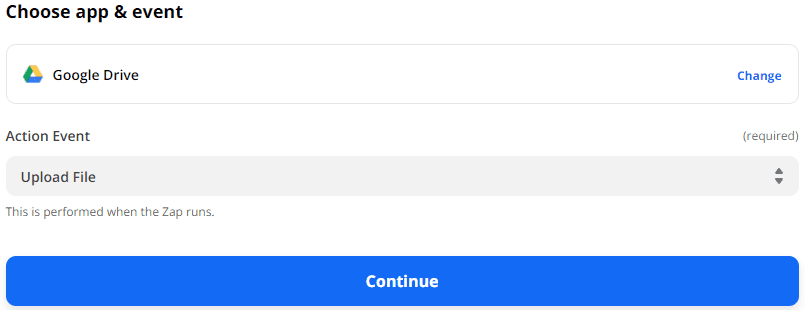
Step 10: Choose Upload File as the Action Event
- Choose Upload File as the action event from the list of events
![Select Upload File as the Action Event](/_next/image?url=https%3A%2F%2Fcdn.sanity.io%2Fimages%2F2niroq9z%2Fproduction%2Fdc532209ade7def365f55e225da4666feaa939e1-805x310.png&w=1920&q=75)
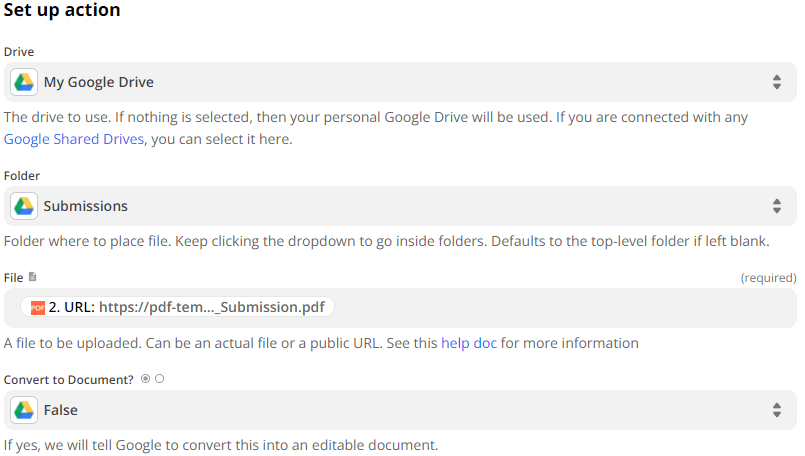
Step 11: Setup Google Drive Action
- Select the Drive and Folder where you want the file to be uploaded
- For File, add the URL of the Filled PDF Form from the PDF.co Action
![Setup Google Drive Action](/_next/image?url=https%3A%2F%2Fcdn.sanity.io%2Fimages%2F2niroq9z%2Fproduction%2Fb32945c5b9afaba11288105346ea600081c5597a-805x456.png&w=1920&q=75)
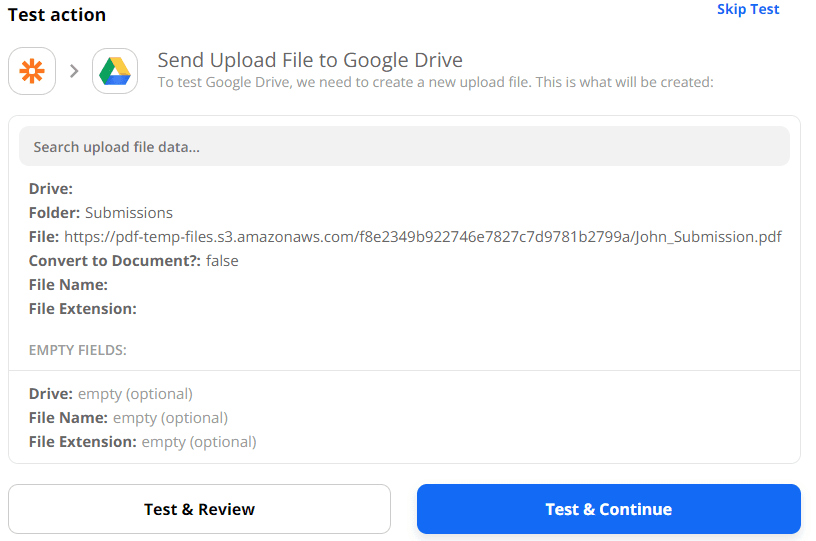
Step 12: Test Google Drive Action
![Test Google Drive action](/_next/image?url=https%3A%2F%2Fcdn.sanity.io%2Fimages%2F2niroq9z%2Fproduction%2Fde7a902a451e8113f73539a9b2a0af8ebbd8dadf-816x541.png&w=1920&q=75)
Step 13: Filled PDF
- Here’s the Filled PDF result
![Screenshot of the Filled PDF Form](/_next/image?url=https%3A%2F%2Fcdn.sanity.io%2Fimages%2F2niroq9z%2Fproduction%2F844cd939b6580e7c49dc3740ef65aa3cd6242e7c-800x438.png&w=1920&q=75)
Through this tutorial, you’ve now learned how to fill PDF with data submitted from Wix Forms using PDF.co and Zapier.