How to Add Security to Existing PDF in C#
This article explains how to secure an existing PDF document using PDF.CO Web API in the C# programming language. Securing a PDF document is an important task particularly when you distribute a document to other stakeholders.
With PDF.CO you can add a layer of security to your PDF documents by performing a variety of tasks e.g removing personal information, adding watermarks, passwords, encryption, etc. In this article, you will see:
You may learn more about all document security options offered by PDF.co here: How to Protect Your PDF: 5 Ways to Protect PDF When You Sell or Distribute PDF Documents.
Delete Text From a PDF Document
For the sake of example, we will create a C# console application with one class and the Main method as a starting point.
Creating the Application
The following script imports the required libraries:
using System;
using System.Collections.Generic;
using System.IO;
using System.Net;
using Newtonsoft.Json;
using Newtonsoft.Json.Linq;
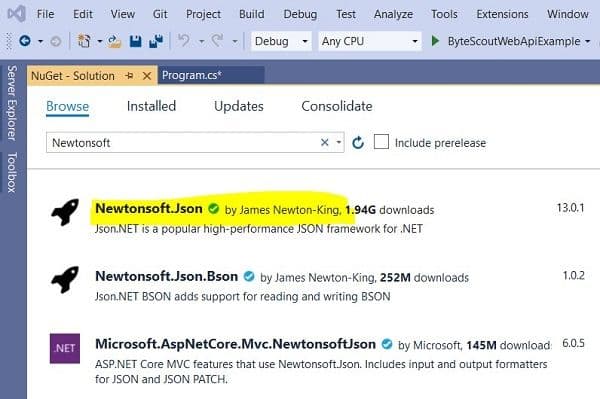
By default, the Microsoft .NET framework contains all of the aforementioned libraries except the Newtonsoft library. You can install this library in the Microsoft Visual Studio IDE. To do so, go to “Tools-> NuGet Package Manager”. Search for “Newtonsoft” library. You will see the following packages. Select the first package and click the “Install” button.

Next, you need to define some configuration variables for the script. You need to create variables that store the PDF.CO API Key, along with the URL of the source PDF file that you want to delete text from, the path to the destination PDF, and the password for the PDF file. You can leave the password field empty if your file is not password protected.
The sample source file from which the text will be removed can be downloaded from the following link:
https://bytescout-com.s3.amazonaws.com/files/demo-files/cloud-api/pdf-split/sample.pdf
The following code is added outside the Main method of the C# library.
 const String API_KEY = "********";
const string SourceFile = @"https://bytescout-com.s3.amazonaws.com/files/demo-files/cloud-api/pdf-split/sample.pdf";
const string DestinationFile = @".\newDocument.pdf";
const string Password = "";
Note: You can get your API key by registering at https://app.pdf.co
The rest of the script is executed inside the Main method of your C# application.
The next step is to create a C# WebClient object that will connect with the PDF.CO Web API.
You need to add your PDF.CO API key to the header of your web client as shown in the script below:
WebClient webClient = new WebClient();
webClient.Headers.Add("x-api-key", API_KEY);
The API call to the PDF.CO library that deletes a text from a PDF document is stored in a string variable. The following script stores the API call.
string url = "https://api.pdf.co/v1/pdf/edit/delete-text";The next step is to create a parameter dictionary that contains attribute values (information) that will be passed to the API call. In this example, you will be adding four parameter values to the parameter dictionary.
name: refers to the destination file nameurl: refers to the source PDF file urlpassword: the password for source PDF filesearchStrings: an array of strings containing values to be deleted
The script below will delete the word “conspicuous” from the source PDF document.
Dictionary<string, object> parameters = new Dictionary<string, object>();
parameters.Add("name", Path.GetFileName(DestinationFile));
parameters.Add("password", Password);
parameters.Add("url", SourceFile);
parameters.Add("searchStrings", new string[1]{ "conspicuous" });
To see the complete list of parameters along with their description, check out the official API documentation.
Next, you need to serialize your parameter dictionary before you can pass it to the WebClient that requests the PDF.CO API.
The following script uses the JsonConvert object to serialize our parameter dictionary.
string jsonPayload = JsonConvert.SerializeObject(parameters);The rest of the code executes inside a Try/Catch block.
We will make a call to the PDF.CO web API using the UploadString() method of the WebClient class object.
The URL for the API call and the serialized parameter dictionary is passed as parameter values to the UploadString() method. The response received is parsed as a JSON object.
If the response doesn’t contain an error, you can print the URL of the generated PDF document. You can also download the document using the DownloadFile() method of the WebClient class object.
In case the response contains an error, the error message is displayed on the console. Look at the script below for reference:
 try
           {
                string response = webClient.UploadString(url, jsonPayload);
                JObject json = JObject.Parse(response);
                if (json["error"].ToObject<bool>() == false)
                {
                string resultFileUrl = json["url"].ToString();
                Console.WriteLine(resultFileUrl);
                webClient.DownloadFile(resultFileUrl, DestinationFile);
                Console.WriteLine("Generated PDF file saved as \"{0}\" file.", DestinationFile);
                }
                else
                {
                Console.WriteLine(json["message"].ToString());
                }
           }
           catch (WebException e)
           {
                Console.WriteLine(e.ToString());
           }
Finally, you need to close the connection with the PDF.CO web API. To do so, you can call the Dispose() method on the WebClient class object. The script below shows that.
webClient.Dispose();

Console.WriteLine();
Console.WriteLine("Press any key...");
Console.ReadKey();
Complete Code for Removing Text from PDF
The complete script for deleting text from a PDF document is as follows:
using System;
using System.Collections.Generic;
using System.IO;
using System.Net;
using Newtonsoft.Json;
using Newtonsoft.Json.Linq;

namespace ByteScoutWebApiExample
{
     class Program
     {

    const String API_KEY = "************************";
    const string SourceFile = @"https://bytescout-com.s3.amazonaws.com/files/demo-files/cloud-api/pdf-split/sample.pdf";
    const string DestinationFile = @".\newDocument.pdf";
    const string Password = "";

    static void Main(string[] args)
    {

           WebClient webClient = new WebClient();
           webClient.Headers.Add("x-api-key", API_KEY);

           string url = "https://api.pdf.co/v1/pdf/edit/delete-text";

           Dictionary<string, object> parameters = new Dictionary<string, object>();
           parameters.Add("name", Path.GetFileName(DestinationFile));
           parameters.Add("password", Password);
           parameters.Add("url", SourceFile);
           parameters.Add("searchStrings", new string[1]{ "conspicuous" });


           string jsonPayload = JsonConvert.SerializeObject(parameters);

           try
           {

                string response = webClient.UploadString(url, jsonPayload);

                JObject json = JObject.Parse(response);

                if (json["error"].ToObject<bool>() == false)
                {

                string resultFileUrl = json["url"].ToString();

                Console.WriteLine(resultFileUrl);

                webClient.DownloadFile(resultFileUrl, DestinationFile);

                Console.WriteLine("Generated PDF file saved as \"{0}\" file.", DestinationFile);
                }
                else
                {
                Console.WriteLine(json["message"].ToString());
                }
           }
           catch (WebException e)
           {
                Console.WriteLine(e.ToString());
           }

           webClient.Dispose();

           Console.WriteLine();
           Console.WriteLine("Press any key...");
           Console.ReadKey();
    }
     }
}
The original PDF document contains the text string “conspicuous” in the first line as shown in the following document.

In the PDF generated after the call to the PDF.CO API, the word “conspicuous” is deleted as shown below:

Add Logo to a PDF Document
Another way to secure a PDF document is by adding a watermark or a logo to the document. Let’s see how you can do so in C# with the PDF.CO Web API. We will be adding a logo to a PDF image in this example.
Creating the Application
The following script imports the required libraries.
using System;
using System.Collections.Generic;
using System.IO;
using System.Net;
using Newtonsoft.Json;
using Newtonsoft.Json.Linq;
The script below defines variables for the PDF.CO Web API key, the URL of the source file to which you want to add a log, the destination file name, and finally the password for the source file (if it is password protected).
We will be using a sample source file from Bytescout demo files which can be downloaded from this link:
https://bytescout-com.s3.amazonaws.com/files/demo-files/cloud-api/pdf-edit/sample.pdf
const String API_KEY = "*******************";
const string SourceFile = @"https://bytescout-com.s3.amazonaws.com/files/demo-files/cloud-api/pdf-edit/sample.pdf";
const string DestinationFile = @".\newDocument.pdf";
const string Password = "";
Next, you need to define the location where the image will be added to the PDF document. The width, height, and the URL for the logo image are also stored in a variable as shown below.
private const int Y1 = 20;
private const int Width1 = 119;
private const int Height1 = 32;
private const string ImageUrl = "https://bytescout-com.s3.amazonaws.com/files/demo-files/cloud-api/pdf-edit/logo.png";
The sample logo can be downloaded from this link:
https://bytescout-com.s3.amazonaws.com/files/demo-files/cloud-api/pdf-edit/logo.png
The script below creates an object of WebClient class that will be used to make requests to the PDF.CO Web API.
WebClient webClient = new WebClient();
webClient.Headers.Add("x-api-key", API_KEY);
The API call that can be used to add images to a PDF document is defined below.
string url = "https://api.pdf.co/v1/pdf/edit/add";Next, the image parameters are used to create a JSON object as shown below:
           string jsonPayload = $@"{{
                                ""name"": ""{Path.GetFileName(DestinationFile)}"",
                                 ""url"": ""{SourceFile}"",
                                ""password"": ""{Password}"",
                                ""images"": [
                                      {{
                                            ""url"": ""{ImageUrl}"",
                                            ""x"": {X1},
                                            ""y"": {Y1},
                                            ""width"": {Width1},
                                            ""height"": {Height1},
                                            ""pages"": ""{0}""
                                      }}
                                ]
                                 }}";
To see the complete list of parameters along with their description, check out the official API documentation.
The rest of the process is familiar to what you saw in the previous section. The WebClient class object is used to make an API call to the PDF.CO Web API. The response is parsed as a JSON object and the URL for the destination PDF document is printed on the console. The converted PDF file is downloaded and stored locally as well.
  try
           {
                string response = webClient.UploadString(url, jsonPayload);
                JObject json = JObject.Parse(response);
                if (json["error"].ToObject<bool>() == false)
                {
                string resultFileUrl = json["url"].ToString();
                Console.WriteLine(resultFileUrl);
                webClient.DownloadFile(resultFileUrl, DestinationFile);
                Console.WriteLine("Generated PDF file saved as \"{0}\" file.", DestinationFile);
                }
                else
                {
                Console.WriteLine(json["message"].ToString());
                }
           }
           catch (WebException e)
           {
                Console.WriteLine(e.ToString());
           }
Finally, the script below destroys the WebClient used to make API calls.
webClient.Dispose();

Console.WriteLine();
Console.WriteLine("Press any key...");
Console.ReadKey();
Complete Code for Adding Logo to PDF
Here is the complete code for adding a logo to a PDF document.
using System;
using System.Collections.Generic;
using System.IO;
using System.Net;
using Newtonsoft.Json;
using Newtonsoft.Json.Linq;

namespace ByteScoutWebApiExample
{
     class Program
     {

    const String API_KEY = "*****************";
    const string SourceFile = @"https://bytescout-com.s3.amazonaws.com/files/demo-files/cloud-api/pdf-edit/sample.pdf";
    const string DestinationFile = @".\newDocument.pdf";
    const string Password = "";

    private const int X1 = 400;
    private const int Y1 = 20;
    private const int Width1 = 119;
    private const int Height1 = 32;
    private const string ImageUrl = "https://bytescout-com.s3.amazonaws.com/files/demo-files/cloud-api/pdf-edit/logo.png";

    static void Main(string[] args)
    {

           WebClient webClient = new WebClient();
           webClient.Headers.Add("x-api-key", API_KEY);

           string url = "https://api.pdf.co/v1/pdf/edit/add";


           string jsonPayload = $@"{{
                                ""name"": ""{Path.GetFileName(DestinationFile)}"",
                                ""url"": ""{SourceFile}"",
                                ""password"": ""{Password}"",
                                ""images"": [
                                      {{
                                            ""url"": ""{ImageUrl}"",
                                            ""x"": {X1},
                                            ""y"": {Y1},
                                            ""width"": {Width1},
                                            ""height"": {Height1},
                                            ""pages"": ""{0}""
                                      }}
                                ]
                                 }}";

           try
           {

                string response = webClient.UploadString(url, jsonPayload);

                JObject json = JObject.Parse(response);

                if (json["error"].ToObject<bool>() == false)
                {

                string resultFileUrl = json["url"].ToString();

                Console.WriteLine(resultFileUrl);

                webClient.DownloadFile(resultFileUrl, DestinationFile);

                Console.WriteLine("Generated PDF file saved as \"{0}\" file.", DestinationFile);
                }
                else
                {
                Console.WriteLine(json["message"].ToString());
                }
           }
           catch (WebException e)
           {
                Console.WriteLine(e.ToString());
           }

           webClient.Dispose();

           Console.WriteLine();
           Console.WriteLine("Press any key...");
           Console.ReadKey();
    }
     }
}
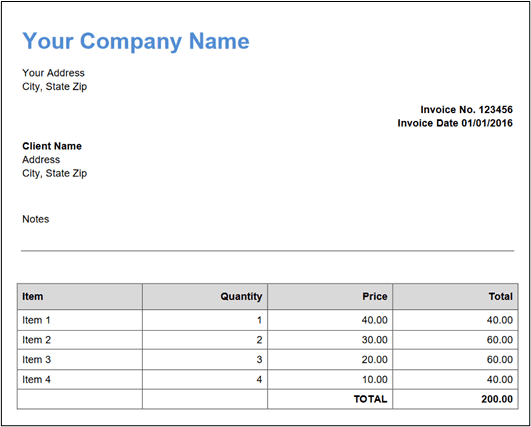
The original PDF document before adding an image looks like that.

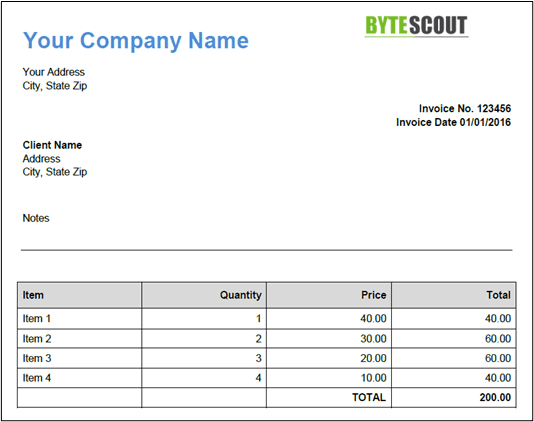
After executing the script in this section, the logo of ByteScout is added to the PDF document, as shown below:

