The example uses async: true. It retains the returned jobId and checks the existing job with JSON POST requests to /v1/job/check. It waits between checks only while status is working, stops on terminal or API errors, and sets an application waiting deadline. Reaching that deadline does not cancel the job. Keep its ID before deciding whether to check again later. Download the output only after success.
How to Delete Pages from PDF using PDF.co Web API
12 Minutes Read
This tutorial and the sample source code explain how to delete any page from a PDF document using JavaScript. This tutorial provides a complete process of deleting PDF pages using the PDF.co Web API.
Asynchronous processing allows you to handle large files or long-running tasks without waiting for the process to complete in a single API call. Below are images of our sample source files and the single PDF output.
For more details on asynchronous processing, refer to the PDF.co Documentation.
IN THIS TUTORIAL
Features of PDF.co Web API
The PDF.co Web API makes it easy to analyze and edit PDF documents using your preferred programming language. It allows you to modify PDF files, including analyzing and deleting pages. The API operates on a highly secure system, transmitting data through an encrypted connection to ensure your files are protected. By automating the document editing process, the API helps save both time and money.
With its asynchronous mode, you can process documents without needing to wait for operations to finish immediately. This feature improves scalability and efficiency, especially when handling large batches of files.
Below, you’ll find complete details about how to use the PDF.co Web API to delete pages, along with a demo and sample code that showcase these features in action.
Endpoint Parameters
Below is a brief explanation of the endpoint parameters of the PDF.co Web API to help you understand their functionality:
url: (Required) Specifies the URL of the source file. The platform supports publicly accessible URLs, including those from Dropbox, Google Drive, and PDF.co’s built-in file storage.httpusername: (Optional) Provides the username for authentication if the source URL requires it.httppassword: (Optional) Contains the password for authentication if the source URL requires it.pages:(Required) A string identifying the pages to delete. This endpoint uses 1-based page numbers, so the first page is1.- Examples:
"1"deletes the first page."1-3"deletes pages one through three."1,3,5-7"deletes pages one, three, and five through seven.
- Always provide a nonempty page selection. Omitting
pages, or sending an empty or whitespace-only string, returns HTTP 400. Check the selected page numbers against the original PDF before submitting the request. See the PDF Delete Pages documentation for supported parameters.
- Examples:
name: (Optional) Allows you to name the output file. This parameter must be a string.expiration: (Optional) Sets the expiration time for the output URL in PDF.co’s temporary file storage.profiles: (Optional) Configures custom settings. This parameter must be a string.- async: (Optional) Set to true to start a background job. Retain its jobId and send JSON {"jobid": jobId} to POST /v1/job/check with the same API key. Continue only while status is working; stop on errors, terminal statuses or the application deadline. Download the output only after success.
Example Using JavaScript
Below is the source code to demonstrate how you can delete specific pages from a sample PDF document using the PDF.co Web API. The example is written in JavaScript and shows how to efficiently edit a PDF document using some of the API parameters.
You can specify the URL of any document you wish to edit, ensuring efficient and secure alterations through this API. To complete this process, follow these steps:
- Provide your API Key: The PDF.co platform generates an API key for you upon logging in. Include this key in your program.
- Specify the URL of the PDF Document: Add the URL for the document you want to edit in the API request.
- Resulting File: After executing the program, the PDF.co API generates a resulting file. You can either download this file or visit the provided URL to see the changes made to the PDF document.
The sample code below illustrates how to use these features effectively.
Sample Code Snippet
Use the corrected code below to delete pages and download the completed PDF. An earlier repository example is available here; its response handling differs from this example.
// Requiring modules
const express = require('express');
const axios = require('axios');
const fs = require('fs/promises');


// Creating express object
const app = express();


const options = {
    timeout: 30000,
    method: 'POST',
    url: 'https://api.pdf.co/v1/pdf/edit/delete-pages',
    headers: {
        'x-api-key': 'YOUR_API_KEY',
        'Content-Type': 'application/json',
    },
    data: {
        url: 'https://juventudedesporto.cplp.org/files/sample-pdf_9359.pdf',
        pages: '1-3',
        name: 'result.pdf',
        async: true // Enable asynchronous processing
    }
};


async function waitForJob(jobId, headers, maxWaitMs = 180000) {
    // Application waiting budget; not a processing-time guarantee.
    const deadline = Date.now() + maxWaitMs;
    while (Date.now() < deadline) {
        const response = await axios.post(
            'https://api.pdf.co/v1/job/check',
            { jobid: jobId },
            { headers, timeout: Math.max(1, Math.min(30000, deadline - Date.now())) }
        );
        const result = response.data;
        if (!result || typeof result !== 'object' || result.error === true) {
            throw new Error((result && result.message) || 'Invalid job-check response');
        }
        if (result.status === 'success') return result;
        if (result.status !== 'working') {
            throw new Error('Job ' + jobId + ' stopped: ' +
                (result.message || result.status || 'missing status'));
        }
        const remaining = deadline - Date.now();
        if (remaining > 0) {
            await new Promise(resolve => setTimeout(resolve, Math.min(3000, remaining)));
        }
    }
    throw new Error('Waiting deadline reached for job ' + jobId +
        '. The job was not cancelled. Retain its ID and check it later before resubmitting.');
}

async function main() {
    let jobId;
    try {
        const response = await axios(options);
        const submitted = response.data;
        if (!submitted || submitted.error === true || !submitted.jobId) {
            throw new Error((submitted && submitted.message) || 'No job ID returned');
        }
        jobId = submitted.jobId;
        console.log('Retain this job ID:', jobId);
        const result = await waitForJob(jobId, options.headers);
        const outputUrl = result.url || submitted.url;
        if (!outputUrl) throw new Error('Successful job returned no output URL');
        const output = await axios.get(outputUrl, {
            responseType: 'arraybuffer',
            timeout: 30000
        });
        await fs.writeFile(options.data.name, Buffer.from(output.data));
        console.log('Saved:', options.data.name);
    } catch (error) {
        console.error(jobId ? 'Job ' + jobId + ': ' + error.message : error.message);
        process.exitCode = 1;
    }
}

main();
Sample Code Walkthrough
Following is the step by step explanation of the sample source code:
Importing Required Modules
- Express: A Node.js framework for building web applications, aiding in server-side logic and networking.
- Axios: A Node.js module that simplifies making HTTP calls.
These modules are included using the require function, which loads essential files such as Node.js, community, and local modules.
Setting Up API Access
- Use the
requireparameter to include theexpressandaxiosmodules in your application. - Specify the request method (e.g., POST), the API endpoint URL, and your API key.
- After logging into the PDF.co platform, you can obtain your unique API key, which acts as an access token for authentication. Add this key in the header of your request.
Providing Data for Alteration
Define the payload with relevant information:
- The URL of the document to be edited.
- The pages to delete (specified as a string).
- The name of the resulting file.
Adding Asynchronous Processing
Include the async: true parameter in the payload to enable asynchronous processing. This allows the operation to run without blocking other tasks.
Sending the Request and Handling the Response
- Make the API call using
axiosand handle the response. - In asynchronous mode, retain the returned jobId. The initial response does not mean the output is ready.
- Send POST /v1/job/check with JSON {"jobid": jobId}, Content-Type: application/json and the same API key. Wait between checks while status is working. Stop on failed, aborted, HTTP/API errors or the application deadline; download only after success.
Downloading the Altered File
- Once the process is complete, retrieve the resulting file using the provided URL.
- You can either:
- View the edited document online using the resulting URL.
- The example downloads the completed file and saves it as result.pdf only after the job reports success.
Error Handling
If the request is unsuccessful, review and modify the program to fix errors and achieve the desired output.
Running the Application
Optionally, configure the application to run on a specific port number and handle GET requests if needed.
Output
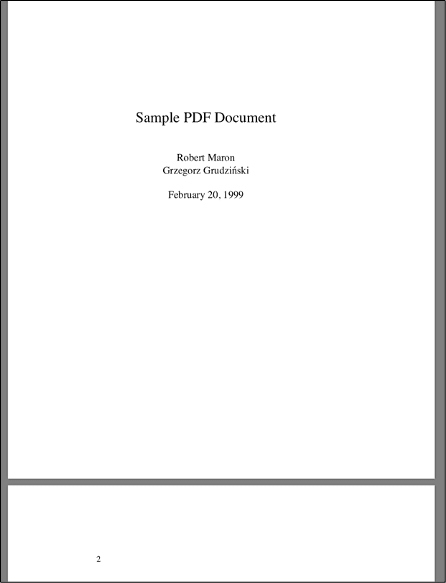
Sample PDF Document
Following is the beginning of the sample document for this example:
Output PDF Document
Below is the screenshot of the edited sample document after deleting pages 1, 2, and 3 for visualization:

In this tutorial, you learned how to delete specific pages from a PDF document using JavaScript. The tutorial provided source code, a demo, and a step-by-step explanation of the process, showcasing how to use the PDF.co Web API effectively. It also highlighted the benefits of asynchronous processing for improved efficiency. For more details, visit the PDF.co Documentation.
Related Tutorials