💡 Tip: Use the PDF.co PDF Edit/Add Helper Tool
Automatically Add Watermarks to PDFs in Google Drive Using n8n and PDF.co
6 Minutes Read
What You’ll Have When Done
You’ll have a fully automated system that watches a Google Drive folder for new PDF uploads, automatically adds a watermark or custom label using PDF.co, and then saves the processed (watermarked) file into another Google Drive folder — all hands-free.
Prerequisites
Before you begin, make sure you have:
- Two Google Drive folders:
- Input Folder – where new PDFs are uploaded (e.g., “INPUT_FOLDER”)
- Output Folder – where processed PDFs will be saved (e.g., “OUTPUT_FOLDER”)
- n8n instance (either self-hosted or n8n.cloud).
- PDF.co API Key → https://app.pdf.co/
- Google Drive OAuth2 credentials added in n8n.
Quick Start Options
Option A: I Want It Working Now
- Import this workflow template → (Download JSON File)
- Connect your Google Drive and PDF.co accounts in n8n.
- Link your Google Drive folders (input and output).
- Update watermark text or placement if needed.
- Run a test: upload a PDF to your input folder and watch it automatically get watermarked and saved to the output folder.
Option B: I Want to Build It Step-by-Step
Follow this detailed guide to create the automation from scratch.
What This Automation Does
Here’s the overview of the workflow:
- Google Drive Trigger → Detects when a new file is uploaded to your selected folder.
- PDF.co API → Adds a watermark or text overlay to the file.
- HTTP Request → Downloads the newly watermarked PDF.
- Google Drive Upload → Uploads the processed file to your chosen folder.
Step-by-Step Guide
Step 1: Set Up Google Drive Folders
Create two folders in your Google Drive:
INPUT_FOLDER→ PDFs uploaded here will trigger the automation.OUTPUT_FOLDER→ Processed (watermarked) PDFs will be saved here.
Your structure:
📁 Google Drive
├── INPUT_FOLDER
└── OUTPUT_FOLDER
Success Looks Like: Both folders are created, and you can copy their folder IDs from their Google Drive URLs.
Step 2: Add Google Drive Trigger Node
Node: Google Drive Trigger
Settings:
- Trigger On: Specific Folder
- Folder to Watch:
INPUT_FOLDER - Event:
File Created - Poll Time: Every Minute
Success Looks Like: Each time you upload a new PDF to your input folder, the workflow starts automatically.
Step 3: Add Text or Watermark Using PDF.co
Node: PDF.co API → Add Text/Images to PDF
This node takes the uploaded PDF and applies your watermark. You can run your test with this sample file.
Settings:
- URL:
={{ $json.webContentLink }}
Text Annotation Example:
 {
  "text": "GEC",
  "x": "104.6",
  "y": "412.33",
  "size": "100",
  "color": "#2563EB66",
  "fontBold": true,
  "fontName": "Arial Black",
  "alignment": "center"
}
Understanding the Color and Opacity
#2563EB66 is an 8-digit HEX code that defines both the color and the opacity of your watermark:
- The first 6 digits (
#2563EB) represent the base color – a bright blue. - The last 2 digits (
66) represent the opacity (transparency level) in hexadecimal.
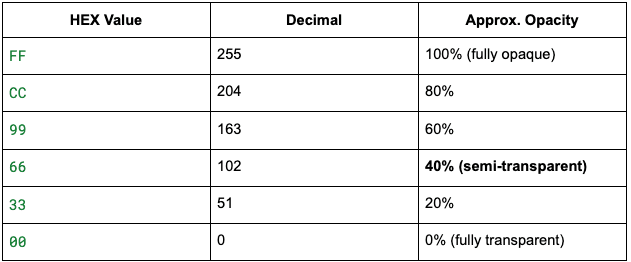
Therefore, #2563EB66 means blue color (#2563EB) with around 40% transparency, keeping your watermark visible yet subtle.
This visual tool makes watermark positioning effortless:
- Upload your PDF template or sample file.
- Draw a rectangle over the area where you want your watermark text or image to appear.
- The tool automatically generates the coordinates (X, Y), width, height, font size, and other parameters.
- Copy those values directly into your n8n node configuration.
This saves you from manually trial-and-error testing positions — it’s quick, accurate, and visual.
Advanced Options:
- Output File Name:
={{ $json.name }}
Success Looks Like: PDF.co returns a JSON response containing the URL to your new, watermarked file:
{

"url": "https://pdf-co-temp-files.s3.amazonaws.com/Watermarked_File.pdf",

"name": "Watermarked_MyDocument.pdf"

}
Step 4: Download the Watermarked PDF
Node: HTTP Request
Settings:
- Method:
GET - URL:
={{ $json.url }}(from the PDF.co node output)
Success Looks Like: n8n retrieves the binary file of the watermarked PDF from PDF.co.
Step 5: Upload the Watermarked PDF to Google Drive
Node: Google Drive → Upload
Settings:
- Input Data Field:
data - File Name:
Watermarked_{{ $json.name }} - Folder:
OUTPUT_FOLDER(select your output folder) - Drive: My Drive
Success Looks Like: The watermarked PDF automatically appears in your OUTPUT_FOLDER folder in Google Drive.
Step 6: Test the Automation
- Upload any PDF file into your INPUT_FOLDER folder.
- Wait for 30–60 seconds for the trigger to detect it.
- Watch as:
- PDF.co processes the file and applies the watermark.
- The final version appears in your OUTPUT_FOLDER folder.
Success Looks Like: Each time you upload a file, it’s automatically processed and watermarked — no manual steps needed.
Step 7: Optional — Batch or Scheduled Watermarking
Want to process multiple files at once or run on a schedule?
- Replace the Google Drive Trigger with a Schedule Trigger.
- Add a Google Drive → List Files node to retrieve all files in your folder.
This setup is perfect for nightly batch watermarking or compliance document processing.
Congratulations!
You’ve just built an automation that:
- Detects new PDFs in Google Drive
- Adds custom text or logo watermarks with PDF.co
- Uploads the processed version back to your chosen folder
- Runs continuously without manual effort
Next Steps
You can enhance this automation further by:
- Sending an email notification once watermarking is complete.
- Logging processed file names in a Google Sheet.
- Using variables like upload date, user name, or document type in your watermark text.
Built something amazing? Share your workflow and tag us @pdfdotco — we’d love to feature your automation!
Related Tutorials
