To connect your PDF.co account to Zapier, add your API Key. You can obtain the API Key in your PDF.co dashboard.
How to Perform OCR PDF Text Extraction and Save to S3 with Honeycode using PDF.co and Zapier
Sep 2, 2024·14 Minutes Read
PDFco PDF to Text API is a software tool that allows users to convert PDF files into text documents while retaining the original layout of the PDF. In addition to this, it also utilizes OCR (Optical Character Recognition) technology to recognize and extract text from scanned or image-based PDFs. This means that even if the PDF file contains images or scanned text, the software can still remember and extracted the text from those images. The resulting text document can be saved in various formats including plain text, CSV, or JSON. PDF.co PDF to Text with Layout and OCR can streamline workflows, automate data extraction, and improve accuracy and efficiency in text-based document processing.
In this guide, we will walk you through the process of using PDF.co and Zapier to perform OCR on a PDF document and extract text, and then using Honeycode to save the extracted text to an Amazon S3 bucket as a text file. By following these steps, you can streamline your workflow and automate the process of extracting text from PDF files while retaining the original layout. This can save you time and effort in manually copying and pasting text from PDF files and improve the accuracy and efficiency of your document processing tasks. So, let’s get started!
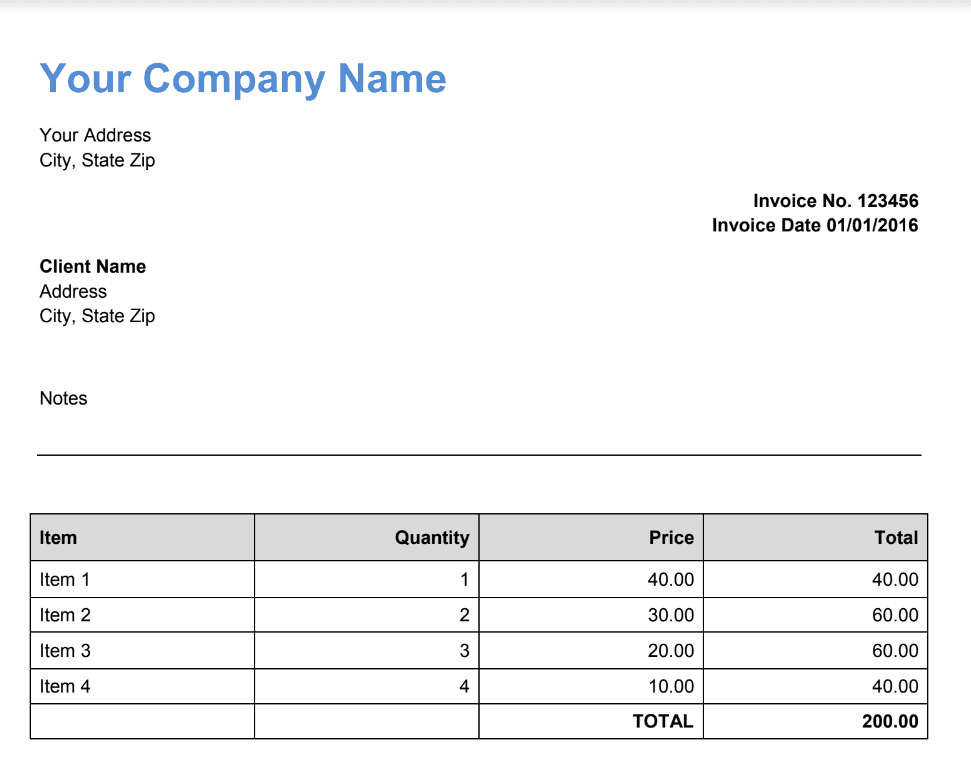
We will use this sample PDF document and perform OCR (Optical Character Recognition) technology with text extraction. This process involves converting the scanned image of the document into editable text, which can then be extracted and used as desired.
Follow the simple step-by-step guide below:
IN THIS TUTORIAL
Step 1: Open Zapier Account
- To get started! First, open your Zapier account and click the Create Zap button.
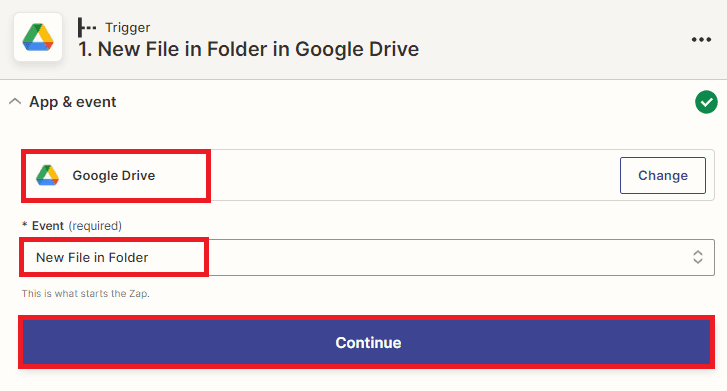
Step 2: Google Drive App
- Next, search for the Google Drive app and navigate to the folder where you want to create a new file trigger. Then, choose the New File in Folder option, which will allow you to create a trigger that will activate whenever a new file is added to the specified folder.
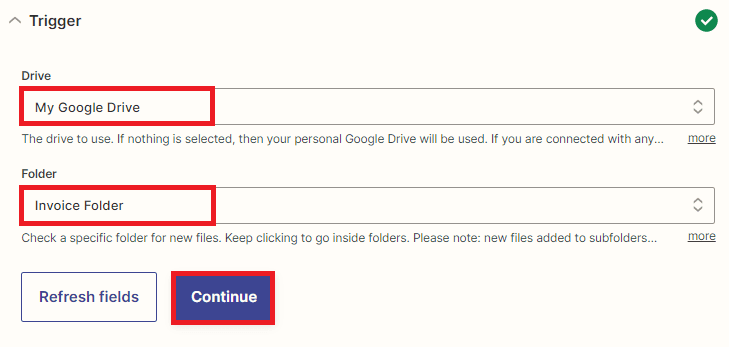
Step 3: Google Drive Configuration
To set up the Google Drive configuration, follow these steps:
- In the Drive field, select My Google Drive as the storage location for your files.
- In the Folder field, enter the name of the specific folder where you have saved the files that you want to trigger the action on. Make sure to enter the exact name of the folder to ensure the proper functioning of the trigger.
Once you have set up the configuration, it’s time to test the trigger to ensure that it works properly.
Step 4: Test Trigger Result
- Great! The test trigger was successful and fetched the file from Google Drive. Now, let’s move on to the next step and perform OCR on a PDF document and extract text from it.

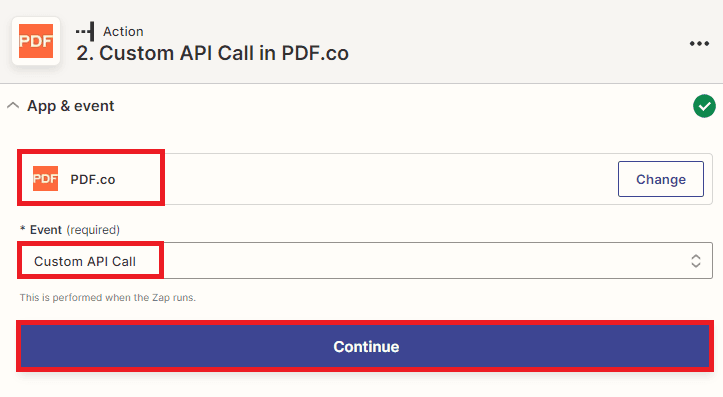
Step 5: Add PDF.co App
- In this step, we will add the PDF.co app to the workflow and choose the Custom API Call option. This will allow us to use the PDF to Text endpoint and perform OCR on a PDF document to extract text from it.
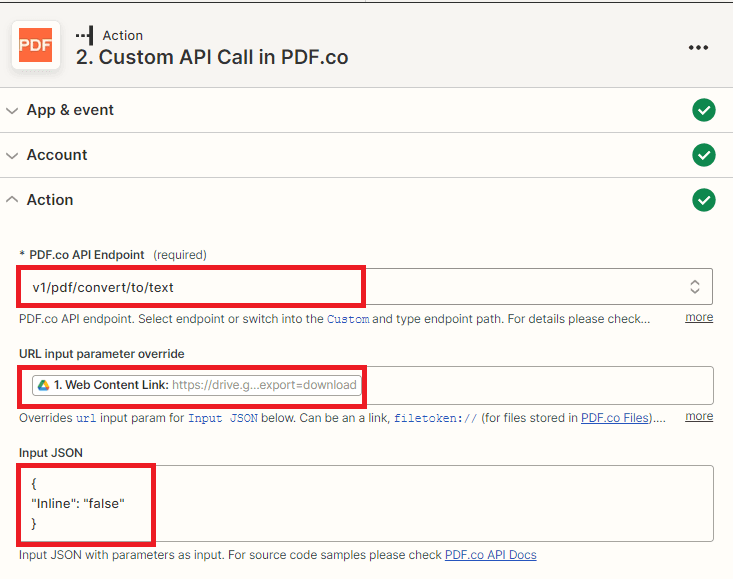
Step 6: Setup PDF.co Configuration
To set up the PDF.co configuration for OCR and text extraction from a PDF document, follow these steps:
- In the PDF.co API Endpoint field, search for and select the v1/pdf/convert/to/text endpoint. This endpoint will enable the OCR and text extraction process.
- In the URL Input Parameter Override field, select the Web Content Link option from Google Drive. This will allow you to specify the URL of the PDF file that you want to extract text from.
- In the JSON Input field, add the JSON code with the Inline parameter set to false. This will ensure that the output value is returned in a URL rather than inline in the response.
Now that you have set up the PDF.co configuration for OCR and text extraction from a PDF document, it’s time to test the action and convert the PDF file into a text format.
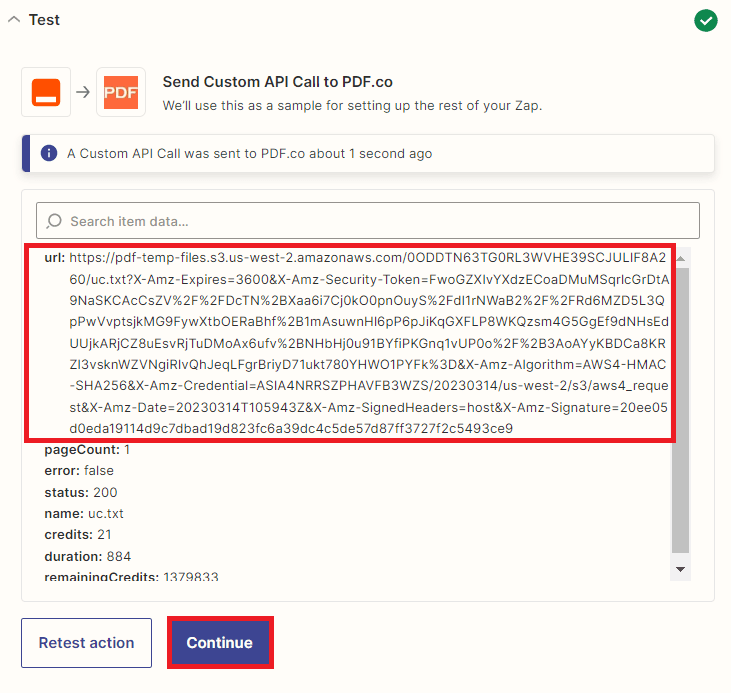
Step 7: PDF.co Test Result
- Excellent! The PDF.co app has successfully processed our request and converted the PDF document into a text file. Here’s how you can view the extracted text, copy the URL and paste it into your browser.
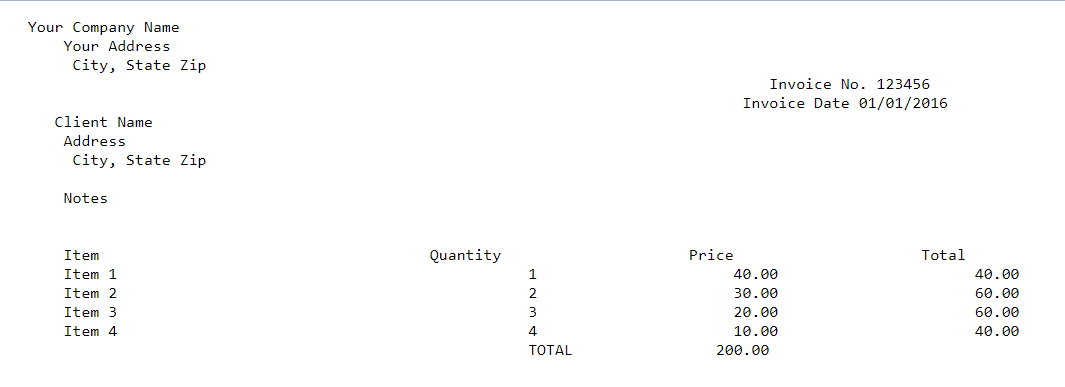
Step 8: Extracted Text Output
- Here’s the extracted text from the PDF document which we perform OCR text extraction.
Now that we have successfully performed OCR text extraction on a PDF document and viewed the output, we will now store the text file to Honeycode and save the text file to an S3 bucket.
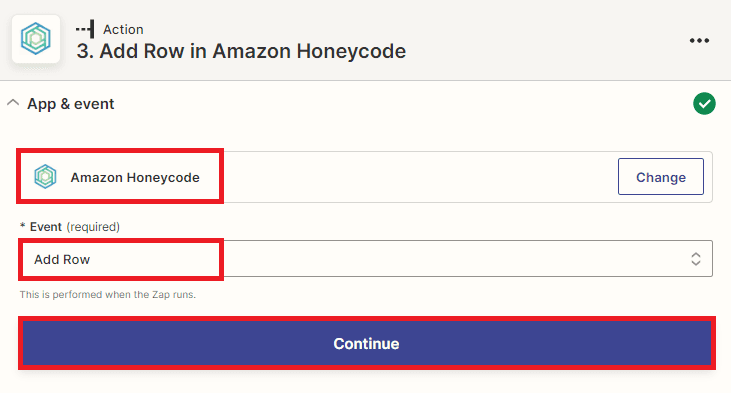
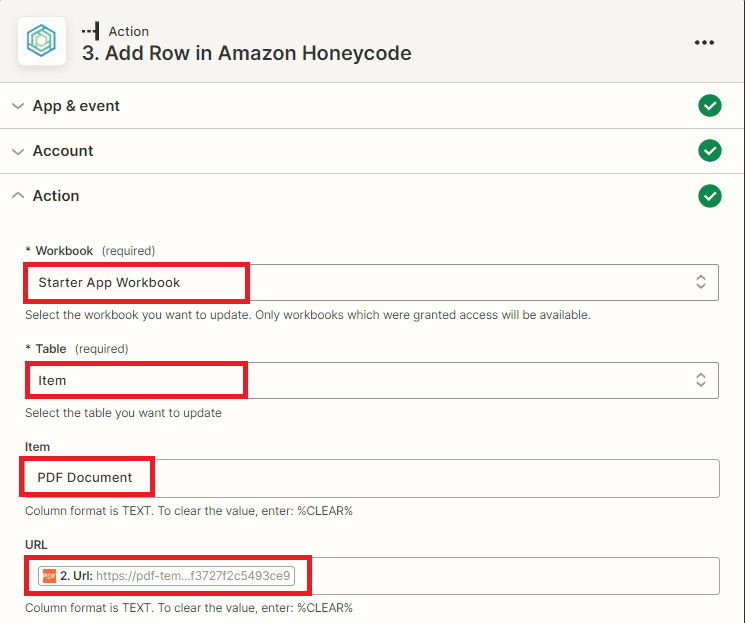
Step 9: Add Honeycode App
- For this step, we’ll use the Honeycode app in Zapier and select the Add Row option to add a new row to our Honeycode table.
Step 10: Setup Honeycode Configuration
Setting up the Honeycode configuration.
- First, select the desired workbook where you want to update the table in the Workbook field.
- Next, choose the specific table where you want to update the data in the Table field.
- Finally, when creating fields in your Honeycode workbook, you have several options to choose from. However, the most important field to create is the one that will store the extracted text URL. This field will allow you to easily access and save the text version to the S3 bucket.
Note: To enable the storage of text file URLs in Amazon Honeycode, create a new workbook and add a new app to the workbook. Within the app, create a new table that will be used to store the text file output.
Now, let’s send a request to Honeycode to add a row and store the text file that we will be using later, and then save it to an S3 bucket.
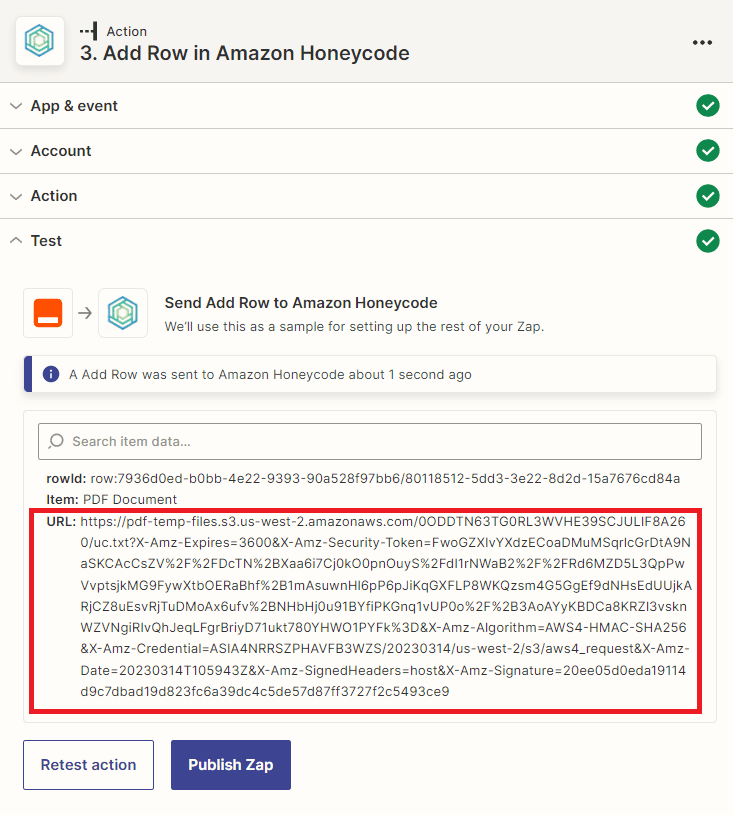
Step 11: Honeycode Test Result
- Now that Honeycode has successfully processed our request and stored the text file, let’s proceed to add another app that will enable us to save the text file to the S3 bucket.
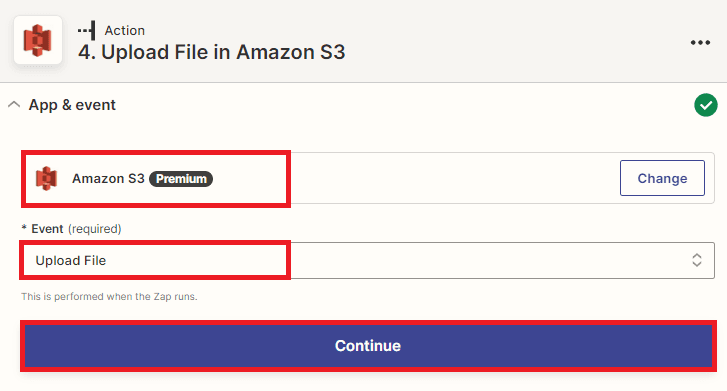
Step 12: Add Amazon S3 App
- For this step, we will add the Amazon S3 app and select the Upload File option to save the text file from the Honeycode workbook to the S3 bucket.
Step 13: Setup Amazon S3
To configure Amazon S3, please follow these steps:
- First, add the name of the S3 bucket that you want to use in the Bucket Name field.
- Next, enter the name of the object that will be created in the specified S3 bucket in the Key field.
- Then, input the URL of the extracted text file that we retrieved from Honeycode in the File field.
- Finally, add text/plain to specify the file type in the Mimetype field.
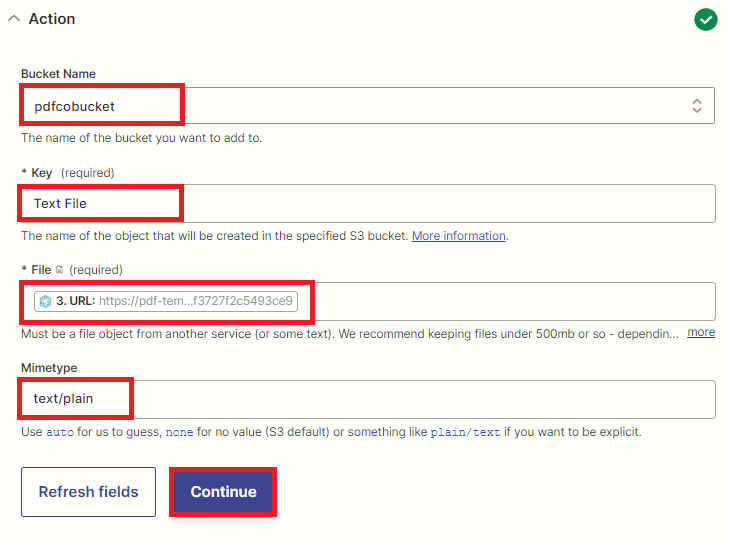
Let’s test the action to upload the text file to the S3 bucket.
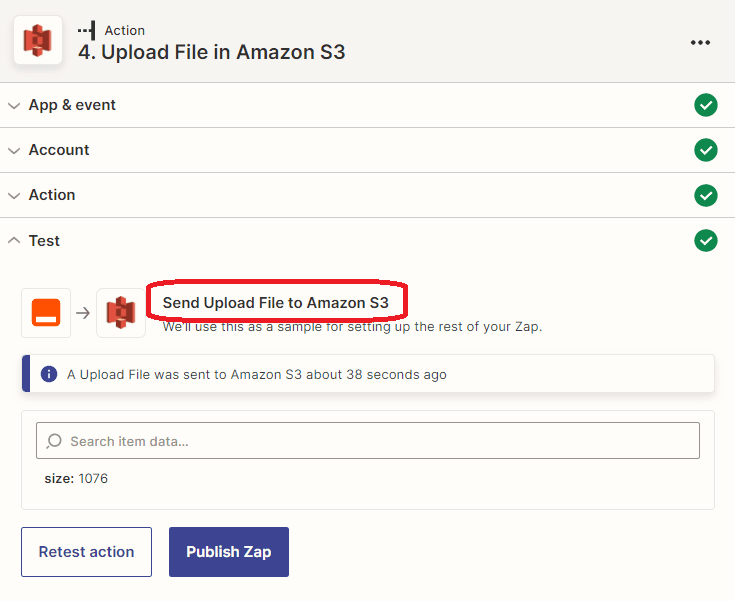
Step 14: Amazon S3 Result
- Awesome! The test has been successful, and the text file has been successfully saved to the S3 bucket. To confirm the file’s successful upload, we can check the S3 bucket for the uploaded file.
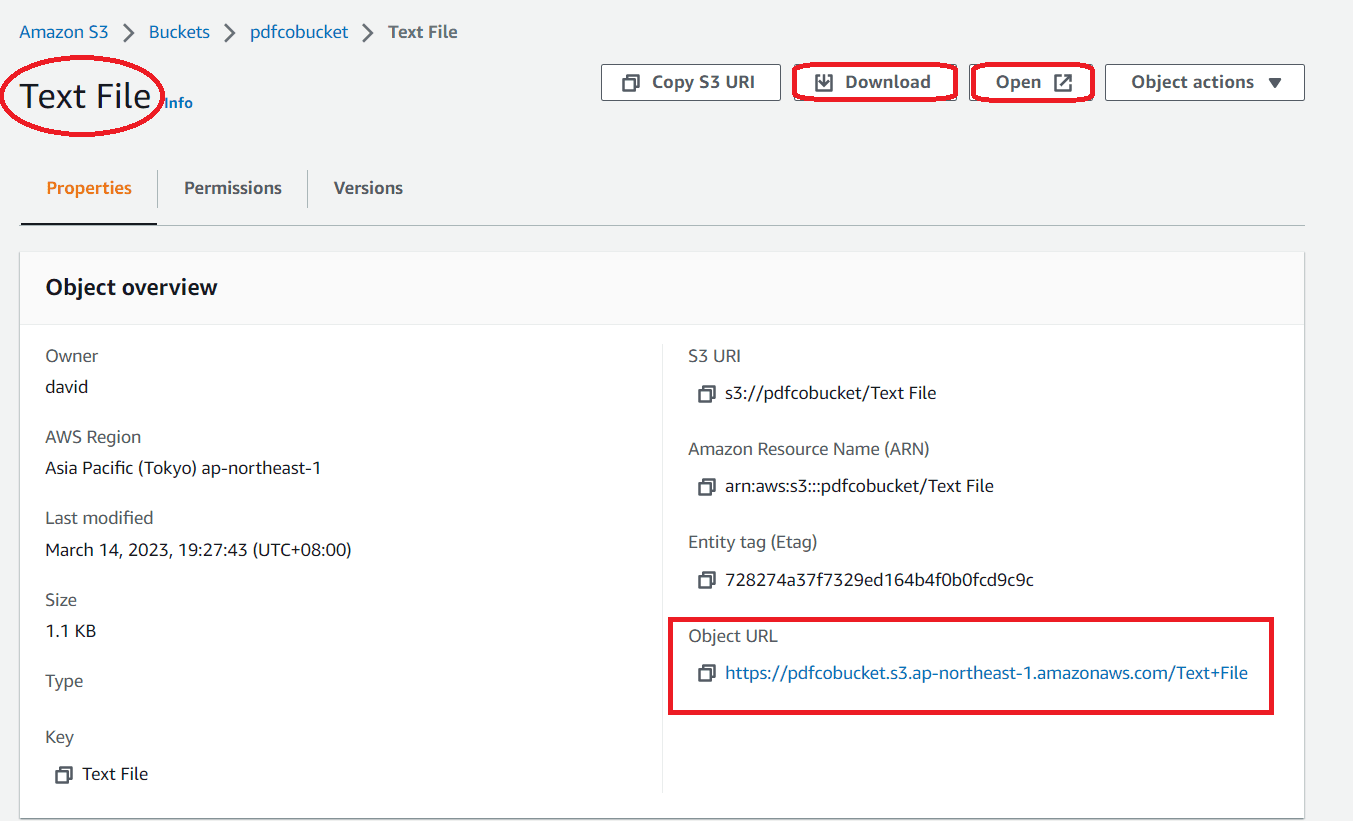
Step 15: Save to S3 Bucket
- The text file has been successfully saved to the S3 bucket. To view the file, you can click on the Open button, or you can download the file directly by clicking on the Download option.
In this tutorial, you have learned how to leverage the power of PDF.co and Zapier to perform OCR text extraction on a PDF document and save it to an S3 bucket with Honeycode. You have also learned how to use PDF.co PDF to Text endpoint to extract text from a PDF document with OCR. This is a valuable skill to have when dealing with large volumes of text data, and it can help you automate your workflows, saving you time and effort.
Related Tutorials

Convert PDF Invoices to Google Sheets using Make
Sep 9, 2024·4 Minutes Read

How to Extract Tables from PDF Files as Table Itself using PDF.co Web API
Sep 2, 2024·6 Minutes Read